sby has a point. Even with my limited exposure to coding practices, I know that comments within the internal scripts are normally intended for their original creator (who may or may not originally intend to share the source code), with a few exceptions, for those that encourage others to rummage through their code.
well it is great to comment your work so others can understand it easier, but i try to be realistic about it.
some reasons why i don't do so much:
not many people actually look at the source. there are plenty of people that do modding in general, but few do mechanics code modding that i do, most are graphical mods using templates.
the code itself isn't very complicated. there are ideas out there that well written code documents itself by being clear. the small areas where things get hairy is where i usually throw in some comments for myself. also when i have function and variable names like flagtoresetpenismask, you generally know what does what. (or at least those that are capable of reading non-camel case concatenated words)
for few occasions where people need some examplecode, people usually ask on the forums. then code may be pasted from sources with some additional comments to explain.
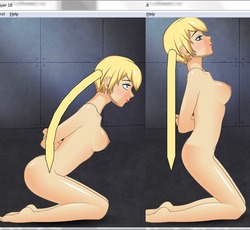
breastSculptV2 is available; check the first post for download links and a list of new features.
If you don't see any replies below this one, then could you please give me a quick sanity-confirmation (e.g. "I downloaded it and it loads up okay and I was able to stretch the boobs" or "The mod refused to load and generated an error message").
It's now possible to share sculpting details in text form. I'd like to use this feature in order to gather some "sample" or "reference" shapes, which can serve as the basis for animation coding. I'll writeup a post about that once I've received confirmation that V2 is actually usable.
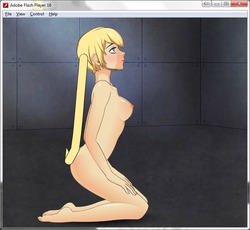
Hi , I downloaded it , and it doesnt work for me at the moment:
I downloaded it , extracted in a folder that I created and named it "Breast scult2" and placed it in Mods.
I started the game , went into "modding" , clicked on swf mod, then on breastScultV2.swf and I got a red message at the top right of the screen >> screenshot : http://i.imgur.com/O7lB9dd.gif
The first version was working fine , I must have made a mistake somewhere :s
You're supposed to copy the "breastsculptV2settings.txt" file (included in the zip) into the loader's /settings folder. If the settings file is missing then you'll be presented with that error message during init but the mod should still be usable - it will use default values for all configurable parameters (such as colours, hotkeys, etc).
I downloaded it and it workes fine for me.
I like, that it supports scalling and reshaping for tops and bras now. Fun thing is, it lets you rescale the breasts even for outfits, that normaly don't support breastscalling. (atleast to some degree)
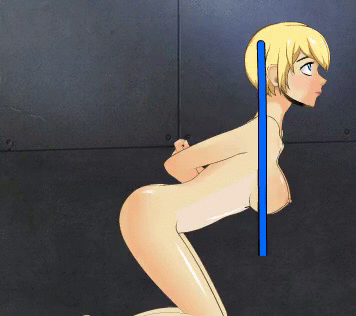
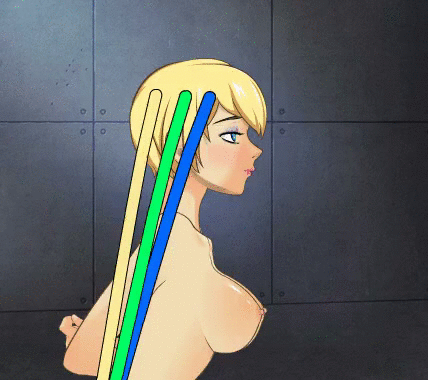
The next thing that I'd like to do is establish a minimum viable state for the jigglePhysics mod. To that end, I'm requesting input from the SDT forum community. If you've read the first post of this thread, then you know that the breast-animation built into SDT has important limitations. It assumes that the character's spine is perpendicular to the floor, and that the plane of motion is parallel to the floor.
I want to avoid such limitation in the design and coding of the jigglePhysics mod. It ought to be based on some basic principles (e.g. gravity, inertia, plasticity) rather than being fine-tuned to produce satisfactory results in a single scenario.
Therefore we need poses. Here's what I'm looking for:
Each pose should consist of a position (created with animtools) and a breast shape which is appropriate to that position (via breastSculpt) for a particular breast size (character definition).
If you find that breastSculpt lacks the flexibility/power to achieve an appropriate breast shape, then please say so! If you're feeling helpful, then you could even post a photoshopped screenshot which illustrates the effect that you're trying to achieve. Alternatively, post a photograph or screencap which shows the effect.
Rationale: If the transformation tools are incapable of achieving reasonable outcomes, then I need to either upgrade those tools, or abandon the physics-simulation mod as infeasible.
Similarly: if players feel that a particular shape looks "incorrect" in a screenshot, then they're inevitably going to be disappointed by a physics simulation which is calibrated to match that screenshot. Feedback is important! If something looks wrong to you then say so!
Exception: There may be disagreement on the grounds of "which shape looks correct for an actual human being" vs "which shape looks correct for an anime character and/or comic book superhero." That's okay, because the mod will (hopefully) include enough configurability to placate both teams.
When submitting a pose, please include at least one clean screenshot ("clean" meaning "good visibility of breast shape, preferably without any giant hair mods or crazy background clutter").
If you'd like, you can include additional screenshots which include markup or post-processing.
If you'd like, you can submit multiple poses belonging to the same position. For instance, an upside-down character with small breasts experiences very little deformation (plasticity is the dominant force) while a large-breasted character would be strongly influenced by gravity.
The initial work on the jigglePhysics will probably use a moderate breast size, but the long-term goal is to produce a reasonable simulation for a range of sizes. Having multiple poses for a single position will help me to calibrate the scaling logic.
"Moderate" is subjective, of course. I'm probably going to do most of my development at 75% of the vanilla breast slider, but I'll slide up and down (25% - 100%) in order to assess the scaling logic. The mod will still be usable for small breasts (<25%) but I'm not going to put much attention/effort onto it.
Extremely large breasts are not going to animate convincingly. The key problem is propagation speed (which is linked to tissue elasticity). With normal breasts (size << λ), each perturbation will tend to resolve before the next one occurs; a bilinear or cubic approximation is sufficient to fool the eye. If size >= λ, I would need to simulate actual wave-propagation and interference (which is way too much effort).
Could you please repeat that without the technobabble? Okay. Imagine that a character is lying face-down (suspended by ropes, or just levitated by magic). When the character moves, I can simulate breast motion using a pendulum. A very large breast does not behave like a pendulum; its behaviour is more akin to a "length of chain" with many internal hinge-points. Chains are hard to program, and I'm lazy. So I'm going to use a pendulum and the mod will look "wrong" when used with very large breasts.
Feel free to comment on poses submitted by other users, or offer suggestions/improvements.
You can upload files, but (for the sake of convenience) I'd prefer raw text in spoiler tags. See example below.
I'll choose four or five submission which provide a reasonably-complete frame of reference, and use them as the basis for the initial development. If I'm able to create a proof-of-concept physics mod which can duplicate those scenarios, then I'll release it as jigglePhysicsV0 and proceed from there. If I can't, then I'll use those scnearios to illustrate the problems and solicit advice from the modding community.
Suggestions
When creating the animtools position file, try to allow for a reasonable range-of-motion along both of the tweens. If movement causes one or both characters to flinch, contort, or flail around then I'll need to spend extra time tinkering in animtools before I can get to work.
Sexual contact is not actually necessary! For the initial simulation work, I'm concerned almost exclusively with breast shape and position. Collision stuff (bodyResistance, frictional slowdown of breast bounce, etc) will be added later. So please feel free to hide the male character and/or reposition him outside the frame.
While creating poses, you may find it useful to engage the firmness override in breastSculpt settings: [breastFirmnessOverride=1.0] By default, the breasts will tend to droop along the y-axis (if the character is upside-down, then they'll be drooping against the force of gravity). You can then use breastSculpt to inject a customized amount of "droop" (via skew, rotation, and repositioning).
Once the initial scenarios have been selected, you can continue to submit scenarios in this thread (as bug reports, or feature requests, or simply to share with other players). If the mod is successful, then I'll probably incorporate more poses into the development-and-testing cycle.
The submitted pose should be "at rest" with all forces in equilibrium.
The physics simulation will incorporate dynamic motion (bounce), dynamic instability (pendulum), and the vanilla-SDT breathing cycle (which actually moves the torso rather than the breasts, but we'll be using global coordinates so the distinction is irrelevant). It's called jigglePhysics, after all!
I want to ensure that it can achieve reasonable rest-state outcomes before I write 500 lines of code for inverse kinematics and PID math.
Therefore, please don't submit "action snapshots" with boobs flying all over the place. Yet. We'll get to those later.
Comments: The normal text is the sort of thing that the submitter might write; the italicized text is the developer's response.
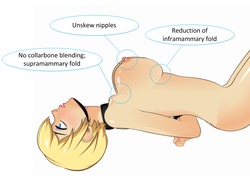
Soften/lighten the inframmamary fold, because the breast is now resting less heavily against the lower ribcage.
This is probably doable (using a mask/overlay with alpha gradient). It would be a significant challenge to determine when and how much to soften the inframmammary fold.
Perhaps I could link it to the physics system { alpha=foo(breastAngle, torsoAngle); } so that the crease would lighten whenever the breast mass shifts towards the head (regardless of whether it's due to temporary motion bounce, a persistent gravity effect, interaction with nipple clamps or heavy nipple piercings, hand bra, etc).
Remove the inflection point at the collarbone; if a large breast rises far enough along the torso then it should generate a supramammary fold.
It would be very difficult to do this in code, but it's still useful to receive this sort of suggestion/complaint. It's something that I can keep in mind during research and coding; perhaps I'll encounter a new technique which makes the task feasible.
[*]When the breast is heavily rotated or skewed, the areola and nipple get distorted. This "fits" into the geometrical change, but it's unrealistic. Please unskew the nipple.
This one is very easy to do in code. I'll probably include it in the next breastSculpt release (as a configuration parameter: [allowNippleSkew=true/false]). I could offer options for adjusting/limiting the nipple size w/r/t breast scaling, but I'll need to check first (I suspect that there's already a mod for nipple size).
If you still haven't got new icons i would gladly do them, which format do you need? Png, swf, gif?
I also got this idea, sometimes the frame gets stuck in the body and you can't move, forcing you to reset it and all settinsg you've done so far, a workaround that maybe works is to add a function like when you hold down a key, you can move the frame freely around freely. so you doesn't have to reset.
I also get a bug sometime, the center gets stuck outside the screen so when you rotate and resize, the AxisAngleRotation-center escapes waay outside the scree, and the tits might fly awa-.(i hope that made sense).
I noticed that ESC didn't work all the times.
sby said:
well it is great to comment your work so others can understand it easier, but i try to be realistic about it
Thanks for this, i'll make sure to comment my code. I haven't done any programming for like 10 years though, and started again just a few weeks ago.
Oh yea, wuoldn't it be possible to bind, lets say, rotation to a key? It would probably make it more use rfriendy. I did som skteches for the frame and icons, wouldn't it e better to av the icons on the side and not half merged into the body? I'll see what i come up with for a new design.
I'm just here to let you know that the new BreastSculptv2 works much better. Only issue I'm having now is it is hard to customize the shape because the advanced sculpting feature is kinda vague as to how it affects the breasts. The points where I click and hold aren't labeled well, and as a result, I confuse the direction and transformation each point governs. Do you think you could add a clearer UI on your To-Do list, low priority of course.
My confusion of the UI is the only thing I disliked. But it's functionality is definitely there, so thank you for those fixes from V1.
It can be done, but the results may be unsatisfactory. One important thing to remember is that we aren't doing anything fancy like edge-detection or cel shading. If you rescale or stretch one element of the scene in isolation (e.g. nipple) then the black border on that element becomes noticeably thinner/thicker. It requires some careful adjustment (by the end-user) to maintain a contiguous outline, and if you push beyond minor (±25%) adjustments then it starts to look out-of-place. It's sort of like looking at a photograph and immediately thinking "this has been photoshopped."
I'll finish the bugfixes that I promised last month (e.g. bra straps, unskewing nipples) and post some screenshots with reshaped nipples. I'm not sure that I want to implement UI-based nipple scaling:
pro: it's a reasonable request
pro: the code can easily support it
pro: it can easily fit into the Character save/load logic
pro: I need to tackle the "multiple sculpting frames" issue eventually (e.g. for seperate adjustment of the left and right breasts, or for buttock reshaping, or whatever)
con: IIRC the nipple and areola are combined into a single sprite. You try to stretch out the nipple, but suddenly the areola is extending too far "backwards" into the breast and it looks stupid
con: it will require either an extra hotkey (e.g. period for breast adjustment, semicolon for nipples, etc) or contextual logic (e.g. "if the mouse pointer is within 10 pixels of a nipple when the user presses the hotkey, do nipple scaling instead"). Either way, the plugin becomes more complex and less intuitive.
con: it creates a future challenge/problem for physics animation. I'd like to model nipple piercings as a single pendulum with a well-defined anchor position; reshaping of nipples forces me to do a little more physics coding but a lot more physics testing.
If you have any suggestions or feedback which can allay my concerns then feel free to post them. Otherwise, it's probably going to be a judgment-call based on whether or not the initial screenshots look okay.
neuromech said:
I also got this idea, sometimes the frame gets stuck in the body and you can't move, forcing you to reset it and all settinsg you've done so far, a workaround that maybe works is to add a function like when you hold down a key, you can move the frame freely around freely. so you doesn't have to reset.
Good call! I've actually run into that problem, and I tried the solution that you proposed. It should be a 5-minute fix but it spawned some new problems (for stupid reasons involving mouse button state) so I reverted the change. I'll add it to the list.
I also get a bug sometime, the center gets stuck outside the screen so when you rotate and resize, the AxisAngleRotation-center escapes waay outside the scree, and the tits might fly awa-.(i hope that made sense).
Understood. It usually occurs in relation to animtools, because you can switch to a new "scene" in which the characters and camera both get shifted several hundred pixels. The user doesn't notice the transition, but breastSculpt still "remembers" the old position and then the bug occurs.
The obvious solution is "reset the transformation axis whenever a scene-transition occurs." I'll need to dig through animtools code in order to figure out how to detect the transitions. I could also reset whenever certain core SDT function get called, but that approach would tend to produce false-positive results.
Do you mean "Esc doesn't reset the position as I expected it to" or "Esc keystrokes are ignored completely"? The latter will occur if you've activated Auto Keys (which rebinds or suppresses keyboard hotkeys; I'd classify this as "not my problem" or "not a bug"). The former would be a new bug which I haven't encountered yet. Or perhaps it's just a misunderstanding because I haven't clearly explained what the Esc key is supposed to do. Further information would be appreciated.
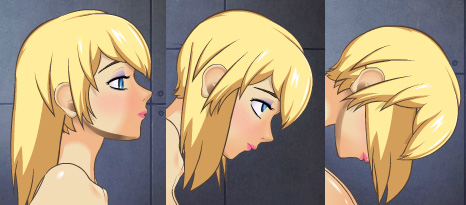
This is a loader mod that I wrote while creating a complex dynamic hairstyle (link). It would not have been possible to create that hair without this mod, because the mod unlocks several new approaches for the planning and implementation of dynamic hair.
If you've reached this page because you want to use that hairstyle in your game, then just hit the swf link below and add an entry to your Mods.txt file. dynamicHairExtender.swf doesn't require any particular position in the load order, but remember that there are some mods (e.g. moreClothing.swf) for which order is important.
Download Links Download links have been moved to the first post
Source Code Download links have been moved to the first post
Compatibility
General
this mod has been designed for 100% backwards compatibility.
All of its features are OFF by default, and must be deliberately invoked in ActionScript.
It is possible to load old dynamic hair plugins (including built-in ones like SDChan) while this mod is in-effect; they will exhibit the "old" (vanilla) behaviour.
You can also continue to use static hair elements; this mod has no effect on them.
Specific Interactions (fully compatible) (some concerns) (incompatible)
moreClothing
when a dynamic hairstyle is activated via the moreClothing-enhanced UI (the left and right selector buttons), dynamicHairExtender will "peek" at the incoming file and attempt to apply any extended features which are "baked in" to the SWF.
while moreClothing is active, you can still use the "Swf mod..." button to load a custom hairstyle which is absent from the moreClothing list (or even one which does appear on the list, but which you're too lazy to click through). dynamicHairExtender will peek at the SWF and apply the appropriate set of corrections.
dynamicHairExtender attempts to peek at each dynamic hair file that's loaded during the moreClothing initialization (when it blasts through your whole library of custom clothing). This interaction is harmless; moreClothing will finish its loading process as usual and the extra delay is imperceptible.
animtools
hair strands will be influenced by the default "scene" gravity, which does not necessarily coincide with the bottom of the Flash Player window -- because animtools allows you to rotate the scene.
Note: this is true for all dynamic hair; it's not a unique problem for this mod. I just didn't want anyone to get false hope.
Animtools allows you to specify a custom gravity vector for semen strands; dynamicHairExtender will ignore it.
I've seen a proposed mechanism for inter-mod communication. I'll look into the possibility of scanning for the animtools "gravity override" value at runtime.
many of the custom tweaks employed by dynamicHairTools are based on the position and orientation of the female character's head. If you load a position which significantly alters the position of the head (e.g. facedown doggystyle) then the hair shape may clip through the edge of the scene, or collide with her body in a way that looks silly.
the lesson here is: if you're using a really fancy animtools position, then you may want to avoid Dynamic Hair completely because it tends to behave inappropriately. Dynamic Hair works best with the basic scenario: kneeling blowjobs.
when you're running the animtools SWF (to create/edit position files) it is not possible to preview how the dynamic hair will behave. You must load the position file and the hairstyle into the actual game to see how the hair will behave. You may need to do some back-and-forth iteration to get everything sorted out.
Changelog Changelog has been moved to the first post
Discussion
For anyone who wants to understand the new possibilities offered by the mod, keep reading. There's a lot of material to cover, so I'm going to split this up into a few separate posts (each one focusing on a single topic). It may take me a few days to finish writing all of it. Please don't ask me questions about this mod until I've filled in the topics listed below (the "RTFM" rule also applies - if you ask me a question that I've already spent several hours carefully answering -- with visual aids! -- then I'm going to be upset).
My #1 piece of advice is to treat dynamic hair as art rather than science. Don't expect that you can perfectly predict how a strand of hair will behave and get all of the parameters "right" in a single pass. Instead, you should setup some basic parameter and then tinker: add a smidge of dynamicRotationMultiplier, shave off 10% of the linkWeight for your hairtips, etc. Load up one of the sample hairstyles and try copy-pasting parts of its configuration into your project. Experiment, test, and iterate until the result starts to look reasonable. For any specific set of config parameters, be sure to check how it looks in the rest posture, with high and low head tilt, in smooth linear motion, and in violent back-and-forth thrashing motion.
Please feel free to stop reading these guides at any time in order to hop into Flash and run a few experiments of your own. "Learn by doing" is the best option and we should use it whenever possible. But please do finish reading the guides at some point -- preferably before you start asking questions that I've already answered :)
dynamicHairExtender Mod Introduction and Anchoring
Summary
This feature fixes a (presumably unintended) consequence of the dynamic hair animation logic, in which the hair's origin point would drift slightly away from its proper position. The mod allows a dynamic hair strand to remain firmly anchored while still undergoing the usual collision, rotation, stretching, etc.
Because the amount of drift is small, this feature will not be useful for the vast majority of users or modders. It is necessary only if you are attempting to draw a hairstyle with pixel-perfect alignment between adjacent hair elements -- or if you've downloaded a pixel-perfect hairstyle and you want it to render properly.
Note: SDT's standard dynamic hair process will always produce pixel-perfect connection of the vertical segments within a single hair strand; you don't need any mods for that. If your dynamic ponytail has seams or gaps then you've probably just made an alignment mistake while drawing it; refer to SClover's guide for troubleshooting instructions.
Background
This is going to get esoteric, so don't feel compelled to read through it unless you're really interested in how dynamic hair is implemented. We'll begin with a review of dynamic hair physics.
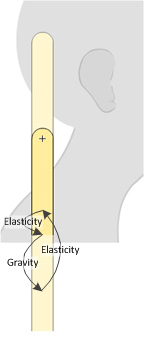
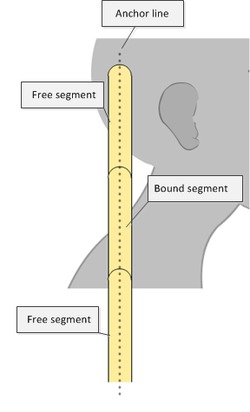
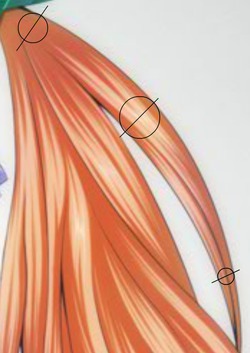
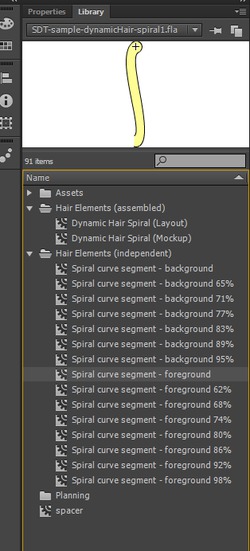
SDT has a "Rope" class, which is used to simulate dynamic hair. Each Rope object consists of "links" (simulated midpoints and endpoints on the rope) and "segments" (basically sprites) which occupy the space between the links.
Each segment has a canonical length, which is implicitly specified by the artist or modder when drawing objects in Flash (or Illustrator, or whatever). At runtime, the game will run its physics simulation. Links will get bounced around by various forces (elastic tension among neighbouring links, collisional impulses, friction, gravity, inertia) and each segment-sprite will be positioned, rotated, and stretched to fill the space between its two links.
I know that this sounds complicated, the system is actually very well-behaved and it runs peacefully in the background. The result is that artists don't actually need to understand the SDT physics system. They simply need to draw a complex object as a collection of long-and-skinny sprites with semicircular ends (as described here) so that the player doesn't see any gaps when SDT decides to rotate a segment. Rotation does tend to produce visible kinks or "sharp corners" in the hair, but this unpleasant effect diminishes if you subdivide a hair into a larger number of segments (but that means extra work for the artist/modder).
Note: SClover's guide suggests that a hair strand should be divided into 2-4 segments. This is a reasonable suggestion for shoulder-length hair, but longer hairstyles should be given more segments in order to ensure smooth motion. You should definitely not assume that there's a minimum of 2 segments or a maximum of 4! It's entirely possible to make a "hairstyle" with a single segment (it would act as a simple pendulum -- similar to SDT earrings). There is no hardcoded upper limit (as far as I can tell); the SDT physics engine could potentially handle a hairstyle with dozens of segments.
As long we're making digressions -- SClover's guide asks you to name each segment with an alphabetically-sorted suffix (partA, partB, etc). This is a good idea because it helps you to keep the segments organized and it helps others to understand your work if decide to share the FLA file. But this naming convention is neither necessary nor sufficient for SDT. What SDT cares about is y-axis position. It will grab all of the sub-objects that appear on stage, starting with the topmost one. If you have two sub-objects with identical y-axis position then SDT will get confused (divide-by-zero error) and your hair will not render correctly. Identical y-axis position is not usually an intentional design decision; it may occur because you inadvertently paste two copies of a single segment into your hair strand.
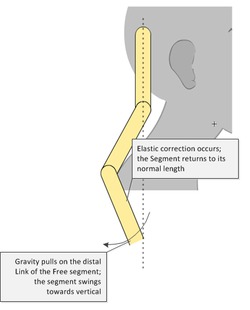
Rotation is pretty straightforward. Stretching is a bit more complex. SDT's physics system tends to pull links away from their canonical positions. This tendency is countered by a correction process which essentially treats dynamic hair as elastic. During each frame of animation, the game compares each segment's current length (which is dictated by the physics sim) against its canonical length (as specified by the artist). It then nudges the two link-points in order to bring the current length closer to the canonical length. It actually over-corrects slightly (the corrective factor is 107.5% of the detected error), but this is (mostly) okay because subsequent corrections will balance it out. Let's look at how SDT handles a dynamic-hair animation frame:
Move the first link to the predefined anchor position (some x,y position on HER head)
Apply the gravity vector to every link except the first. Nudge everything downwards.
Link 1 stays in place; Link 2 gets dragged downwards. Link 1 and Link 2 are now further apart.
Apply elastic correction to segment 1.
Link 1 gets nudged down; Link 2 gets nudged up. Link 1 and Link 2 are now closer together. In fact, they're too close!
Apply elastic correction to segment 2.
Link 2 gets nudged down; Link 3 gets nudged up.
Link 2 and Link 3 are now closer together. In fact, they're too close!
Link 2's downward movement has put it in a better position w/r/t Link 1. The original overcorrection has been resolved.
The process is imperfect. The actual lengths will approach the canonical lengths without ever reaching them; the game is constantly overshooting when it tries to make a correction. But the error values tend to shrink over time, and the constant oscillations are too small to be detected by the human eye. Since there will always be some discrepancy between the actual length of a segment and its canonical length, SDT simply stretches the sprite to make it fit. Note: this stretching is done on the y-axis only. X-axis stretching could cause individual hair segments to "bulge outwards" -- which would create a visual break in the border/outline of the hairstyle.
The y-axis stretching does not usually attract the eye, because SDT's art style employs a limited palette with large regions of flat color. The eye is attracted to acceleration and motion; the player is more likely to be bothered by the "sharp corners" in a ponytail than by its linear deformation. In any case, the magnitude of stretching is usually less than a single pixel; macroscopic stretch occurs only during rapid movement.
If the dynamic hair included small adornments (eg. barettes) then these might catch the eye enough to draw attention to stretching. But the artist/modder could always compensate by cranking up the damping variable (which makes the hair more rigid). Customizing the link weights would also be a valid solution to this challenge, but I'll address that topic in a subsequent post.
Okay. So what's the problem?
For the purpose of the mod's Anchoring feature, the crucial details are:
gravity is applied to every link in the dynamic hair except the first
elastic correction is applied to every pair of adjacent links
for each pair, elastic correction mostly moves the lower link towards the upper one (82.5% corrective factor) but it also moves the upper link towards the lower one (25% corrective factor)
The consequence is that a dynamic hair will always be pulled slightly away from its canonical anchor point in the direction of gravity. This is usually not a concern, but if you're attempting pixel-perfect alignment between static and dynamic hair elements then it will make your task very difficult impossible. To illustrate:
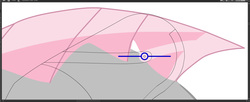
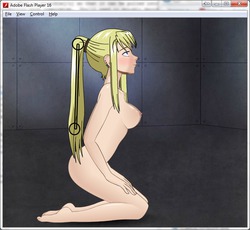
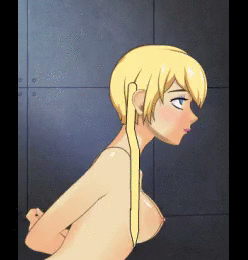
The upper element is a static hair piece. We would normally want it to occult the dynamic hair (as shown in the screenshot), but for this example we'll shift it back. The lower element is a dynamic hair strand whose origin point lies at the intersection of the two hair elements.
I've added a bullseye. The outer ring (and horizontal line) belong to the static hair; the inner ring is drawn on the dynamic hair (exactly at its origin point).
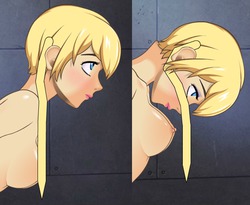
When the head is tilted, we expect the dynamic hair to rotate on its origin point. The bullseye should remain intact. Whether the rotation is visually believable will depend on the skill of the artist. This particular sprite has lots of ragged edges because I tried to manhandle individual vertices into alignment -- before I understood that the origin-point issue made alignment impossible.
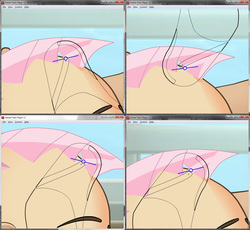
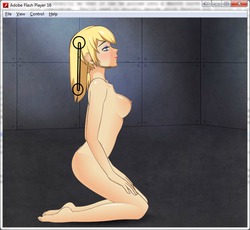
Now let's take our custom hair into the game. We find that the bullseye is broken. I've taken several shots with different head-tilts and different gravity settings, to illustrate the crucial point: the direction and magnitude of the anchor-drift varies during gameplay. It is not something that an artist can fix by tweaking their sprites. They would need to redesign the hair to include special joints with a ±10 pixel drift tolerance, or redesign the hair with fewer dynamic elements.
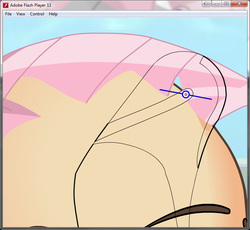
Here's what it looks like after we apply the anchoring fix.
What does this mod do?
dynamicHairExtender broadens the "API" which you invoke when registering a dynamic hair element in Flash. In addition to the standard stuff (gravityAngle, damping, toggleable) it supports a new "inelasticFirstLink" option*. When the mod encounters a hair element with this property, it will make the first link (the anchor point) immune to elastic displacement.
* It supports several other new configuration parameters, but we'll cover them in later posts.
I could not find a way to apply this fix "once and for all" so instead the mod applies the correction during every animation frame (via the lProxy coding technique). The performance penalty is miniscule, but there's a slight risk of incompatibility with any other mods which impinge on dynamic-hair rendering.
I'm not aware of any such mods at present; this is just a forward-compatibility concern. I know that ModGuy had planned an overhaul of the lProxy implementation which would prevent mods from inadvertently disrupting each other's proxies; I'll use that technique if it's available.
The mod operates on a per-element basis. It will apply the correction only to those dynamic hair strands which have been specifically opted in via the [inelasticFirstLink = true] script setting. It's therefore possible to have modded and unmodded hair elements side-by-side in a single hairstyle, although I assume that modders will probably employ an all-or-nothing approach. You don't really gain anything by leaving the anchor-drift behaviour in place.
If a hairstyle has been designed for use with this mod, then the hairstyle can still be used without it -- it can even be used by people who have not installed the Loader. In such cases, the usual anchor-drift will occur and the hair will show minor flaws in its alignment or animation.
For technical reasons, the mod has a limit of twenty dynamic hair elements and they're managed in FIFO order. The twenty-item limit refers to ropes (aka hair strands). Thus, you could have a character with ten sidetails and ten ponytails, each consisting of 5+ segments (for smooth movement without sharp corners). Your framerate would be terrible and the character would resemble an octopus, but it is technically possible.
If you somehow manage to exceed this limit then you're probably doing something wrong (maybe PM me for advice). When you hit 21, the oldest of your hair strands will be "forgotten" by dynamicHairExtender and the mod will cease to apply realtime correction on them. This means that the strand behaviour may change abruptly: it might collapse into a jumbled heap or get yanked up towards the sky, but it's far more likey that it will just hang downwards under the influence of gravity.
Edit: the hardcoded limit has been removed (thanks to ModGuy). You can use as many strands as you want, but be reasonable - each additional strand takes a toll on performance.
Usage
Add the following line to your ActionScript:
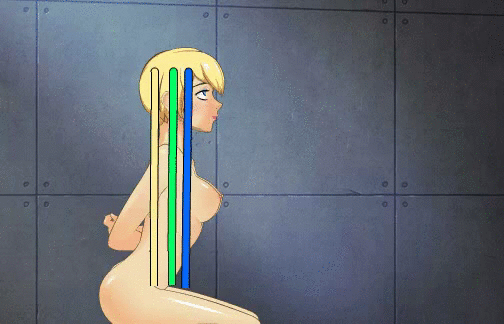
As previously explained, the SDT dynamic hair animation/simulation process is based on a collection of midpoints and endpoints known as Links. Each adjacent pair of Links contains a Segment, which presents some visual content (such as "one fifth of a blonde ponytail"). The segments constitute the "payload" - they're the reason that we bother to do all of the simulation math! But they play a very minor role in the logic. The simulation focuses almost entirely on the Links.
Each Link has a Mass value (which we'll henceforth refer to as "Weight" because that's a more colloquial word) and a Friction value. By default, all links are assigned the same Weight and Friction (20.0 and 0.9 respectively). Since these parameters are identical, the main reason why the various sections of a hair strand respond differently during actual gameplay (hairtips swinging wildly while the upper portion of the ponytails scarcely moves) is relative position. The pendulum behaviour of a ponytail is essentially set-in-stone when the artist traces out its shape and chops it into segments. Any two ponytails with the same length and the same number of segments (or "hinge points") will behave identically in SDT. Even if one of them is a skinny little Samus Aran strand while the other is a braided monstrosity which could club a man to death. SDT doesn't innately recognize the width, thickness, or density of a hairstyle. Nor does it understand that some hinge-points ought to be fairly rigid while others should swing wildly at the slightest impulse.
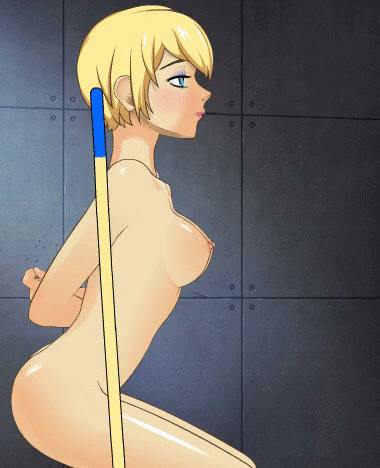
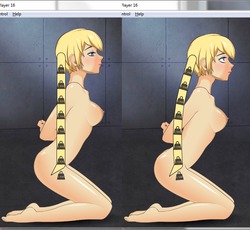
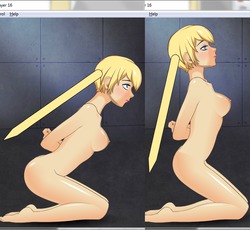
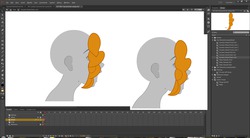
We can change this. Look at what happens to a simple ponytail when we assign it a low weight (left) and a high weight (right):
Link Weights and Physics
Whenever the SDT logic wants to move a Link (e.g. it's being tugged downwards by gravity, or it's being nudged sideways by elastic tension from its neighbour), the simulation logic does not simply overwrite the Link's x/y position. It asks the Link to move, and the Link reacts in accordance with its Weight parameter. A heavy Link responds more "reluctantly" to an impulse. It is slow to start moving, but tends to remain in motion once underway. When character movement stops, the gravitational "drag" factor becomes dominant and the heavy link quickly settles into its final position. "Stable position" is related to a key concept which we'll explore in-depth later on (equilibrium). For now, it's enough to recognize that this is a position in which the forces acting on a Link (upward elastic pull from the previous Link, downward elastic pull from the next Link, and downward pull from gravity) sum to zero -- the Link will remain in this position until the character begins moving again.
A lightweight Link tends to react immediately to motion and can quickly change directions in response to a new impulse. When movement ceases, the lightweight Link will sometimes overshoot its final position before settling into it. Lighter Links tend to take longer to reach equilibrium and they're more likely to demonstrate undesirable visual effects (jitter, oscillation) if your hair-physics configuration is imbalanced. But a clever modder can turn this vulnerability to their advantage. If you deliberately include some high-detail elements in your hairstyle and then assign them to (or surround them with) low-weight Links, then the high-detail elements will continue to slide, bounce, or bob even after the majority of the hairstyle has settled into a stable shape. The human eye is drawn to motion; focusing the user's attention on the high-detail parts of your work is an efficient way to improve the apparent quality of the whole thing -- it means that you can slack off on the detail (both drawing quality and animation fidelity) of the other sections, and viewers will be less likely to notice the flaws.
Starting from the default Weight value of 20.0, it is expected that most hairstyles will keep their variation within the 5.0...40.0 range. When you push parameters too far from the norm, you tend to end up with very bizarre and unbelievable behaviour. You can assign zero weight to Links, which causes them to slowly float around (being constrained only by elastic bonds to their neighbouring Links). You can also assign negative weight to Links, which causes them to be pulled towards the sky. Go ahead and try out both of these options when you're experimenting and learning to work with the dynamicHairExtender mod; they can provide an amusing diversion from the more serious stuff (especially "tinkering with rotation coefficients" which isn't much fun). However, I would advise you not to rely on negative or zero weights for hair modding*; there are more predictable and practical techniques which can be employed when you want to create hairstyles with gravity-defying elements (bouffant, ahoge, etc). We'll discuss those techniques in post #5.
Of course, negative weight is perfectly appropriate if you wanted to mod in something that's supposed to float on the end of a simulated rope. A helium-filled party balloon, perhaps?
Sidenote: please remember that the Weight logic is all part of the vanilla SDT code. All credit goes to Konashion. dynamicHairExtender isn't adding any real-time physics logic. The mod merely gives you an API so that you can tap into the existing physics system and put it to full use.
Curves and Kinks
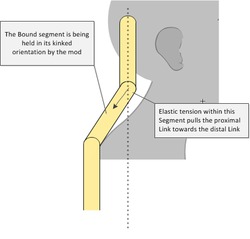
Remember that high-weight and low-weight Links respond differently when subjected to equal impulses. If you place these Links adjacent to each other then your overall hairstyle will tend not to flow into a graceful curve (the expected behaviour for SDT dynamic hair). Instead, it will tend to form kinks and sharp corners. The same effect applies (to a lesser degree) when you have high-weight or low-weight links immediately adjacent to normal-weight Links.
Weight-shifting is still a perfectly valid technique for hair modding, but you must understand the consequences of these choices while planning your hairstyle and you must ensure that all of your physics choices are "corroborated" by the visual appearance of the hair itself. If you start re-weighting the Links within a conventional straight ponytail, then the result will probably look silly. If your hairstyle includes natural bends or kinks in its resting shape then those are excellent candidates for weight-shift experiments.
Here's a design example. The fulcrum (origin point) for this hair segment is at a point of natural curvature -- where the hair strand shifts from being mostly vertical to mostly horizontal. We assign normal weight to the links constituting the vertical part, and then light weight to the final link (the hairtip). The result is a small but pleasant animation detail: the horizontal segment will tend to bob up and down in response to minor movements of the head. If we tried to make the whole hairstyle move up down then the result would probably be unconvincing (or just "annoying").
These details aren't hard to implement, but they do require some planning. In this case, I needed to subdivide the strand into only three segments (which makes the strand more stiff). If I had split the strand into five segments of equal length then I would have obtained animations which are cleaner and more fluid... but I would not have been able to produce the exaggerated bounce effect on the hairtip.
--------------
Hair accesories (such as clips, tied ribbons, and barettes) provide a visually-plausible explanation for constraints on hair movement. If you find it necessary to make a major weight-change to a hairstyle (e.g. to reduce the likelihood of torso collision) then you might consider adding a hair ornament at the point of modification. The same idea applies (much more emphatically!) to rotation constraints which we'll cover in the next post.
Here's an example of weight-difference hinge effects in action. A thin ponytail with a "heavy" sphere embedded into it. Note the that hair above is pulled taut by the heavy object, while the hair below it trails behind.
Alternatively, you might prefer to do your work entirely on the physics side of things while leaving the artwork intact. In that case, you can try to "blend in" the weight change. Let's say that you want Link5 to have a weight value of 30 (150% of the norm). Make that change, then work backwards: linkWeights[4] = 27; linkWeight[3] = 25; linkWeight[2] = 23; The result will (hopefully) be a hair strand which forms a believable curve during movement. It will be different from the default/vanilla curve, but perhaps it will be enough to avoid unsightly kinks. As is always the case with Dynamic Hair configuration, you should try to test your parameters "early and often" and fine-tune them as needed.
Changing Gravity
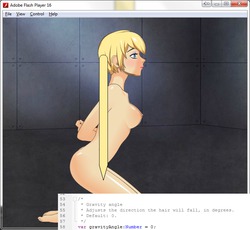
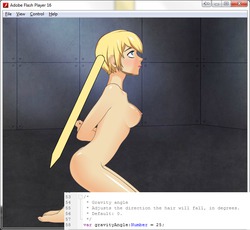
One of the standard features available to SDT hair-modders is the gravityAngle parameter. It instructs the physics simulation to "pretend" that gravity is pulling in a different direction. This setting is configured independently for each hair strand, so it's possible to have a character with multiple strands originating at a single point and extending radially outwards in all directions. A Gorgon, perhaps?
You may notice a problem here. SDT applies a gravity vector to Links during each animation frame. But what we're specifying here is only a direction; we don't have a coefficient through which to specify magnitude.
Link weights give us a simple workaround. After setting gravity to the desired direction (or just leaving it as "straight down"), we can adjust all of the weights so that the amount of gravity experienced by hair strand is proportionally higher or lower. When we change the Weight of everything in the scene, we've effectively changed the overall strength of gravity.
What does the mod do?
After constructing each rope object (remember that a "rope" object in SDT encapsulates a single strand of dynamic hair), the mod checks for a set of weight parameters which have been supplied by the artist/modder. These settings must be embedded in the SWF file (and hence, must be defined in its FLA source file). The dynamicHairExtender mod does not have the ability* to apply custom player-defined weight values (e.g. by reading them from a text file in the Settings folder).
And I'm probably going to keep it that way. I feel that it's appropriate to respect the artistic integrity of modders. If they choose to share their FLA source files then go ahead - reconfigure them as much as you want! But if they've deliberately released their work in an executable format without sharing the source, then directly tampering with it (in terms of colour, form, or animation behaviour) seems disrespectful.
Each strand of hair can have a separate set of link weights defined for it. Any link for which no custom weight has been specified will retain the default weight value (20.0). If a hair strands has not been given a linkWeights variable in its definition, then all of its links will retain the default weight. This is important for backwards-compatibility; if you have a dynamic hair mod from 2012 and you load it in conjunction with dynamicHairExtender, I want that hairstyle to animate exactly the same way it would in an unmodded game.
I have not attempted (and do not intend) to provide an automatic tool which could automatically assign an appropriate weight value to each segment on the basis of (for example) its width or its total area. I believe that the weighting is somewhere between "judgement call" and "artistic license" and that it should be left at the discretion of the individual modder. It needs to account for the artistic style of the original work (anime hairstyles might be more light and bouncy than those of video game characters), the presence of headwear or clothing, and the type of hair (fluffy/curly hair would be less dense and more subject to air resistance -- we'd assign it a lower Weight value). The specific criteria aren't very important, though. The key concept is: play around with weight settings until the hair looks right to you.
If we return to the two ponytail-weight example animations above, you probably noticed that the heavy-weighted version seemed off. It wasn't believable. You expect hair of that thickness - even if it's very long - to exhibit more bounce and sway. Let's repeat that same test, with exactly the same physics parameters but with a hairstyle which is visually much thicker.
This version seems much more believable than the skinny ponytail, right?
Of course, it's not necessary for weight values to be consistent across multiple strands. Let's imagine that a character has a thick braided ponytail at the back of her head, and thin sidetails at the temples. We could assign high weight to the braided ponytail (so that it moves ponderously) while keeping the sidetails at default weight (or reducing them to low weight if we really want them to bounce and shimmy around).
If an anime character has an ahoge at the top of her head, then that's a great opportunity for experimenting with weight reduction.
Usage
Links are numbered in vertical order, starting with index 0. Link[0] is the anchor point for the hair strand. Link[0] and Link[1] are neighbours; they form the boundaries of the first Segment. The next segment is bordered by Link[1] and Link[2]. And so on. If you want to modify a particular link in your hairstyle but you're not sure of its index, then just assign a very high (or low) weight value to one of your links and run a test. You'll immediately notice the aberrant link and you can react accordingly ("Aha! The one that I want to change is actually two links down from the floating one.") If you see no change at all, then you probably chose an index which is too large -- your hairstyle doesn't actually include that many elements, so the mod ignored your input. Try again with a smaller number.
Once you have an idea of your link indices, add the following lines to your ActionScript:
Code:
var linkWeights = new Array();
linkWeights[4] = 25.0;		// Assigns a heavier-than-average weight to the fifth link
linkWeights[0] = 5.0;		// Assigns a very light weight to the first link
					// This is pointless, because the first link is inherently immune to gravity
linkWeight[2] = 20.0;		// Assigns the standard weight to the third link
					// This is pointless, because links will always have weight 20 until you assign a different value
linkWeight[99] = 15.0;		// Assigns a lighter-than-average weight to the hundredth link
					// Your hairstyle probably doesn't have 100 links.  However, this assignment is harmless.
					// dynamicHairExtender will simply ignore any superfluous weight information.
We could also express the previous statements more compactly:
Code:
var linkWeights = new Array() { 5.0, 20.0, 20.0, 20.0, 25.0 }
Compact ActionScript code isn't really a virtue, though. Remember that you're not really "writing code" here; you're specifying configuration parameters. Therefore, it's a good idea to spread out the individual statements and include inline comments -- it will help you to remember WHY you needed to apply a special weight on some particular link. Imagine that you return to a hairmod project a few weeks or months after shelving it. You see linkWweight[4]=12.0 What does that mean? "Maybe that was the special fix for the shoulder-clipping problem? Or was this that weird experimental thing that I left in-place because it created a neat hair-flip effect whenever she tosses her head?"). Descriptive information will also be invaluable for other modders, in the event that you decide to share your FLA files.
However, if your hairstyle include a lot of segments then you may find it tedious to populate it line-by-line. This is especially true if you just want to adjust the gravity for your entire hair, regardless of how many links or segments it contains. In that case, go ahead and use a loop.
Code:
var linkWeights = new Array();
var i;
for (i = 0; i < 50; i++;) {
	linkWeights[i] = 12.0;		// Assign a light weight to every link (assuming that the strand has 50 segments or fewer)
}
SDT is Frictionless
At the beginning of this post, I mentioned two variables: Mass (which we refer to as "weight") and Friction. Why haven't we talked about friction at all? The answer is that, as far as I can tell, friction isn't implemented in the hair physics simulation. Each link has a Friction value assigned, but it doesn't do anything.
I suspect that Konashion initially intended to simulate an "air resistance" effect which would gradually nullify the motion vector of a link (assuming that it was not acted on by any additional impulses). However, before he wrote that code, he discovered that the gravity effect, in conjunction with elastic tension effects from neighbouring links, would tend to dampen down any residual motion. Since moving links will drift to a stop, there was no need to try to implement a separate friction effect (which would have necessitated more testing and tuning -- if you make Friction too strong then it could impede the downwards acceleration of an object due to gravity!). Konashion therefore abandoned the Friction idea but forgot to remove it from the code.
The dynamicHairExtender mod does includes a "linkFriction" array (equivalent in function to the "linkWeights" array) and you're welcome to try to adjust the friction settings for your custom hairstyles. However, I expect that your configuration changes won't actually have any impact on the game. If you do somehow manage to activate friction or achieve some neat animation effect, then let us know about it - I'll be happy to be proven wrong :)
dynamicHairExtender Mod Part 3: Constrained Rotation
With Great Power Comes Great Fuckups
The tools and techniques introduced in the previous two posts (anchoring, weighting) are endogenous to the SDT physics system. Misusing those tools can cause your hairstyle to animate unconvincingly -- the viewer will say "that's obviously a ponytail, but the modder gave it the properties of styrofoam!" Such errors can usually be fixed with additional tinkering and tuning.
From this point onwards, we're going to be working with new tools which can significantly alter or override portions of the SDT physics system. If you make mistakes when working with these tools, then you may open up large gaps between adjacent segments of your hairstyle. You may get segments which rapidly flicker between two unstable positions 180 degrees apart. You may get an entire hair strand which will continuously spin counter-clockwise as if it's been demon-possessed.
If you're trying to add a few fancy dynamic effects to a complete hairstyle, then such problems are minor -- you always have the option of simply reverting the strands (such as "a pair of ahoge at the top of the head") to static hair. It won't be as pretty, but you can still finish the hairstyle and release it. If you're halfway through a major dynamic-hair project, and you've already slashed the hair into dozens of separate strands which must all animate in concert... then running into a physics problem is very upsetting and it might cause you to abandon the whole project.
If you've added several different physics parameters simultaneously, then it can be difficult to determine which one of them precipitated the problem. In fact, each of the parameters may individually be "innocent" -- with dynamicHairExtender, there are a few problems which arise because of interactions among separate factors. I can't "fix" these problems because doing so would take away most of the power that I'm trying to give to modders! Therefore, some general advice:
when you've adding a new physics parameter to a hairstyle, try adding it at a small magnitude (e.g. 10% or 20% of the intended value) and then test it in-game. Check for any signs of adverse interaction or positive-feedback effects.
when you want to add several physics parameters to a hairstyle, add them one-at-a-time and test in-game after each addition.
it's sometimes possible to fix a physics problem by transforming the sprite geometry (see Post 5 for details). Treat this as a last resort! It's dangerous because, if you subsequently decide to alter or revert your physics parameters, you may forget to remove the Transform.
keep a backup copy of your "most recent stable physics configuration" in case you need to revert
the simplest approach is to copy-paste the physics configuration for each strand, and comment it out. If you manage to screw up a particular strand of hair then you'll be able to recover by deleting the active code and uncommenting the old stuff.
wherever possible, do your physics experiments on a disposable "sample" hairstyle -- I'll provide several of them at the end of this series of posts. When you're comfortable with the animation tools, apply your knowledge to proper hairstyles.
Interfering with SDT Physics
Remember that Links are the midpoints and endpoints within a simulated "rope" object. Links experience physics effects (impulses, gravity, etc). One each frame of animation, SDT jostles the Links around, then draws a Segment in the spaces between each pair of Links.
For technical reasons, it is extremely unsafe to make changes directly to the Segment objects. SDT "cares" about the apparent y-axis length of every segment. If we ever change that length (e.g. by rotating the segment 1 degree clockwise), then SDT will assume that the segment has been elastically stretched or compressed. It will "fight back" against our interference. Within a few frames, the Segment will be stretched and twisted so much that it no longer connects to its neighbours. Whatever animation effect that we were hoping to achieve is now moot; the scene is a write-off. Therefore we must not alter the segments.
Instead, dynamicHairExtender concerns itself entirely with Links. This approach has a major advantage: the SDT code "knows" that Links can get deflected significantly from their canonical positions. It doesn't mind; it simply applies its normal physics rules and attempts to get the Link back into an acceptable position. If we continue to make changes on every frame, then the Link will (usually) settle into a position which is a compromise between "where dynamicHairExtender wants to put it" and "where SDT wants to put it" -- this is a crude description of the "Equilibrium" concept which we'll explore (with helpful diagrams) in part 4.
For now, the key details are:
dynamicHairExtender can alter the position of Links
once dynamicHairExtender has moved a Link, SDT treats its altered position as "legitimate" and incorporates it into subsequent physics-simulation cycles
if we yank a Link into the sky, then that Link will apply the normal elastic effect on its neighbours. Even though dynamicHairExtender didn't directly alter the neighbour Links, they'll still get yanked upwards
on each animation frame, SDT draws Segments so as to connect each pair of Links. It doesn't care whether the Link positions have been adjusted; it just tries to draw a contiguous picture using the available art assets.
Origin and Arcs
All rotation effects in dynamicHairExtenderV1 are made with reference to the [g.her] element*. In layman's terms: this mod cares about where her head is pointing.
I intend to make it more flexible in subsequent versions, so that you could assign a specific hair strand to rotate in conjunction with the neck, torso, etc... There are some technical challenges that I'll need to overcome first. Even if this feature is added, I expect that most strands will remain attached to the head -- because that's how human hair behaves. All subsequent examples in this writeup will employ the head as the reference object.
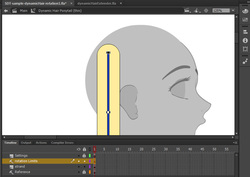
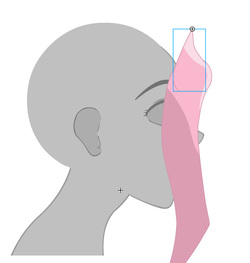
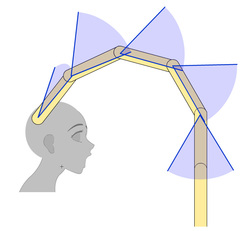
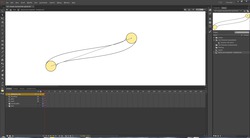
Whenever we talk about degrees of rotation, you can imagine it as follows. Starting from the anchor point of the Dynamic Hair strand, draw a reference line straight down towards the bottom of the screen. Shift the transform point of this new line to its top. Apply a rotation to the line (using the Flash toolbar is recommended because it will give you a precise numeric readout). Fine-tune it as needed. Once you're happy with the appearance, write down the number somewhere -- or copy-paste it directly into your phsyics parameters.
At this point, you may be asking "why don't I just rotate the hair strand itself? That would give me a more accurate preview." The answer is "you can, but it's more dangerous." If you forget to undo the rotation then you'll find that your hair segments (in-game) have been pulled out of alignment. It should be easy to return to the design view and cancel out the rotation, but complications may arise. It's safer to setup a few disposable reference lines. Expert users can bypass the visual references entirely; once you're familiar with the process you'll probably find it easier to just plug some estimated values into the physics params ("plus 45 degrees, minus 20 degrees... that sounds reasonable") and then fine-tune them by testing in game.
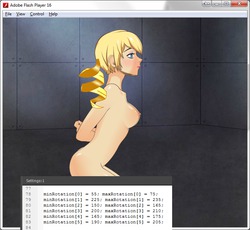
A simple example with minRotation = -30 and maxRotation = 30
The purpose of this phase is to choose an arc of rotation for the hair strand. We're going to be setting up boundaries beyond which the hair shall not be allowed to rotate. The new reference layer in Flash is not actually necessary for the mod nor for the SDT game-logic; it's just a visual aid for the modder (to help predict and plan out possible collisions among hair strands).
Obviously, the selection of boundaries is left up to the discretion of the modder. By default, dynamicHairExtender applies no boundaries whatsoever; it allows hair to rotate according to the logic of the SDT physics engine. We've seen a few examples of silly behaviour in the previous post - negative-weight Links levitating up into the sky and zero-weight ponytails floating about as if the character was in free-fall. We're going to see a lot more silliness as additional features of dynamicHairExtender are revealed. Rotation constraints are an important tool for the modder, because they allow you to "veto" some of the more bizarre effects of physics simulation, and some of the unforeseen interactions among extended-physics settings.
You might apply rotation constraints reactively -- as a fix for a known problem.
"The bangs tend to fall down into her eyeballs when she raises her chin suddenly. That looks bad, so I'll just set [maxRotation = 300] so that they can't do that."
You might also apply rotation constraint before you've started any serious tinkering with physics -- as a proactive hedge against unknown future problems.
"Okay, I've cropped the bangs out into a separate layer. I've tried rotating them around in design mode, and they look okay when they're between 150 degress and 250 degrees of rotation. So I'll designate those numbers as the limits of rotation."
There's an important limitation to note at this point: rotation limits are enforced "absolutely." Hair animation tends to be a smooth process, and it exhibits a lot of negative-feedback response patterns (such as elastic deformation). If hair has been poorly tuned then it may appear "off" to the viewer -- this was demonstrated in Part 2 when we applied heavyweight physics to a ponytail which appeared to be lightweight. But even a mis-weighted hair strand still appears to be some kind of flexible material. By contrast, a hair strand which has reached its rotation limit suddenly becomes rigid. There is no smooth transition. The minRotation and maxRotation thresholds do not gradually "deflect" or "decelerate" or "repulse" an approaching hair strand - they simply stop it dead when it reaches the magic number.
This is sometimes appropriate! For example, we would expect a hair strand to stop dead when it collides with the torso (rather than crossing through the spine and falling "into" the torso). But if your rotation-limit number corresponds to a point of empty space then viewers may be confused. As previously mentioned, your physics choices should always be corroborated by some element of the character anatomy or the hairstyle's visual design (such as hair clips, ribbons, creases and parts, etc).
Here's a simple example. We have a lightweight ponytail (linkWeight = 5.0) -- which would tend to "lag behind" the movement of her head, and droop down through the torso. But we assign a minRotation value of 10 degrees, which corresponds (roughly) to the position of her shoulders. When the head moves towards the left, the topmost hair segment strand will rotate counter-clockwise. When it reaches the shoulders (this occurs within the first 500ms of motion), it will rotate no further -- it will seem to be "pushed" backwards by its apparent contact with her body. It will remain in contact with the shoulders until the head movement is complete, at which time it will fall away (rotating clockwise) towards its resting position. Through elastic interaction, the constrained segment of hair will tend to drag the remainder of the ponytail. Despite its low Weight (which would normally leave it floating somewhere near her breasts) it will fall - approximately* - along the curve of her back.
*By putting a lot of effort and fine-tuning into your hairstyle, you could obtain a ponytail which seems to recognize anatomical boundaries and which minimizes clipping. Unfortunately, it is not yet possible to publish a general set of physics parameters for a "no clipping" ponytail. Each strand has unique requirements which will reflect its length, thickness, number of segments, length of segments, the position of its anchor point, etc...
Here's a contrary version of the previous example -- this strand has a maxRotation threshold near the shoulder (instead of minRotation). When the head moves to the right, the ponytail is inexplicably glued to her shoulder and dragged along. This animation is not visually believable. It could make sense if the scene or the character design included some costume element in the space behind her head and which conceivably interferes with her hair. Perhaps a backpack? Or a large pair of headphones looped around the nape of the neck?
Thus, the "hair stops abruptly when it reaches a rotation threhold" behaviour sometimes adds to the visual believability of a scene rather than detracting from it. Nonetheless, you should usually try to achieve the desired hair-animation behaviour using other approaches (weighting, blending, etc) before you resort to simply setting limits. Why? Because the other techniques can achieve a "repulsion" or "soft landing" effect, which tends to look more natural. There's no harm in using both approaches, though! You could apply a blending rule (to softly push the hair away from the torso during gentle head motion) while still retaining a minRotation value (which will prevent torso collision during violent head motion).
One final point regarding compatibility -- rotation constraints will prove troublesome if you want your hairstyle to be fully compatible with animtools. What will happen if the girl is put into a bondage scenario and suspended upside-down from the ceiling? Answer: each hair strand will continue to enforce its built-in rotation constraints -- even though those constraints were planned (and tested) with the girl in an upright posture. If you want compatibility, then:
test your hairstyle with a lot of weird animtools positions
be prepared to relax (or even abandon!) your rotation constraints
for example, you may need to accept that your hairstyle is going to look 30% worse in upright posture, just to get it looking slightly-believable when the girl is upside-down
Note: dynamicHairExtender is not yet truly compatible with animtools. sby and I have worked out a simple compromise, though, so you should see dynamic hair strands responding to custom scene gravity with dynamicHairExtenderV2 and animtoolsV14 (neither of which is yet available for download).
The "Fishing Rod" Problem
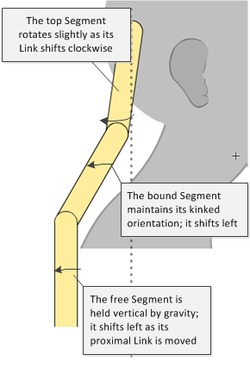
As of dynamicHairExtenderV1, rotation limits apply only to the FIRST segment -- which means that you exert direct control over Link[0] (the anchor point -- you set its position in Flash design view) and Link[1] (by defining the arc of positions which it's allowed to occupy). All of the remaining Links in the hairstyle will simply "dangle" from Link1, under the influence of gravity.
The immediate consequence of this limitation is that a hairstyle with very strict rotation constraints will often resemble a fishing rod: the first segment ("rod") extends stiffly upwards, while the remainder ("string") hangs down limply. You can change the direction and strength of gravity (as discussed in the previous post) but there will almost always be a "kink" in the strand at Link[1].
How do we avoid this kink? The simplest answer is: "design the hair strand so that its resting shape is inherently anti-kinked." When the kink is applied at runtime, the hair assumes its "normal" resting shape. Example:
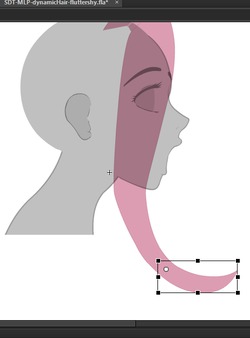
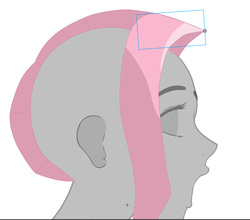
Here's the front strand of the Fluttershy hairstyle, in its resting state (with all the origin points of all its segments lying along a common vertical reference line). It looks completely wrong!
The ActionScript specifies a minRotation value for this segment. Here's what it looks like with that rotation applied. The vertical portion of the strand falls across her cheekbone, while the top of the strand (the "fold line") coincides with the static mohawk behind it. Remember that the vertical segment is allowed to swing back-and-forth across her face, via the normal rules of gravity and elasticity.
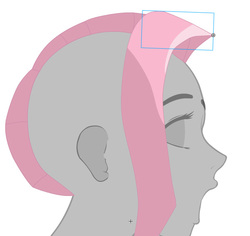
And here's what it looks like at maxRotation. The strand still falls across her face, but the top line is no longer perfectly contiguous. We could have prevented this, of course, by setting [minRotation = maxRotation]. But this particular character's hair design is already extensively styled, and its resting shape is artificial. The degree to which it defies gravity is implausible. By allowing it to reveal slight imperfections during motion, we give the impression that the various strands are colliding with and stacking against each other. We (hopefully) improve the credibility of the design and encourage the viewer to overlook its fundamental impracticality. When the hair relaxes back into its resting shape, the contiguous outline will gradually be repaired -- a small animation detail which pleases the eye.
You'll note a second imperfection which gets revealed by the excessive rotation - the pointy "front tips" of the hair strands are exposed! This is an undesirable detail, and the highlight is supposed to mask it. However, I haven't yet managed to get the highlight to animate convincingly, so viewers see an ugly flaw when the head is tilted upwards. Shit happens.
The gradual repair of the top line is significant. Do you remember the earlier warning about how minRotation and maxRotation thresholds tend to cause a moving hair strand to stop very abruptly? If your desired resting position does not lie along the gravity vector, then you'll need to apply some careful fine-tuning in order to create hair strands which can softly "bounce" out from their resting place during motion, and which can softly "settle" back into place afterwards. "Reduce the weight of the first few Links" is the obvious approach when you want to make things light and bouncy, but blended rotation is also viable in some cases. As always - experiment and test until you find an approach (or mixture of approaches) which fits your requirements.
Rotation Constraints for Additional Segments
This feature is not included in V1! It's slated for inclusion in dynamicHairExtenderV2.
This feature could be implemented in two ways. For each segment of hair, you would be able to define rotation limits with respect to:
the hair strand's reference frame (e.g. her head)
OR
the preceding hair segment
I'm currently leaning towards the latter option. I think that it makes more sense (in terms of "how human hair actually behaves") and would allow modders to create a more interesting variety of custom hairstyles. For example, you could extend the current "fishing rod" idea into an "arch" which has two stable positions. The example shown below is exaggerated for emphasis, but I think that it could be practical on a small scale - especially for ahoge strands. They're a relatively common element of anime character design, and it's a shame that SDT doesn't give modders the ability to easily animate them.
I'm open to fedback on this feature proposal. If you're going to send in suggestions then please do so by PM; I'd prefer to keep this set of "how to" posts in sequential order without mixing in a bunch of incidental conversation.
It turns out that I needed this feature for one of my own modding projects, so I went ahead and implemented it (using the second approach). Here's an example of a bistable "ahoge" strand. It's ludicrously oversized (for easy visibility) and therefore requires an enormous amount of head motion in order to flip it back and forth. If you were incorporating this sort of element into an actual hairstyle, it would presumably be much smaller so that it would flip quite often (and occasionally "hovering" in the unstable middle position for a few moments).
[attachimg=1]
-----------------
The ActionScript configuration will presumably involve an array, whose numeric indices refer to Segments.
Code:
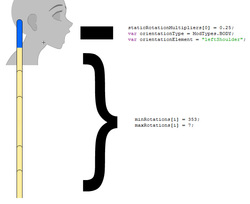
var minRotations = new Array();
var maxRotations = new Array();

// Segment 1 must rotate at least 15 degrees further clockwise than Segment 0
minRotations[1] = 15.0;

// If Segment 5 is already in-line with Segment 4, then it shall not be allowed to rotate any further in the clockwise direction
maxRotations[5] = 0.0;

// Segment 3 shall always be kept perfectly in-line with Segment 2
minRotations[3] = maxRotations[3] = 0.0;

var minRotation = 42.0;      // OBSOLETE!
var maxRotation = 42.0;     // DEPRECATED!
// To ensure backwards-compatibility, un-indexed declarations will still be allowed.  They'll be applied to segment 0.
What does the Mod do?
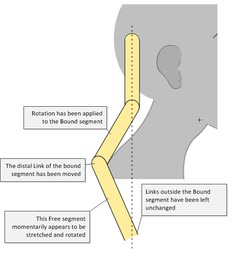
After each animation frame, dynamicHairExtender checks the effective rotation of the first Segment with respect to the [her.head] object. If the rotation is less than the minRotation value, it gets increased to match the minimum. If it's greater than the maxRotation value, it gets decreased to match the maximum.
The mod then takes note of the implied position of Link1 (note: it has not yet made any changes to Links; only the first Segment has been altered).
The mod then cancels the rotation of the first Segment (remember: altering the Segments is forbidden because it causes SDT to go crazy). It then moves Link1 into the appropriate position (that is: the desired endpoint of the rotated version of Segment1).
----------------
On the frame AFTER we adjust a Link, we expect SDT to re-draw the affected Segment(s) in a way that reflects the modified Link1 position. Since we do not interfere directly in the position or orientation of the visible Segments, it is possible that a Segment will drift across our minRotation or maxRotation thresholds and remain in a "forbidden" spot for an entire animation frame -- our corrective adjustment is not immediately evident. We don't care about this lag, because animation frames are very short (30 fps) and the viewer will hopefully not notice a momentary bit of clipping. If you do get noticeable clipping, then you can simply adjust your constraint numbers slightly so that the corrective reaction begins a bit "sooner."
----------------
As was previously discussed in the context of Anchoring and Link-Weighting, the rotation-constraint logic is applied independently for each strand of Dynamic Hair in the scene. It's therefore possible to have strands with similar origins which have different constraints (such as two ahoge at the top of the head -- one of which points forwards while the other points backwards). It is also possible to have rotation-constrained hair strands existing alongside strands which are comletely unconstrained (allowed to rotate freely). And these dynamic hair strands can by drawn atop, or underneath, any number of static-hair elements.
Usage
In the ActionScript for your hair strand, add the following lines of code:
Code:
var minRotation = 45.0;		// The hair strand is required to rotate at least 45 degrees clockwise from the straight-down reference orientation
var maxRotation = 90.0;		// The hair strand is allowed to rotate up to 90 degrees clockwise from the straight-down reference orientation
Another example:
Code:
var minRotation = 270.0, maxRotation = 270.0;
// The first segment of hair will always be rotated so that it points towards the front of the skull, with the rest of the strand dangling down
Your configuration statement must always define a permitted range . You cannot specify a single limit (min or max) in isolation, because doing so is not geometrically meaningful. If you attempt to do it, the mod will simply ignore/discard your input.
Code:
var minRotation = 340.0;		// The hair strand is not allowed to rotate COUNTER clockwise by more than 20 degrees.
var maxRotation = 720.0;		// This limit value is unenforceable (rotation values cannot exceed 360 degrees) and will be ignored.  Hence, the preceding definition (min=340) will also be ignored because it does not form part of a pair.
Similary:
Code:
var minRotation = 340.0;		// The hair strand is not allowed to rotate COUNTER clockwise by more than 20 degrees.
//var maxRotation = 45;		// This was a valid configuration statement, but it has been commented out.  Since we aren't supplying a maxRotation parameter to the mod, it will ignore the minRotation parameter.
dynamicHairExtender Mod Part 4: Blended Rotation and Equilibrium
Here be Dragons
This is going to be the most difficult section of the guide. The concepts that it covers are sometimes difficult to visualize; the only way to build up a proper understanding of them is by taking a working sample and then cranking the coefficients up and down and testing each set of parameters in-game. By doing so, you'll see see how the parameters influence both the dynamic motion of a hair strand and its static resting shape (more accurately: "shapes" ... a blended strand may be straight when resting in one position but convex when resting in another position).
And then you'll need to repeat the process, because the effects of blended rotation are extremely sensitive to the exact layout of the strand, its place in the scene, and the posture of the character. Animtools is very helpful here, because it can extend the range of body motion and head-tilt, and thus it allows you to visualize the large-scale effects of minor configuration tweaks. Sometimes you may find that activating a new physics feature will overwhelm some of the careful fine-tuning work that you've done previously. You may attempt to incorporate two countervailing forces into your hairstyle to yield an "S curve," but then you discover that the two effects simply nullify each other. You may get frustrated and declare that the whole thing seems to be broken and useless.
This section is optional. There are very few scenarios in which Blended Rotation is the only technique which can twist a hair strand into the desired shape. If you have a design in mind, odds are that you'll be able to bring it to life using other techniques: angled gravity, weight-adjustment, rotation constraints, and clever layout (which will be the subject of the next post). The chief virtue of Blended Rotation is that, when it's tuned properly, it makes the motion of hair strands more believable. Hence, it's perfectly valid to learn (and apply) the other techniques first. You can always retur to this topic later, learn what you need, and then add small touches of Blended Rotation to finished hairstyles - just to give them a little extra zazz.
If you find that you're not absorbing the material, or that it simply doesn't make sense, or that it doesn't seem useful -- then please skip ahead to the next post. The subject matter of the next post is much more "immediately accessible" and it involves a lot of hands-on experimentation.
Simple Equilibrium
"Equilibrium" is a state in which multiple forces are acting on an object, yet the object remains at-rest because the forces are balanced. The first form of equilibrium that we'll discuss is one that we've already seen (in Post 1) - the interplay of Gravity and Elasticity.
Glossary: "proximal" means "near the origin." We use this adjective to denote hair Segments (or Links) which are higher up the strand - closer to the hair root. "Distal" is the opposite; it means that something is closer to the hairtip.
Consider this simple ponytail Segment. What happens to its distal Link during each frame of SDT's physics logic and animation?
The Link gets pulled downwards by gravity. It gets pulled upwards during elastic correction of this Segment. Then it gets pulled downwards again during elastic correction of Segment 2. The Link returns to its starting position. Well, not exactly to its starting position because of imprecision in floating-point math and deliberate inaccuracy in SDT code -- but it's close enough to make no difference.
The same is true of all of the Links in this ponytail. Since Gravity and Weight do not fluctuate over time*, the balance of the physics forces can be broken only by motion. So long as the girl's head remains in its current position, the hair strand will remain unchanged.
Animtools can alter the direction of gravity within a scene, but it does so at specific moments (rather than making continuous adjustments). And activating a new Animtools position usually causes the characters to move within the scene, so the equilibrium will be broken anyways.
We refer to this type of equilibrium as "simple" for two reasons. First, because any perturbation is canceled out within a single SDT logic cycle (before anything has been drawn). And second, because all of the forces involved are defined within the vanilla SDT codebase (mod code is involved only peripherally - such as by adjusting Link Weights during initialization).
It's possible for you (as a designer/modder) to influence the point at which simple equilibrium is achieved for any particular Link within a hair strand. You can shorten or lengthen individual hair segments (which alters their's elastic-correction behaviour). You can tweak the Weight and Friction of individual links (although Friction is apparently non-functional in the SDT codebase). And you can change the direction in which gravity pulls the entire hair strand (via the gravityAngle configuration parameter).
In the absence of mods, a hair strand will tend to move towards simple equilibrium. That's a good thing! Even if your hairstyle misbehaves (jumping, flickering, etc) in response to rapid head motion, it will tend to settle back into a sensible shape. The only problem with this tendency towards simple equilibrium is that it makes Dynamic Hair strands look fairly boring when they're at rest. If you've seen one ponytail dangling limply towards the ground, you've seem 'em all :)
A hairstyle in simple equilibrium also has a limited range of visually-acceptable orientations. Consider the standard "SDChan" hairstyle.
At a neutral resting position, the hair does not fall directly downward -- its path is twisted slightly in the clockwise direction. As the chin moves down, the strand engulfs the ear -- the image could be salvaged if we magically promoted the strand to a higher layer. Under heavy head-tilt we lose any sense of biological plausibility. The strand shows perpendicular intersection with static hair elements -- we could fix this problem by converting more of the static hair (especially the bangs) into dynamic strands. But the strand also ignores the contour lines of the skull and jaw, which is visually implausible. SDT doesn't model interaction between hair and anatomy, so we need to do some modding.
Non-Equilibrium
Before we go any further, let's clarify something. It's possible for a hair strand (or a Segment thereof) to be in a stable position without being in the state of equilibrium.
Rotation constraints can effectively "lock" a Segment in place. A rotation constraint does not attempt to nullify or counter-balance the forces acting on a Segment; it simply overwrites the orientation of the Segment during each animation frame. Hence, a Segment which reaches one of its rotation threshold values suddenly becomes rigid.
Equilibrium is precarious. Whenever a new force is added (e.g. a sudden movement of her head), the balance of forces will be disturbed and the hair strands will move about. If you can apply a significant force without causing the hair to react, then it probably was not in a state of equilibrium.
EXPANSION HOOK - THIS FEATURE IS NOT YET IMPLEMENTED
There's potential here for a second type of stable non-equilibrium position. In addition to setting limits on Segment rotation, we could also force hair Links into specific anatomical reference positions. For example -- "the fourth link in her ponytail shall always be placed at the (x,y) coordinates of him.leftHand". Such a binding rule could be used to create visual effects such as "pulling her hair" (so that it falls into a loose U-shaped curve when she's nearby but grows taut as she tries to pull away) or "holding a leash attached to her collar." The latter example is plausible because the extended hair-physics logic can be applied to anything in the scene - including headgear, collars, etc.
I'll probably include a proof-of-concept example in Post 8, but I'll wait for feedback and suggestions from modders before I formally add it to the API. The configuration syntax is going to be complicated, because we'll need to support references to multiple reference objects for each strand of hair. END OF EXPANSION STUFF
Orientation Sources and Anatomy
Every hair strand in SDT carries a reference to an object in the scene. This object is typically the girl's head -- although it could be any other part of her anatomy (or even an element of the background, if you want to get really clever). This object serves as a rotational "reference point" for the strand. We can instruct some (or all) of the Segments within the hair strand to inherit some (or all, or "more than all") of this object's rotation. The net effect is that the hair strand will tend to mimic any twists made by its anatomical reference object.
In the example above, the yellow strand is the "control" - it has no anatomical binding and so its shape is dictated by gravity and inertia. The green strand is weakly bound to the ribcage as a rotation source, and the blue strand is strongly bound to the ribcage. All other physics parameters (such as linkWeights) are identical. Note that the three strands are parallel when the character is in the "neutral" position, yet they acquire very different resting shapes when the character reaches the limits of movement allowed within the scene. The animation lingers briefly at each position in order to demonstrate that each strand is stable in each resting position -- what we're seeing is a special type of equilibrium (which we'll discuss later).
This example was deliberately chosen to show off the flexibility of the system, but the result is fairly silly -- the scene does not give the viewer any reason why the blue strand ought to rest in such a "horizontal" orientation. Almost all practical uses of this feature will rely on the default value for orientationSource: g.her. The default binding is especially applicable for any hair strand which needs to demonstrate "blow-dried" or "hairsprayed" behaviour -- we bind the proximal Segments strongly to the head (so that they move somewhat rigidly, with their orientation being a real-time compromise between head-tilt and gravity) and then taper off this binding effect as we move down the strand. As we reach the halfway mark, we can probably reduce the binding strength to zero -- the distal half of the strand can ignore head-tilt entirely. It will orient itself according to gravity and inertia.
Still, there are a few cases in which you may find it useful to bind a hair strand to a different part of the body. When a long hair strand is supposed to fall along your character's back, binding to g.her.torso and applying a mild rotation influence to a few Segments can help to "nudge" the hair in accord with body movement - reducing the likelihood that the strand will intersect ("clip through") her body.
In the previous animated example, we applied a consistent amount of anatomical binding to all of the Segments within each strand of hair (although we used a different value for each of the three coloured strands). In this example, we'll concentrate all of the binding onto a single Segment (which I've highlighted in blue for emphasis). We can expect this single Segment to respond noticeably to motion of its associated anatomical object -- the shoulder.
The tagged Segment is reacting appropriately to the movement of the shoulder. Unfortunately, changing the orientation of a single Segment isn't enough -- the strand is still clipping through when she leans forward. Let's apply a lesson from the previous Post (rotation limits) to add some "stiffness" to the other Segments of our hair strand. We'll still apply anatomical rotation influence exclusively to the blue Segment, but now the rest of the strand will be semi-rigidly dragged along for the ride.
Yay! Our hair strand no longer clips through the shoulder. It instead slides along her upper arm, which is physically plausible when you consider the position of her elbows.
The stiffness is essentially a "cheat" - a real ponytail is very flexible and so the animation looks wrong. Still, small applications of the stiffening technique might be visually plausible when applied to hair strands which are tightly wrapped or braided.
Please note that this "concentrated binding" technique is a tutorial concept only. I intended to give the viewer (i.e. you!) a very clear visualization of the anatomical-orientation effect on a single Segment -- because most of the previous explanation has dealt with Links, but this lesson focuses on Segments. You should definitely not assume that each anatomical reference object can be bound only to a single Segment. In fact, spreading the effect amongst several adjacent Segments (and tapering it off smoothly to zero) will produce smoother animations. If we had applied a small amount of anatomical influence to the upper and middle Segments of our hair strand, we could have avoided clipping without relying on the "hair stiffness" trick.
Blending Coefficients
Once you've chosen an Orientation Source for your hair strand, you'll need to decide how strongly that object's rotation should influence each Segment within your strand. This is done by means of a simple floating-point coefficient called staticRotationMultiplier (default value = 0.0). At 0.0, the Segment completely ignores its Orientation Source object. At 1.0, the Segment inherits the full Rotation value from its Orientation Source, on each animation frame. At 2.0, the Segment inherits double the Orientation Source's Rotation value. And so on for every value in between. Let's revisit our earlier animated example:
We mentioned that the blue strand was "strongly bound" to its orientationSource; it has a staticRotationMultiplier of 0.3. The "weakly bound" green strand has a staticRotationMultiplier of 0.15. The yellow strand, being a control element, has staticRotationMultiplier = 0.0.
At this point, it is absolutely crucial to remember that these rotational effects (which we've previously refered to as "nudges") are included in the physics simulation. When we nudge a Segment into a new orientation, what we're actually doing (in terms of code) is moving its endpoint Link into a new position. The altered Link position is part of the SDT physics system; it's subject to gravity and elastic correction. At the visual (or "gameplay") level we see that the strand initially experiences a local "twist" or "kink" (centered on a particular Segment). SDT's physics response will usually spread the "nudge" effect out among adjacent segments (which conceals the kink).
In a few edge cases involving anomalous Weights, SDT will exaggerate and deepen the kink into a zigzag - but that's very rare.
Here's an example of a nudge applied to a normal-weight strand, which is in a straight-vertical simple equilibrium state before the nudge begins.
This is usually desirable. We can deliberately setup a local deformation in the strand (e.g. twist the shoulder-adjacent Segment of a ponytail to avoid clipping) and trust that SDT will find some way to incorporate our changes into the scene without looking completely crazy. But what if we want a persistent local deformation? What if we're willing to meticulously tweak dozens of parameters in order to achieve a custom hand-crafted animation effect, and we don't want a bunch of automated physics behaviour overriding our hard work? The answer is: we can change that.
Each Segment has a second coefficient, called dynamicRotationMultiplier. Its default value is 1.0. By reducing this value, we effectively weaken SDT's ability to rotate the Segment away from its zero-rotation shape (i.e. the shape that it exhibits in Flash design view). Our anatomy-based "nudges" will exhibit greater magnitude and duration because the forces opposing them have been weakened. But we're also weakening SDT's ability to "remember" the orientation of a hair Segment between animation frames, which can yield some surprising and unpleasant consequences. Increasing this value will amplify the net rotation imposed on the Segment by SDT physics logic: it will swing farther during inertial motion, and after reaching its zenith it will take longer to fall back into its gravitationally-determined resting position.
We refer to this technique as "rotational amplification" or simply "amplification." When the effect is reduced, we can call it "rotational suppression." The word "damping" is already used in the SDT codebase to describe a different effect, and "hysteresis" is way too obscure and hard to spell. In the example below, we have three different ponytails with identical origin points and identical physics parameters, except for dynamicRotationMultiplier. The yellow strand is our experimental control (dynamicRotationMultiplier = 1.00), blue is amplified (1.03), and green is suppressed (0.97). These strands have not been assigned any anatomical links; their motion is dictacted simply by plain old physics forces (gravity, inertia, elasticity). However, the mod tinkers with their rotation in real-time by applying the coefficients that we just mentioned. Here's the result:
Note that this change produces a highly visible alteration in the motion of the strands, despite the very small magnitude of the change (+/- 3%). The amplified strand (blue) experiences great difficulty in returning to its zero-rotation resting position; it seems to be moving through a viscous fluid. The green strand returns to zero more quickly -- as if it had been assigned a higher Weight. Yet we know that it has not actually been assigned a high Weight, because it forms a visible "S" curve during motion -- and also because it has the same length as the other strands (hair is elastic, so a heavy strand will be stretched out along its axis). Hence, very small adjustments in the dynamicRotationMultiplier coefficient can be used as a substitute for the missing "Friction" parameter. However, you would need to apply such changes consistently to every hair strand in the scene (otherwise viewers will very quickly notice the different "viscosities" of your strands -- as you've just seen in the blue-green-yellow example).
Toying with the dynamicRotationMultiplier parameter is the easiest way to fuck up your Dynamic Hair and turn it into an incomprehensible crayon-scribble, because you're essentially creating a local anomaly in the laws of physics. I strongly advise you to use coefficient values within this range: (-0.5 ... 0.0 ... 1.2). Negative values are sometimes valid (when used in conjunction with a strong anatomical link), and zero has a few niche uses. Large magnitudes (regardless of whether they're positive or negative) are very unstable.
When you're working with a proper hairstyle, adjusting the dynamicRotationMultiplier parameter at all is something that you should do only after you've attempted to solve a problem using all of the more "well behaved" techniques. Of course, if you're working with a disposable "sample" hairstyle then go ahead and experiment :)
-----------------
You can apply the two coefficients simultaneously - subtly re-balancing the way in which the strand reacts to anatomy, vs its susceptibility to SDT physics. The ability to mix-and-match different values of these two coefficient is why the feature is called "Blended Rotation." At this point, further explanation of the physics modding is not very useful. You really need to open up a few sample hairstyles, tinker with the settings, observe the effects, and acquire a "kinesthetic" understanding of how these coefficients influence hair strands. While doing so, you'll probably discover a few neat animation tricks which you can subsequently apply to real hairstyles.
-----------------
One "Blended Rotation" example that's worth considering is the degenerate case: a hair strand which has been assigned
for all of its Segments. What happens to this strand as the head moves?
After SDT has calculated physics effects on each link, the mod steps in. It wipes away all of the work done by SDT. It then grabs the value from g.her.Rotation, and repositions the strand's Links so that each Segment will exactly match the head's orientation. The net result? Our entire hair strand has become a piece of static hair. It ignores gravity; it has no inertia; it will never curve or twist.
This seems crazy. Why would you ever want to do this? Answer: layering. If you're trying to achieve a complex hairstyle in which static elements overlie dynamic elements, you'll probably discover that the standard set (DYNAMIC_HAIR_OVER, HAIR_BEHIND, etc) is inadequate for your needs. However, you can always take a static hair element, register it as a single-Segment dynamic strand, assign it the "degenerate" physics parameters shown above, give it the same target as your true dynamic strands (e.g. DYNAMIC_HAIR_OVER), and then add it to the scene.
When multiple dynamic hair strands share the same target, their layering is determined by load order. Elements which occur later in the ActionScript will appear on top of their predecessors.
Complex Equilibrium
I'm going to repeat my earlier warning here. This section is complicated, and you don't actually need to understand it in order to use this feature. You're welcome to simply tinker with blending coefficients (in the same way that you might tinker with Link Weights) until you discover a combination of effects which looks cool.
-----------------
Complex equilibrium is the intended outcome of Blended Rotation. It is not a necessary result. If your blending parameters are poorly tuned, then it's quite possible to create a hair strand which never settles into a stable shape - it will either oscillate within an unstable range, collapse into a tangled mess, or spin continuously around its anchor point (like the hands of a clock). Example:
I whip my hair back and forth. My hair whips itself back and forth.
-----------------
Blended Rotation involves adding two "forces" to the SDT physics system.
gravity
elastic tension from previous Link
elastic tension from next Link
torque inheritance from the Orientation Source
torque amplification
Let's consider a ponytail which has not yet been modded. To keep things simple, we'll use a strand which contains only three Segments, and we'll focus our attention on the middle Segment.
[[TODO - diagram1]]
The force vectors which I've drawn are estimates, of course. This link is in a state of simple equilibrium: gravity balances elasticity. Now, let's bind the Segment to an Orientation Source whose current Rotation value is 5 degrees(with staticRotationMultiplier = 1.0).
[[TODO - diagram2]]
The vectors are no longer balanced. During each animation frame, SDT will move the Link. It will continue to move until it reaches this position:
[[TODO - diagram3]]
At this point, the vectors are balanced again. The horizontal component of the torque matches the horizontal component of the elastic tension from the preceding Link. The vertical components are also matched. It's important to note that, as SDT rotates the Segment towards this orientation, the imbalance of forces gradually shrinks. Hence, we observe a negative-feedback response and the Segment settles gently into its place.
[[TODO - diagram4]]
We refer to this state of affairs as Complex Equilibrium because:
it incorporates an exogenous force. The mod must intervene on every scene in order to maintain the Complex Equilibrium -- if the mod suddenly crashed then the strand would quickly fall back into its Simple Equilibrium shape
it is vulnerable to second-order effects. They are complicated.
-----------------
Now let's talk about second-order effects. The previous example assumed that only a single Segment within the strand is subject to Blended Rotation.
TODO This section is incredibly esoteric and it's tricky to explain. I'm going to need to include animations -- possibly even interactive ones. Even if I explain it perfectly it's almost impossible for anyone to actually apply this knowledge. It would be stupid to delay the rest of the guide for the sake of this section. I'll come back and fill it in later.
-----------------
When applying Blended Rotation to a design, the challenge lies in fine-tuning. You want the overall strand to inherit enough torque to produce a noticeable change in its resting shape (and/or the intermediate shapes formed by the hair during motion), but not too much. And then you must figure out how to allocate this torque among the various Segments. If you focus too much torque on a single Segment, you produce a local deformation in the strand (which is usually unsightly and undesirable). If you spread the torque equally across the entire strand then its motion will feel fake - each "nudge" will occur simultaneously across the entire strand rather than rippling outwards from a "point of collision."
Understanding the principles of Blended Rotation will help you to make good first-guess estimates, and it will help you to recognize when you have an animation goal which this feature simply can't achieve. However, even with perfect knowledge of the principles you'll still need to do a lot of in-game testing, fine-tuning, and refinement.
Dream Big - But Start Small
The introduction of this post mentioned that Blended Rotation is a significant factor in hair-animation behaviour, and here's why: each hair Segment inherits its rotation value directly from the associated anatomical reference object. When that object (e.g. torso, head) twists into a new orientation, the corresponding "nudge" effect is applied to the bound hair Segment(s) instantly. Dynamic Hair is normally very "laggy" - after the head moves, it takes many seconds for the ponytail to swing into its new position. During those seconds, the hair is liable to clip through many parts of her anatomy (or his anatomy). It will eventually settle into an appropriate shape, but viewers will probably be bothered by the clipping even if they understand why it's happening. If the character is constantly in motion (e.g. Auto Mode) then clipping problems will arise frequently.
By making hair strands sensitive to the orientation of anatomy, we can encourage the strand to "move out of the way" of an approaching arm/shoulder/neck/etc before a collision actually occurs. Even if we rotate only a single Segment of hair, SDT's elastic-correction logic will quickly spread the displacement effect throughout the whole hair strand. The elastic-displacement effect will grow weaker as it passes through each successive Segment -- it may be imperceptible when it reaches the hairtip! -- but that's okay. By initiating the "nudge" at the point of greatest collision-risk, we've given our "laggy" hair strand a substantial head-start. The total duration of clipping will be reduced, the maximum depth of clipping will be lessened, and the viewer is more likely to forgive the momentary flaw.
What I'm describing here is a blue-sky goal. In practice, it is very difficult to get a hair strand to hug the body closely when at rest, animate convincingly during dynamic and inertial motion, and consistently avoid collisions -- through Blended Rotation alone. The previous Post included an animated example wherein a constraint (minRotation = 10 degrees) was used to absolutely forbid a dangling ponytail from ever crossing into the girl's shoulder. Feel free to apply both techniques! You may find a set of Blending parameters which works nicely to avoid collision when you're using Auto Mode on the "Self" and "Soft" settings... but then you find that you still get collisions when it's cranked up to "Normal" or "Hard." No problem! Keep your blending coefficients as-is, and then add in a minRotation or maxRotation parameter for the relevant Link(s). You'll end up with a strand which gets elegantly "nudged" away from body-contact during smooth motion, and which gets rigidly "pushed" or "dragged" by the body during violent motion. Whenever the violent motion ends, the hair strand will fall gracefully away from its conformal body-contact position and settle into a resting shape.
If you can achieve all of that, then you've pretty much mastered SDT hair modding.I certainly can't achieve such results, and I'm the one who wrote the damned mod. Please keep your goals reasonable, and don't expect perfection on your very first attempt. When we get to Post 5, you'll see that decisions made while chopping a hair strand into Segments can have a huge impact on the shapes it will be able to take during gameplay.
To achieve the best results with the dynamicHairExtender mod, you'll need to plan out its animation details before you start slicing it into strands. If you're trying to use dynamicHairExtender to "upgrade" an existing hairstyle (especially a static-hair PNG) then it would be foolhardy to immediately script in amplification and anatomical binding. Try adjusting some Link Weights first -- you can obtain a big improvement with only a few minutes of work, and the design process is very straightforward: "look at the shape of this hair at each Link. Is it thick and heavy? Assign it a high linkWeight. Is it skinny or flimsy? Assign it a low linkWeight."
-----------------
One technique that's quite easy to achieve with Blended Rotation is "stacking." When you have a few adjacent strands of similar length and shape, bind them to a common anatomical reference but with slightly different strengths. As the character reaches the end of her range-of-motion, several hair strands will seem to merge together. When sketching out this feature, you can plan for the strands to encounter an obstacle (e.g. back, ear, shoulder, collar) which they must all "wrap around" via a shared path. In the example below, I placed three parallel ponytail strands on the DYNAMIC_HAIR_BETWEEN layer so that they would get visually "caught" in the armpit as the girl leans forward. I then linked them to the g.her.backModContainer with varying strengths -- stronger influence for the inner strand, weaker influence for the outer strand.
If you want to be extra clever, you can try to correlate the hair behaviour with gameplay. For instance, you could fine-tune your hairstyle so that the "hair strands merge together" effect occurs at the same position* as "throat penetration begins" and "girl's eyes go wide with shock." As the girl pulls herself back from the uncomfortable deepthroat position, the merged strands would separate and her hair would settle back into a more natural shape. Of course, that's usually the moment when she begins breathing heavily to catch her breath. Since the strands have different anchor points, the heaving motion of her body will automatically cause the parallel hair strands to shift and sway slightly with respect to each other (you don't actually need to do any custom work in order to make this happen). It's a very subtle animation effect, but it emphasizes the girl's state of discomposure.
* Of course, such fine-tuning of positions will get screwed up if the user decides to load your hairstyle into a crazy upside-down Animtools scene, or if the user has modded in a 24-inch penis. But that's their problem, not yours. You can't please everyone :)
Don't Steal the Spotlight!
You may have observed that most of my examples involve the shoulder. This is a personal policy of mine -- you're free to reject it or ignore it as you see fit. I think that Dynamic Hair should serve as a peripheral element - something that adds detail to the edge of the screen, because the camera - and the viewer's attention - will be focused on the sexual contact.
As our hairstyles get bigger... as our animations get more flamboyant... as we push further into the scene... we tend to call more attention onto the inherent flaws of Dynamic Hair. Such as its inability to interact with semen strands, its unrealistic opacity, the fact that its shadows and highlights remain fixed even as the strand changes its orientation to the scene's hypothetical light-source, and - most importantly - the absence of true collision physics. We also begin to overshadow other elements of the scene which may be very important for the viewer's immersion and engagement - costume, lingerie, tanlines, footwear, tits and ass. In the worst case, a wayward strand of hair might censor out the actual penetration.
Hence, I try to start out by adding a lot of little physics/animation details to a hairstyle. After testing, I scale these effects back (or mix in additional constraints) to avoid encroachment. The shoulder is a handy reference point because it includes a layer transition.
Of course, this policy applies only to very long strands which are flagged DYNAMIC_HAIR_OVER, such as braids and ponytails. If you're creating a cowlick, bouffant, ahoge, bun, drill hair, mohawk, bangs, or anything in DYNAMIC_HAIR_BACK... then you can do whatever you want :)
What does the Mod do?
During initialization, the mod looks up anatomy elements via the dictionaries in SDT's CustomElementLoader class. It attempts to assign each strand an appropriate orientationSource object, based on its configuration parameters. For example, (ModTypes.BODY) and "chest" becomes g.her.torso.midLayer.chest. If the lookup fails (or if the configuration parameters are absent) then the mod reverts to the default: g.her.
After SDT has performed its normal physics calculations (this occurs once per animation frame), the mod steps in and does the following:
for each Segment:
multiply the existing segment.Rotation value by dynamicRotationMultiplier
by default, the dynamicRotationMultipler parameter is 1.0 -- no change occurs
lookup the Rotation value of the orientationSource object. Add (orientationSource.Rotation * staticRotationMultiplier) to the segment.Rotation value
by default, the staticRotationMultiplier parameter is 0.0 -- no change occurs
apply Rotation limits
this process was described in the previous Post. It's important to note that it occurs AFTER rotation blending. Hence, blending coefficients will never cause a Segment to violate its rotation constraints.
Nonetheless, poorly-tuned blending parameters can cause a Segment to oscillate or spasm within its permitted rotation range, so you should still make an effort to test and fine-tune your coefficients.
if any segments have been rotated, move the Links so that their (x,y) positions are in accord with the new Rotation values (refer to previous Post for details)
undo all of the Segment rotations (refer to previous Post for details)
Usage
Anatomical binding is activated by assigning a nonzero value to the staticRotationMultiplier array for one or more of the corresponding Segments. You may choose a specific orientationSource, or you may stick with the default (g.her).
Code:
// This is a "hairsprayed" strand, so we want the top part of the hair to be somewhat rigid while the bottom moves more fluidly
var staticRotationMultiplier = new Array();
staticRotationMultiplier[0] = 0.5;				// Bind the first Segment so that it will strongly mimic the orientation of the head
staticRotationMultiplier[1] = 0.3;				// Bind the second Segment so that it will mimic the orientation of the head, but only moderately
staticRotationMultiplier[2] = 0.1;				// Bind the third Segment so that it will barely mimic the orientation of the head
staticRotationMultiplier[3] = 0.0;				// The fourth Segment (and all after it) are given zero binding; they will dangle limply under the influence of gravity
Here's a more complicated example:
Code:
// This strand falls across the nape of her neck, so we need to nudge it backwards when she straightens her shoulders
var orientationType = ModTypes.BODY;
var orientationElement = "back";

// The corrective nudge is applied only to the two Segments which are near her shoulder.  A slightly stronger nudge is applied to the upper Segment.
var staticRotationMultiplier = new Array();
staticRotationMultiplier[2] = 0.4;
staticRotationMultiplier[3] = 0.2;
Amplification is off by default. It can be enabled by setting dynamicRotationMultiplier to any value other than 1.0 (which means "off"). This modding effect can be used in conjunction with anatomical binding, but it also works fine in the absence of anatomical binding.
Remember that this effect should be applied in moderation (staying close to the default value of 1.00) and that applying wildly-different coefficients to Segments within a single strand will usually produce a silly result.
Code:
var dynamicRotationMultiplier = new Array();
var i;
for (i = 0; i < 50; i++) {
	dynamicRotationMultiplier[i] = 0.98;		// Apply a moderate suppression effect to all Segments within this strand of hair
}
dynamicRotationMultiplier[0] = 0.97;		// Apply a stronger suppression effect to the first Segment
dynamicHairExtender Mod Part 5: Non-Vertical Arrangement
Design Focus
This post is intended mainly for visual artists and designers. If that's your field then you may have felt annoyed by the focus on coding and geometry in previous posts -- hopefully this one will allow me to make amends. I'm going to include a lot more screenshots of the Flash workspace, and try to explain some aspects of the decision-making process, rather than just showing animations of the in-game results (although I'll include those as well!).
You may also be annoyed at the fact that all of my example use crudely-animated primary-color tubes rather than actual hair designs. That's intentional. I want viewers to be able to instantly recognize origin points, edges, and intersections (details which would be cunningly concealed in a proper hairstyle). The use of simple shapes means that I can focus my effort on coding and documentation. I'm hoping that the deliberate awfulness of animations will inspire you guys to subsequently apply these techniques with actual character designs and beautiful colours.
I'm going to include grey reference lines in all of the examples in this post. The intent is that these line will help designers to recognize the displacement and rotation which occurs between "hair strand as seen in Flash" and "hair strand as drawn in-game." This is especially important when we consider hair elements whose stable rest position lies far away from their own internal "reference lines."
Please note that these design examples do not include FLA sample files; those will need to wait until the final post. First: I need some more time to clean them up. Secondly: most of the samples rely on features which don't exist in dynamicHairExtenderV1 -- you'd be able to create SWFs and load them in-game, but they wouldn't animate properly until I send out the next version of the mod.
Compromise
It's fairly easy to implement a hair strand whose rest position is vertical. Refer to SClover's guide on the subject. There are a few technical challenges (mostly involving alignment) but the walkthrough will help you to understand and resolve them. The design decisions are more interesting, yet also more challenging.
You must find appropriate spots at which the strand can be sliced into segments. There are three competing motives here:
1. slice the strand only at points of minimal visual complexity. Ideally: find a zone of completely flat colour without any highlights or shading. When rotation occurs at this joint, it will not create any visible breaks or seams in the internal visual details of the strand.
2. slice the strand only at points of inflection, curvature, or constraint (e.g. hair ribbon). When rotation occurs at this joint, the overall outline of the hair strand will still make sense (because hair ought to flex at such junctures).
3. slice the strand as often as possible so that it can be pulled into a smooth curve by hair-physics. An "S" shape is preferable to a "Z" shape.
this process is fraught with compromise. You'll need to quickly decide which factors are crucial to your project (and/or your character design) and which ones you're willing to sacrifice.
For example - if the character is very haughty/vain then you might opt for a strategy which slices the hair strand at irregular intervals - because your primary intent is to avoid visible seams. The strand may not animate very convincingly, but it will always look fabulous when the character is in a standard "resting" pose.
If the design is visually simple then you can slice it aggressively, so that it exhibits very fluid motion during gameplay.
If the design shows great merit or complexity as a hairstyle (ie. the product of hours of curling and setting by a skilled stylist) then you may wish to include only a small number of joints. This approach will allow you to devote more attention to fine-tuning the physics parameters of each joint, so that the hair can assume different shapes (and reveal its careful workmanship) as the character's head tilts up and down.
There is, of course, a fourth competing motive: time. Even a floor-length ponytail would probably be sliced into no more than ten Segments (smoothness be damned!), because each additional Segment demands a few minutes of additional work for the designer. Similarly, a skilled artist might be able to achieve both artistic fidelity and animation quality, by editing the hair strand's highlights so that they leave behind a few convenient "bare patches" at which the strand can safely be sliced -- but such re-drawing work also takes time.
You must decide how the entire strand will join up with the rest of the hair.
one simple approach is for long dynamic hair strands to be anchored at a point behind the skull:
The skull itself is covered by a static-hair element (could be a cropped PNG; could be a vector drawing). The static element includes a backwards-reaching extension (such as a hairclip or scrunchie) filling the gap which would otherwise exist between the static and dynamic elements.
this approach is fairly easy to plan, test, and implement. We don't need to worry about layer interactions because we simply declare "the ponytail strand is on top of everything else in the scene!"
this approach also supports a very broad range-of-motion -- the character can literally be flipped upside-down and the hairstyle suffers no technical faults. Sure, it's visually implausible: the weight of the strand really ought to apply some tension to the skull hair when she's inverted. Yet we see no clipping, no self-crossing, no bald patches, etc.
alternatively, your dynamic hair strand can originate at a position on the skull:
Dynamic hair strands usually include a semi-circular rotation joint at their point of origin. That's fine for a behind-the-skull ponytail but a strand of hair originating on the skull shouldn't just draw a giant circle on top of her head. You will usually need to have the strand lie beneath a static-hair image.
Careful planning is needed here, especially if you want your hairstyle to maintain a single unbroken outline when the dynamic portion rotates with respect to the static portion.
finally, you can mix the two techniques:
Create a single strand which incorporates the "skull" hair, the hairclasp/ornament, and the entire ponytail. Each must be defined as a separate Symbol (the ponytail, of course, can consist of several Symbol) so that SDT can position and rotate them with respect to each other.
Anchor the strand on the skull and have it extend backwards (with strictly constrained rotation) to a point behind the skull.
Once it reaches the behind-the-skull joint, the strand's rotation constraints can be relaxed so that it begins to droop downwards.
This sort of design should probably include a hair ornament (e.g. clip, barrette, scrunchie) which can explain the tension/stiffness of the proximal segments, while also calling attention to any vertical motion which occurs.
Escaping Verticality
If you're reading this guide, then you probably intend to setup a hairstyle in which one or more strands do not form a vertical line when the hair is at rest. There are several ways to tease hair strands into other shapes; the choice of technique will depend on the length of the hair, its straightness or curliness, its position on the head, and how much you're willing to let it move ("lots of movement is good!" vs "I don't want it to clip through the body EVER"). Some techniques are well-suited to the creation of short-and-bouncy strands (such as bangs and cowlicks) while others work well with long inertial hair strands (which may form an "S" curve during movement). I suggest that you read through all of the examples below before you try to implement them in an actual hair modding project. The rationale is that the techniques can be combined within a hairstyle, or even within a single strand. I encourage you to take breaks, and to experiment with each approach in Flash as you're reading. But please finish reading before you choose an approach for your next major hairstyle project.
It's important to remember that all of the challenges and compromises that we discussed above (slicing hair into strands and segments) also apply to non-vertical designs. If you haven't done any experimenting with Dynamic Hair yet then I suggest that may attempt a few "vertical ponytail" designs at first. Gain some familiarity with the basics before you try to bring the fancy physics stuff into play.
Ideally, you should practice by loading up an existing PNG static-hair which includes a long ponytail, and then trace the vectors, convert the ponytail into a simple dynamic strand, and re-release it as a SWF import. If you run into difficulties then you don't need to mention your attempt to anyone -- just learn from it and move on. If you succeed then you'll have contributed something new to the SDT community! Alternatively, you can practice by tweaking and modifying some of the sample files at the end of this guide.
The Design Workspace
Important rule: when you are looking at a hair strand in Flash, you must be able to trace a single vertical line which passes through the origin point of every Segment. That's what SDT is going to do when it attempts to load your hairstyle. If the origin points don't align then then there will be large gaps between your hair segments when you load the SWF in-game. This rule applies regardless of whether you're making a vertical ponytail for the vanilla game, or a complex hairstyle for use with the dynamicHairExtender mod.
Corollary: the shape that you see in design view will not necessarily resemble the shape that you see in-game when the hair is at rest. If you've used Flash a lot then you probably appreciate the fact that it's a very honest design platform which tends to follow the rule of "What You See Is What You Get" (in terms of how it presents layers, transforms, alpha blending, etc). If you want to complex complicated dynamic hair strands, then we're going to break the WYSIWYG rule. After editing a Segment in Flash, you may not be able to assess how well it aligns with its neighbours until you actually compile your SWF and load it into the game. It sucks. I know. Deal with it.
Admittedly, the compile-test-edit process is much slower and more cumbersome than making live in-context edits within a scene. In fact, you may find it convenient to setup a second Symbol for each hair strand, in which each Segment has been rotated and moved into its expected resting shape. You can find an example of this below (Approach #5: Springy Spiral), in which the components are assembled into a special "mockup" view which is not actually used by SDT but which serves as a handy visual reference for the modder.
Approach #1: Horizontal Hairtips
The first technique that we'll cover has nothing to do with modding or scripting. This technique is perfectly viable for "vanilla" dynamic hair strands and can be used by someone who was never heard the word "Loader."
When SDT initializes each hair segment, it essentially does the following:
draw an imaginary line from the origin point of the Segment straight down (within its own (x,y) space) until you're parallel with the lowermost visible thing in the Segment
treat the Segment's origin as its transformation point (for any stretching or rotation which it will undergo)
pretend that that all of the segment's Weight is concentrated at the end of the imaginary line
this is why it's very helpful to include vertical reference lines in your hair Segments. If you put them on a "Guide" layer then they'll never accidentally show up in SDT, so you can leave them in even when your project is complete.
if the animated physics behaviour does something strange, then you can copy-paste the vertical Reference line into a visible layer (so that it does appear in SDT). Then you'll be able to easily visualize any changes in length or orientation, and get some insight on what's wrong with the physics system (the reference lines are especially useful if you suspect that there's a misalignment problem).
Reference lines are a bit hard to spot in screenshots, though, so I'll opt for the "cartoon" approach -- comically oversized anvil-style weights.
We can "exploit" the SDT segment-handling logic a bit, by applying a Rotation to the "hairtip" (aka the distal Segment). This Rotation must be applied to the Symbol itself; rotating it within the scene will have no effect.
Gravity will pull on the Segment so that the reference line is vertical when the strand is at rest. Hence, the visible "hairtip" will be drawn in a diagonal orientation. Movement of the hair strand will temporarily disturb the verticality of the reference line. Whenever the hairtip is supposed to swing back and forth (e.g. pendulum) then this rotation will be applied with respect to the "kinked" or "diagonal" orientation of the hairtip. As a result, viewers will see the "hairtip" tend to "bob up and down" rather than "swing back and forth."
This approach is most effective when applied to a hair strand which includes few Segments. This example used 8 segments, so 7/8 of our strand remained vertical.
This approach should not be applied to any Segment other than the hairtip itself, because doing so simply creates a visual break in the hair strand.
Approach #2: Angled Gravity
The second technique, like the first, is a "vanilla" approach which requires no modding. It does require a very small amount of ActionScript.
When we register a hair strand with SDT, we can (optionally) define a custom angle for the gravitational force which will act upon that strand. This is often used (for instance, by the SDChan hairstyle) to twist ponytails a few degrees clockwise so that they're less likely to collide with the shoulder. However, modders can specify any number that they want -- you can have a hair strand which runs parallel with the floor, or one which points directly up into the sky.
This approach allows us to setup non-vertical strands, but the strands remain linear. Hence, they tend to be visually uninteresting when at rest. They'll animate smoothly in response to character movement (which is good!), but they'll revert to a perfectly-straight-and-rigid diagonal shape when at rest (which is implausible -- unless there's a jet turbine somewhere off-screen). Hence, this approach works best for short strands (such as bangs and cowlicks) -- where the stiffness effect is less noticeable (and/or where the stiffness effect can be plausibly explained by hairstyling products).
Approach #3: Constrained Rotation and Stiffness
Rotation Ranges
As discussed in Post #2, the dynamicHairExtender mod allows us to setup Rotation Constraints. This is a geometrical concept involving "permitted" and "forbidden" arcs of rotation. For each Segment within a hair strand, we can choose to apply limits which the mod will "enforce" during SDT gameplay. If the SDT physics simulation (and/or character movement and/or Animtools positioning, etc) ever causes a Segment to rotate into a "forbidden" orientation, then the mod will react by pushing the Segment into the closest "permitted" orientation.
In many cases, this will result in a behind-the-scenes tug-of-war. For example: SDT gravity will attempt to pull a Segment downwards, then the mod will notice the change and yank the Segment back upwards. The net effect is that the Segment will seem to "hover" at the pre-defined limit position -- the viewer should not see any actual flickering or oscillation.
We can also choose to leave one or more Segments entirely free (unconstrained).
Visualizing Constraints
Rotation Constraints are specified in ActionScript; they have no "natural" or "automatic" visual representation. The only truly reliable way to understand them is to compile your mod and load it into SDT. This is sometimes impractical or inconvenient (e.g. because some sections of the hair have not yet been created, and so the SDT physics system gets very confused when it attempts to simulate the strand).
When you're planning a hairstyle, you may find it useful to sketch out a set of coloured arcs in Flash. As you move and rotate your Symbols within the mockup, the arcs will help you to predict the set of possible shapes which your strand can take during gameplay. Included below is an example of the rotation arcs for an "ahoge" strand. Note that each Segment in the mockup is at the limit of its permitted rotation -- this is intended to be a stable "resting position" for the strand.
Start at the Top
When you're planning to include Rotation Constraints in your design, it's best to start at the hair root. Choices made at the root will have the greatest influence on the overall shape of the hair. Also, rotation constraints tend to manifest themselves as a visible "stiffness" or "rigidity." Viewers will tend to understand (or "forgive") such effects when they occur near the hair root, because the actual anatomy of hair follicles imposes some natural shape and stiffness onto human hair. If your strand is very long (e.g. ponytail) then viewers will expect it to gradually "relax" into an unconstrained curve.
Hence, you can assign fairly "tight" or "aggressive" rotation constraints on your first Segment, but you should loosen the constraints as you move down the strand.
Example
We'll revisit the hair strand which we used in the previous example -- a ponytail which is rotated 25 degrees clockwise. Instead of implementing this effect via Angled Gravity, we'll use a Rotation Constraint. First Segment will be locked at 25 degrees clockwise; all other Segments will be locked at 0 degrees.
So far, there's not much difference. The 25-degree offset is applied relative to the character's head (instead of the stage itself) so the ponytail will take different shapes as the head is tilted. Still, it's entirely stiff and rigid. Let's leave the first segment contrained (@ 25 degrees) but gradually widen the permitted arc ("reduce the stiffness") for the rest of the strand.
When the character stretches upwards, the ponytail's 25-degree offset (relative to the skull) leaves it pointing almost straight down (relative to the scene). Hence, the remainder of the strand acquires a very slight curve, but it mostly just hangs straight down. When the character leans forward, the "gradually tapering stiffness" effect becomes apparent. The segments around the neck remain fairly stiff, mimicking the orientation of the hair root. As we move past the shoulders the hair is noticeably losing its stiffness. As we reach the hips, the strand's shape no longer has any relation to its original "stiff" orientation -- it's being determined entirely by gravity (and, during movement, by inertia).
Approach #4: Strong Anatomical Binding
Binding
The dynamicHairExtender mod allows us to bind hair Segments to elements within the scene, so that the Segment will be influenced by that element's orientation. Typically, we bind hair strands to parts of the girl's anatomy, in order to create neat animation effects (e.g. exaggerated "flicking" of the hair when the head is thrown back), or to cancel out an unwanted motion of the hair strand (e.g. clipping into the shoulder).
When compared to the previous technique (Rotation Constraints and Stiffness), anatomical binding is much less predictable. It's more difficult for you - as a designer - to guess the final "resting" shape of a hair strand and to predict its path of motion. This can be a good thing - it encourages you to be very experimental and creative, and the results will often surprise the viewer. However, this approach does tend to require more testing and fine-tuning.
The main advantage of anatomical binding is that it can produce smoother animations.
Influence Can be Negative
Each Segment can be made to align itself partially (or fully) with the anatomical reference object. However, you can also choose to give a Segment an opposite influence - so that it tends to "oppose" or "resist" the rotation of the anatomical reference. We can demonstrate this technique by revisiting the "stiff ponytail" from the previous example.
We'll use the girl's head as our anatomical reference. The top of the ponytail (hair root) will be bound at full strength (1.0) to the head. Hence, the first strand should maintain a constant angle w/r/t the head. It should completely ignore gravity, inertia, etc... It will behave like "static hair."
As we move down the strand, we'll taper off this effect. The middle Segments will have zero anatomical influence; their orientation will be determined by physics forces (gravity, elasticity, etc).
As we approach the end of the strand, we continue to "taper off" the influence - extending into negative numbers. The hairtip itself will have -1.0 influence; it will try to orient itself in mirror-image opposition to the head.
The result is that the hair strand will tend to form "C" shapes whenever the head is tilted. When the head is in neutral position, the hair will dangle limply downwards.
We can swap the numbers around, so that the hair root has negative influence while the hair tip has positive influence. We still obtain a vertical strand in neutral position and "C" shapes when the head is tilted, but the convexity has been reversed.
These examples used very strong influence values, in order to clearly demonstrate the potential of this modding technique. In practice, you'll probably want to employ much smaller coefficients (e.g. -0.4 ... 0.4). That way, you'll be able to obtain neat visual effects (such as exaggerated "flicking" of hairtips as the strand settles into a new resting position) and a variety of interesting shapes, without creating something which blatantly ignores gravity and annoys the viewer (as in the preceding animation samples).
Approach #5: Invisible Anti-Gravity
Playing with Anti-Gravity
This technique uses very little in the way of geometry or advanced modding. Instead, it requires us to think creatively about physics forces and the exact meaning of "a strand of hair."
If you've followed the previous posts in this guide, or done some experimenting on your own, then you're probably familiar with weightless or floating Links. These Links defy gravity, allowing us to create a hair strand with unusual properties. For example: if the lowermost (distal) Link in a long ponytail is assigned a negative Weight then it will float during gameplay, causing the hairtip to curve upwards.
This technique is fun but not especially practical. SDT is sensitive to Weight in its pseudo-friction logic, which means that the "floaty" parts of the hair will tend to move strangely. Even if their vertical positioning ("amount of hairtip curvature") is appropriate, the negative-weight Links will exhibit an excessive amount of horizontal drift.
Finally, there's a perennial problem: any Segment which connects a negative-Weight link to a positive-Weight link will almost always become severely kinked. Such kinks are usually undesirable because they make the hair strand look wrong.
Hidden Segments
The SDT physics system understands (and "cares about") the size of its Segments, because it uses vertical size in calculations involving stretching and elasticity. SDT does not, however, care about visibility. We can therefore assign a strong Alpha-blending effect to a Segment of hair (making it nigh-invisible), and SDT will treat it exactly the same as a fully-visible Segment. We can push the Alpha-blending to 0% (total invisibility) and SDT will still include the hidden Segment in all of the relevant physics calculations.
Presumably, we won't apply alpha-blending to any of the actual hair Segments. Instead, we'll add new invisible Segments to the end of our hair strand. These Segments serve as "handles" -- we can apply physics forces to them, and they will tend to pull their neighbours (the visible parts of the hair strand) along for the ride.
Note: because this is a tutorial, I'll use a 25% blending factor. The special Segments will still be visible, but you should be able to clearly distinguish them from the "normal" (fully-visible) Segments in design view and in-game screenshots. I advise you to do the same during planning and testing your own hairstyles because it will be easier to identify problems; you can switch to 0% when you're happy with your hair strand's shape and its animation patterns.
Note (2): this example will put the invisible physics handles at the distal end of the strand ("beyond the hairtip"). Placing such elements at the proximal end (hair root) will probably be ineffective, because the hair root is anchored. You can also splice very small invisible Segments between visible hair Segments and thereby exert physics forces (lift, drag, etc) in the middle of your strand. I haven't done much experimenting with such splices (because it tends to produce kinky shapes instead of smooth curves) but it is a valid technique.
Hidden Anti-Gravity Segments
If we assign negative Weight only to special Segments which we've made invisible (via Alpha-blending) then many of the problems become more manageable.
the "floaty" parts of the hair will tend to move strangely
The "floaty" parts of the hair will be invisible, so we don't care.
"any Segment which connects a negative-Weight link to a positive-Weight link will almost always become severely kinked"
The most-kinked Segment will be invisible. We still need to fine-tune physics parameters to ensure that the less-kinked visible Segments curve smoothly.
"negative-weight Links will exhibit an excessive amount of horizontal drift"
all of the visible Links have a positive Weight, so they won't drift. The invisible Links will continue to drift, and will exert a slight elastic effect on the visible ones, but we can fine-tune the physics parameters so that disruption will be minimal.
Result
This technique is viable, but I've yet to find an actual hair design for which it's appropriate. Here's an example that I was able to put together.
A simple ponytail.
The same ponytail, but with a negative Weight (anti-gravity) assigned to the hairtip. The tip gets kinked while the remainder of the ponytail barely "notices" the change. Ugly.
We can revert to the original ponytail and then assign the anti-gravity stuff to new invisible Segments which we add onto the end of the strand. I've represented them as a "balloon on a string" for the sake of visual clarity -- this is of course not necessary (the SDT physics sim doesn't care about shapes). We can then assign a very large negative Weight to the "balloon." The balloon will become visually distorted due to the peculiarities of SDT physics (it gets stretched along its vertical axis) but we don't care because it's invisible. As a result, we can generate a very strong anti-gravity effect -- one which suffices to pull the entire strand into a graceful curve (although the effect it still concentrated at the hairtip).
Our new ponytail exhibits one noteworthy animation quirk. You can force the strand to "curl in on itself" by moving the character to the left. This is an inertial effect and hence the excess curl is temporary; the strand will smoothly uncurl itself (revert to its resting shape) within a few seconds. But, if you don't give it time to naturally uncurl and instead move the character to the right, then the hair will quickly discharge its pseudo-tension via a "whiplash." As mentioned above, I don't know of any character designs wherein this example would be useful -- actual human hair cannot sustain enough spring tension to produce such a dramatic effect. Nonetheless, it may be possible to apply this effect to a different type of SDT mod - such as clothing or accessories. Let me know if you have any ideas :)
dynamicHairExtender Mod Part 5: Non-Vertical Arrangement (Continued)
Approach #6: Springy Spiral
This technique will create a spiral hairstyle. It's intended for small strands (notably "drill hair" in anime character designs) but we'll present it as an enormous ponytail. Why? Because the large size makes it easier to demonstrate some of its interesting characteristics and behaviours.
The artwork in this example is going to be rudimentary -- it's mostly about "process" rather than "results." There's an important weakness in the technique which will prevent us from achieving high visual fidelity, so I'm not going to put much effort into it (example: the background curls ought to be foreshortened). Later on, we'll see an example of a spiral hair strand which actually does look halfway-decent.
We're using a conventional approach to Segment intersections here (as described in SClover's guide), so we'll setup a semi-circular joint wherever two Segments meet. Since they're meeting at an acute angle, we end up drawing an almost-complete circle. I've drawn in a grey reference line connecting the centers of these two circles, since they will serve as the attachment point for the two neighbouring Segments.
I've used a darker shading on the "background" curls of the spiral in order to readily distinguish them from the foreground curls. If this was a proper hairstyle then we'd probably use less contrasting colours, because we could convey the depth-of-field information via changes in the shape and thickness of the strand. Alternatively, we could use the same colour throughout the strand, but apply lots of shadow details to the background Segments and lots of highlights to the foreground.
Note the "opening" at each juncture. SDT will always give the proximal (upper) segment priority over the distal (lower) segment. If we want the lower segment to appear "on top" then we must "cut away" the corresponding portion of the upper segment. This lesson is somewhat unique to the Spiral hair example. With "straight" hair strands we tend to place joints at areas where the two adjoining segments have the same colour, and therefore cutouts are unnecessary. In this case it matters because the shape of the cutout dictactes the colour transition (and hence, we rely on the cutouts to give a visual impression of "crossover").
If you want to get fancy, you don't need to use a hard-edged cutout. Instead, the end of each segment could be an alpha gradient so that the assembled hair strand will show a fade/bleed/penumbra effect at each juncture. We're not going to bother with fancy visuals in this example.
Remember that our Symbols must always be rotated so that their internal reference lines are vertical.
Here's a quick mockup; I've pulled in a few of the Symbols, rotated them, and fit them (roughly) together. Looks reasonable.
One important principle to remember here is that each curl of the hairstyle MUST be an independent Symbol. You can't just paste a dozen instances of the "Background Curl" onto your stage and then scale them down (95%, 89%, etc). Well, technically you can... but SDT will partially override your transforms and your hair strand will look ridiculous when you load it in-game.
What you CAN do, of course, is create a single "Background Curl" Symbol and then create several new Symbols, each of which consists of a copy of "Background Curl" with a transformation applied. That's what I've done here.
Now we need to get everything onto the stage and assemble it. We need to get the origin point of each Segment to link up with the cutout of the preceding segment. This can, of course, be done by hand - using careful nudges at high zoom. But there's an easier way to do it. Let's return to our Symbols.
We'll hide the actual artwork (by toggling it into a "Guide" layer). Now, when the Symbol is placed on the stage, only the grey reference line will be visible.
The "snap to" option in Flash will allow us to perfectly align all of our elements.
Now we can toggle the artwork back into existence and admire our assembled hairstyle! The first thing that we notice is that it's incredibly LONG. I've added the body reference elements to this screenshot, just to emphasize the scale. This is an obvious example of a principle that was mentioned earlier - the design view of a hair strand in Flash can differ considerably from the in-game view. "What you see" is not "what you get."
Now we can assign some physics parameters, compile the SWF, and watch the strand bounce around.
Sidebar: ActionScript
In order for the spiral to animate convincingly, we must inform the simulation that each curl of the spiral is lighter than the one which preceded it; the upper segments should move ponderously while the hairtip should be able to flip about lightly. Scripting each Weight value by hand would be tedious, so it's a great opportunity to use a loop.
Code:
var i:int = 0;
var linkWeight:Array = new Array();
for (i = 0; i < 15; i++)
{
	linkWeight[i] = 30-(i*0.5);	// Begin with a high weight; taper down in conjunction with the thickness of the strand
}
This approach is more concise than a series of 15 separate assignments. However, its real value lies in the ease of iteration. We might test our hairstyle in-game, decide that the hairtip is "too springy", and edit a single line of code:
Code:
linkWeight[i] = 20 - (i * 0.3);
The spiral will still exhibit a gradual tapering of its simulated Weight, but the taper will now be slightly weaker and so the hairtip will be heavier (less springy) than it was before.
If our hair strand's physics can be specified using a bit of algebra in a loop (instead of 15 separate lines of code!) then we'll be able to fine-tune it more quickly.
Important Restriction: Flash enforces strict layering priority between objects. If you want to have two spirals (or helices) sharing an axis then you're going to run into trouble -- one of them will always eclipse the other (rather than alternating over/under, as one might naively hope). There's an advanced technique which sidesteps this problem (scroll down for details) but it involves additional work.
Approach #7: Bouncy Hat
Animation Sample
Design Details
This is a variation on a theme that we've already explored: Constrained Rotation and Stiffness. It's notable because its origin point is on the neck rather than the head, and because it consists of several "short and flexible" segments (the neck strap) followed by a single "long and rigid" segment (the hat itself).
The hat Symbol is tilted with respect to the vertical reference line. This is an application of the very first technique that we covered -- "Horizontal Hairtips." We could have kept the hat perfectly aligned with the string and tinkered with the physics parameters to achieve the same overall result. In this case, it was easier to grab the Transformation handle and spin the hat until it looked "right." Adjusting angle values in ActionScript is a valid approach, but it lacks visual immediacy. Another reason to apply the rotation in Flash is that the hat was actually vertical in the reference/source artwork because the character was standing upright. We rotated the hat it in order to make it fit onto a kneeling character, but this meant that the highlight pattern on the hat was slightly inappropriate (with respect to a hypothetical light source directly above the scene).
[http://]
After rotating the object so that its orientation in Flash matched its "average" orientation in-game, we gave ourselves a proper "context" in which to redraw the highlights.
[[img - highlight gradients]]
The person who requested this hat was kind enough to vector-trace it; they opted for a gradient highlighting pattern to make the hat feel more realistic and visually interesting. I think that the design looks cleaner (and more consistent with SDT art style) with a simple flat-colour highlight, but Flash makes it [i]incredibly easy[/i] to accommodate both options. So we simply deliver two copies of the SWF.
[b][color=green]EXPANSION HOOK[/color][/b]
I haven't tried to do any hue-shifting stuff with dynamic hair, but I assume that it's possible. I'll ask the senior modders about it. If we can get a proof-of-concept hairstyle to work with color adjustment then we might be able to add a set of ARGB "hair dye" sliders to the UI.
[b][color=green]END OF EXPANSION STUFF[/color][/b]
[/spoiler]
[u]Weighting is Crucial![/u]
[spoiler]
There's one aspect of the design which isn't evident in the screenshots but which is very important for the animation behaviour: the "hat" links have been assigned a very high Weight while the "string" links start out very light and acquire more Weight as we approach the hat. This is important! We want the hat itself to impose a great deal of tension on the string (drawing the string "taut" when the hat is at rest), but whenever the hat bounces upwards the string will wave around. The "waving" effect will be most prominent at the point of least Weight, which coincides with the center of the girl's neck. The (typically-) light skin of the neck contrasts with the dark earth tone of the string, allowing the viewer to clearly see the animation effect. It would have been more [i]realistic[/i] to place the greatest amplitude further [i]back[/i], but then the effect might have been difficult to discern against the background. [SIZE=11px]I may be a computer programmer, but I'm still allowed to put style over substance.[/SIZE] Here's a quick "heatmap" showing the Weight distribution.
Note that the lowermost Weight is actually "outside" the hat. If you think back to the first example in this post ("Horizontal Hairtips") then you'll recall that the position of Links used in SDT's physics simulation need not actually correspond to the visible shapes that we're trying to present. It's okay to "deceive" the simulation a bit, if it leads to better in-game results.
You can, of course, extend this design using the techniques that we've covered in previous sections. For example, if you wanted the hat to be more "floaty" then you could attach an invisible anti-grav segment to the end of it.
Accepting Imperfection
Let's talk about the limits of physics modeling and the importance of "project scope." Consider the hat's neck strap in the following two screenshots.
The left image looks okay; the string is under tension (because it's carrying the entire weight of the hat) and is drawn taut against the neck. The second screenshot looks wrong: the weight of the hat is resting mainly against the back and the strap seems to be slack (it's bulging up above the shoulder), yet the strap is still pressed tightly against her neck.
Ideally, the "front" of the string ought to be animated -- it should slide down-forward slightly when the string tension is relaxed. It's easy to mockup this idea (see screenshot above). It's relatively easy to setup Segments which will "obey" the new fulcrum/anchor point. It's really fucking hard to get the whole thing to animate properly - the additional axis of motion hugely increases the risk that the hat will clip through the body. We're forced to tightly constrain the motion of the hat - shaving 30-40 cm off of its total range - in order to provide 2-3 cm of motion for the neck strap. That's a terrible bargain; the viewer probably won't even notice the shifting neck strap because their attention will be focused on the inexplicably-stationary hat.
Hence, I abandoned the attempt. The "front" of the neck strap is rigidly anchored to the skin below the larynx. We don't allow it to show any slack, nor do we attempt to "indent" it into the skin when it's under strain. It would be really cool to see such features implemented (skin-indentation in conjunction with a "collar and leash under tension" would be a challenging but fun modding project). But this project was supposed to be about a bouncy hat, and it was foolish of me to spend time on "conditional slackening of the neck strap." Just writing out those six words makes me feel stupid :)
Realism is a laudable goal, but it can lead you astray. When you've sunk many hours into a physics-enabled object, it's easy to get seduced into putting more and more effort into tinier and tinier details. Try to set goals at the start of any physics-modeling project, and be honest with yourself when you assess your progress. If you find that a minor physics feature threatens to consume many hours of work (and/or jeopardize work that you've alredy done) then discard it and move on. You can always return to the project later on, with greater wisdom and some new tricks up your sleeve. You can also share your FLA file and invite the forum community to try and achieve the desired effect.
Dealing with Anatomy
The cowboy hat example carries an important design flaw. Its physics parameters are fine-tuned so that it will hover near the body when at rest. It's supposed to swing/bounce up and outwards during body movement (it's a cowboy hat... but it can also be a cowgirl hat, if you know what I mean) and then settle back into its resting orientation. The rest position depends on the girl's posture - it should nestle against her shoulderblades when she's upright, slide down her back as she leans forward, and dangle into empty space when she leans back.
Unfortunately, this fine-tuning is invalidated as soon as the user touches the "Body Scale" slider. Our fine-tuned hat clips through large bodies, stubbornly hovers inches away from small bodies, and generally looks like the work of an incompetent amateur when the slider is set to anything other than "the value that the modder was using while testing the hat." It even suffers from clipping with the body slider at Default, which is disgraceful.
Lesson: when you're creating a physics-enabled object which relies on fine-tuned physics parameters, it's a good idea to release a Character Code alongside your object so that players can experience it "the way that it's meant to be played."
Similar problems arise when you load a custom position via Animtools. The hat has been fine-tuned for a fairly narrow range of body-postures, and it begins to clip as soon as we exceed the fine-tuned range.
EXPANSION HOOK
It's theoretically possible to setup hair-physics parameters which are mathematically related to anatomy. "The weight of this Link shall be (20 + 0.45*bodySliderValue)" or "This strand shall be rotated 10 degrees normally, but the rotation shall increase to 20 degrees if either of Her Arms is in the 'back' position". Hair strands (or accessories, like the cowboy hat) would reshape themselves in real-time based on changes made to the scene configuration.
I don't plan to implement this feature, because:
I really doubt that anyone would bother doing enough testing to suss out the necessary algebraic formulae which will make their hairstyles and accessories fit with the entire bodySlider range.
Compare/contrast - when someone creates a new Clothing or Armor mod in Skyrim, they usually just get it to fit onto their own prefered body model. They could simultaneously release a half-dozen variants for all of the popular skeletons, body-replacers, animation packs, etc... but they usually don't bother.
based on some very limited testing, it seems that linear coefficients are insufficent. I might need to support quadratic formulae.
most hairstyles will presumably target a particular character archetype (e.g. petite, robust). If you tell a modder, "Your anime-waif hairstyle clips through my big muscly amazon girl. Pls fix." then they're likely to retort, "Thank you for your feedback. Now put the waif hairstyle on a waif body and stop wasting my time!"
if anatomy-clipping due to bodySlider turns out to be a major problem, then this isn't the ideal solution (because it requires visual artists to do very tricky math, on top of all of the effort that they've already put into drawing and animating the components of their design). It would be more productive for me to put effort into a separate mod (e.g. automatic body-clipping-detection and hair-strand-deflection) which would solve the problem directly without putting additional workload on artists.
END OF EXPANSION STUFF
Drawing vs Coding
Note that each Segment of string is perfectly straight - there's no curve "baked in" to the artwork. The convex shape is established during gameplay entirely by the physics system. The string can, during fast movement, exhibit localized concavity (and inflection points, of course). Each string Segment must be quite short in order to allow the overall string to appear "rounded" during gameplay. If we had used a smaller number of longer segments then we'd see sharper corners.
The design of this cowboy hat suggests that its creator prefers to focus on math and coding. A visual artist might prefer to sketch out a nice curve (and maybe add a rough "texture" to the leather of the string itself) but they would probably include very few hinge points for the physics system. After all, each one of those hinge points will introduce an ugly kink into your beautiful curve!
You can contrast this "physics-based design" approach with the Spiral hairstyle which we saw earlier, which used simple physics to achieve a zig-zag shape and then relied on hand-drawn curves to create the visual effect of a spiral. It would have been technically feasible to create that entire Spiral using straight segments of varying lengths, wired together with a complex set of physics rules. I opted not to do so because I felt that it would simply confuse and alienate the intended audience (artists and designers). The approach that we used (pre-baked curve segments) strikes a balance between:
animation fidelity
the design work would have been easier if we had placed the joints in the middle of the spiral rather than at its edges. However, the resulting animation would be less fluid.
capacity for visual detail
Imagine a curvy hair strand which consists of 20 very short segments. Now imagine that you're trying to draw a highlight which spans several adjacent segments. The work will be very challenging and your carefully-drawn pattern may look bad during gameplay because the mutual rotation of the Segments spreads it out into an ugly smear!
If a hair strand is sliced into short Segments then it becomes very difficult/tedious to add any internal visual detail to the strand. You can mitigate this problem by drawing all of the internal details before slicing, but the small segments will hinder any subsequent attempt to revamp, edit, or correct your artwork.
By using long Segments we maintained a capacity to subsequently add shadowing or highlights to the Spiral hairstyle.
design/planning complexity
The design relies on a mixture of physics scripting (to bend the hair strand into a zigzag shape during gameplay) and drawing (to "round out" the zigzag corners and make the strand look like an actual spiral).
The mixed approach requires a "broad but shallow" skillset from the modder. It requires a bit of visual design work (mostly editing Paths) and a bit of physics scripting (which can be borrowed/adapted from sample projects).
The hair strand's appearance in the Flash design view gives the modder only a very rough idea of its actual in-game appearance. Such "visual infidelity" increases the complexity of the project, because the designer cannot rely on WYSIWYG editing and must carry an additional mental workload.
I expect that most hair-modding projects will be similar to the Spiral rather than the Hat. That is to say -- I expect that they'll begin with detailed artwork, subdivide the artwork into strands and segments according to an animation plan, and then add physics parameters as the final step.
--------------------
If you're not an artist but are instead a big computer nerd (like me) who sucks at drawing then I hope that the hat can serve as an inspiring example. It shows that you too can create sexy curves and bouncy animated hairstyles. You don't actually need to have a steady hand, or an eye for colour, or an intuitive understanding of human anatomy. All that you need to do is trace out a few simple geometric shapes and then spend hours testing and fine-tuning the physics parameters which unite your simple shapes into a graceful curve. You do enjoy spending hours staring at code, repeatedly re-compiling it, and Alt-Tabbing to run tests... right?
When you're satisfied with the animation of the hairstyle, you can hand it off to a visual artist and ask them to fill in the highlights and shadows. They may also need to draw in a few extensions which will mask the rough edges between your dynamic strands and the "static" elements of the hairstyle which you vector-traced from the reference image. Or perhaps you'll have gained enough confidence in your own creative abilities that you'll take a shot at shading and assembling the hairstyle on your own.
Approach #8: Advanced Layering
Layering is Ordinal
Let's revisit the Spiral hair strand that we created earlier. You probably noticed that the joints looked awful. That's partially because I'm a poor artist, but also because I didn't want to put a great deal of thought/effort into a design where extra effort would produce lousy results. We can do better. Let's grab a spiral-haired anime character to serve as a reference.
The chief obstacle is that SDT enforces strict visual (layer) prioritization among Segments, from hair root to hairtip. Distal segments will ALWAYS be "behind" proximal segments. If your hair strand has joints in which "background" elements meet up with "foreground" elements, then there's a 50% chance that it's going to look wrong and that you're going to need to put in huge effort to make it look half-decent. If you try to implement a spiral design (where every single joint involves a foreground-background intersection!) as dynamic hair then you're going to run into frustration and disappointment. Let's ignore that problem for now.
We begin by tracing the reference image. I'm going to half-ass the actual Paths and just throw in lots of gradients. My intent isn't to achieve a high-fidelity copy of the reference image; I want the result to be "good enough" to prove that SDT can faithfully render a complex-layered dynamic strand. Of course, the quality of the hair strand shown on-screen cannot exceed the actual amount of effort put into it by the artist or modder.
Next, we move the strand into the desired position on the head.
We mark off the points of intersection (which will become Links in the finished strand) and begin slicing our vector-traced object into Segments.
Done. Each Segment is now defined as its own Symbol. They've been laid out in proper order; the origin point of each Segment lies along the common vertical reference line. Let's assign some physics parameters and then see how it behaves in-game.
Oops. We mentioned the layering problem earlier but we didn't actually do anything about it. Proximal segments always have visual priority. Half of our intersections look good, the other half look stupid. Let's fix it.
Use a Second Strand
The fix is very simple in concept: split the hair strand in two. Maintain the exact same shape, but put all of the background elements into one strand and all of the foreground elements into another. Then we ensure that the "foreground" strand occurs later in the ActionScript load order. The foreground strand will be drawn on top, therefore all of the foreground Segments will be drawn on top of the background Segments, and we'll achieve the desired visual effect.
The implementation is a bit trickier. We cannot actually remove any Segments, because doing so would cause the SDT physics system to treat the two strands differently. Instead, we create an exact duplicate of our existing Strand and leave both of the strands intact. But we apply an Alpha effect to the "unwanted" Segments in each strand so that they disappear from view. SDT will still include them in its physics calculations, but the player won't see them.
These screenshots show a 50% Alpha effect (for clarity). You should actually apply a 0% Alpha effect - total invisibility.
Here's the Main page (note the load order in the ActionScript!). We have two separately-defined hair strands which must be registered independently. Neither Flash, nor SDT, nor the dynamicHairExtender mod recognizes any particular relationship between these two strands. The mere fact that they're anchored in the same (x,y) position is not important, and the fact that they share a common set of components is not "meaningful." You might ask - "if there's no relationship between the two strands, how do we ensure that they'll actually 'stick together'? Aren't they at risk of getting separated during rapid movement?"
SDT hair physics is deterministic - it does not rely on random numbers. Therefore if we setup two hair strands with identical origin points, Segment lengths, Weights, physics coefficients, etc... then those two Strands will remain perfectly aligned at all times. The "if" clause in the preceding sentence is VERY IMPORTANT. After splitting the strand, you must remember to apply any subsequent physics-parameter changes to all copies. In this case I finalized my physics parameters before performing the split, so no extra work was needed.
Result
Here we see the finished spiral. An animation sample has been provided below. Note that the actual dynamic "bounciness" in this strand is quite subdued. If this was a real modding project then I would probably add some anatomical influence and amplification to each segment. I didn't do any fine-tuning here because the crucial lesson is layering rather than physics (which we've covered elsewhere).
Flash Performance
If you have a working hair strand, then the design/development cost to split it should be only a few minutes. If you've already fine-tuned the joints in order to work with the proximal-distal layering rule, then you may need to redo some of your work. Please don't blame me! I warned you to read the whole guide before putting in a lot of work on custom hairstyles!
The runtime cost (FPS impact for the player) is moderate. The additional math/physics cost is trivial, but we're adding an alpha-blended Layer to the Flash scene and so each frame of animation becomes slightly more expensive to render. It's nowhere near the FPS cost of a bukkake scene, of course.
If you have a single ponytail and you want accurate background/foreground behaviour then go ahead and split it. If your hairstyle already includes a dozen separate dynamic strands then I suggest that you make a backup of your FLA and SWF before you start splitting anything. If you find that the end-product carries a significant FPS penalty, then you can release both the finished file and the backup file ("high quality version" vs "low quality version") and let players make a choice between performance and visual fidelity.
Priority Reversal
What happens if all of your intersections look wrong? Perhaps you're new to SDT hair-modding and you accidentally draw the semi-circular joints on the distal end of your segments instead of the proximal end. Or perhaps you're working with an unusual hair design whose joints don't "work" unless you drawn them backwards.
There's a simple answer: the dynamicHairExtender mod allows you to flip the priority rule.
Code:
var reverseSegmentOrder:Boolean = true;
In the example below, the segments have been assigned unusual anchor points which are quite far away from the actual point-of-contact between each Segment and its immediate neighbour. The reasoning is a bit difficult to explain, but let's summarize by saying that it makes the overall hair strand seem more "curly" as it bounces around. As a consequence, it's possible for the mutual rotation of two adjacent Segments to create a visible gap between them. As a countermeasure, we've drawn an "extension" on each Segment which reaches downwards to partially cover its neighbour.
Unfortunately, the "extensions" are always visible. They cover up some of the internal visual details of the strand, and they simply look "wrong." In design view, we can obtain the desired visual effect by changing the visual order of the Segments to "bottom up" instead of "top down." Making this change in the Flash design has no effect on the in-game behaviour, but it allows us to verify that a simple "reversal" will suffice. We take the code snippet shown above, splice it into the ActionScript for this hair strand, and then we can compile our SWF and see that our hair strand uses the opposite visual priority.
Note: as usual, the dynamicHairExtender mod applies configuration parameters on a case-by-case basis, and it will apply the default rule ("proximal Segments have visual priority over distal segments") to all hair strands unless it's given a specific order to do something different. If you want all of your strands to use reverse-ordering then you'll need to copy-paste the code snippet many times. It's possible to have several strands with different visual-ordering rules within a single hairstyle: normal strands, reverse-order strands, foreground-background split strands with special Alpha effects, etc...
Approach #9: Convergence and Divergence
The previous example used two separate hair strands with exactly identical physics parameters - they differed only in appearance. But what if we want to create a compound hair strand in which multiple strands dangle and swing about according to their physics parameters, then get forcibly gathered together at a single point (e.g. by a hair ornament), and then spread out from this point according to their individual physics rules? The answer is: "we can do that - but it requires additional planning."
Preview
TODO - this section cannot be completed at present. I need a feature which won't be implemented in the dynamicHairExtender mod until V3, and I'd prefer to walkthrough an actual modding project (e.g. Angela Balzac) rather than putting together a "fake" tutorial project.
Approach #10: Bistability at the Shoulder
Discussion
We've already seen an example of rotational bistability being used with a narrow permitted range -- which allowed us to create a dynamically-animated ahoge strand at the top of the head which could point either forwards or backwards. We can use a similar technique to create a hair strand with a narrow restricted range. Our hair strand will be able to rest against the character's back, or lie comfortably along her front (e.g. against the collarbone) but it will never be allowed to "dangle down" into the shoulder (because that looks wrong and stupid).
As with the ahoge example, the character must move in order to "flick" the strand from one of its stable positions into the other position. The minimum magnitude of the head-flick depends on the size and weight of the hair strand - we don't specify this in code; it's an "emergent behaviour" of the SDT physics system. As a general rule - strands which are stiff and light are easier to flick; limp and heavy strands are more difficult to flick. You're free to fine-tune these parameters during play-testing, of course. For example: you may want a hair strand which is somewhat difficult to flick, so that it tends to stay in-place during normal gameplay, but gets flicked often when you activate Auto Mode and switch to "Hard" style (because the flying hair strands add a sense of urgency and danger to the scene).
This technique is best-suited to short strands. If you apply this technique to a long strand then players may have difficulty actually getting the strand to reliably flick across the body. It will also be difficult for you to fine-tune the strand so that it looks "correct" when resting against her front. Remember: the SDT hair-physics system does not "understand" breast size and so it's extremely difficult to create a hair strand which will believably rest against (or nestle between) breasts of various sizes.
TODO - this section is incomplete at present. I'd prefer to walkthrough an actual modding project (e.g. Calamity) rather than putting together another "fake" tutorial project.
UPDATE - It's actually somewhat difficult to setup a bistable shoulder strand that doesn't look like crap. I'll do this via a fake project so that I can dissect it properly.
Animation Sample
From the Top
This design is a bit more complex than some we've seen previously, in that it involves several interacting physics tweaks. Segment 2 is the most crucial because it's the only part which possesses a strict rotation limit. However, the rotational "flip" behaviour depends on the origin of Segment 2 (which is determined by the preceding Segments) and on the elastic/gravitational influence of the remainder of the strand.
I'll build up the hairstyle in chunks, explaining the physics rules (and providing screenshots) for each chunk. Please note that the behaviour of the strand will change as we extend it. This isn't because I'm being sloppy when grabbing screenshots, or because I'm making sneaky changes between screenshots. It happens because SDT's physics-simulation causes Segments to influence each other.
Plan and Alternatives
It is possible (albeit very difficult) to create a hair strand which completely avoids clipping through the body. Perfect avoidance usually entails very strict limits on rotation and/or a very small number of segments (to simplify configuration and testing). Both of these options cause the hair to look less fluid and less believable -- which defeats the purpose of the endeavour.
Fuck that; I'm going for an elbow-length strand with eight Segments. I'll use an animation strategy which allows clipping but seeks to minimize its duration. When the hair strand encounters the upper arm, it will initially "collide" and "resist" any deeper penetration. Upon reaching the critical point, the strand will magically "phase through" the arm as quickly as possible, and settle into a new stable position on the other side.
We could have attempted an animation strategy in which the strand would "snake up and over" the collarbone whenever it wants to pass the arm... but that's very hard to implement for a strand of this length. I might apply that technique for the Calamity Rose hairstyle.
Segments 0...1 - Obstinacy
The hair strand is anchored just behind the ear. We want the initial Segments to be somewhat stiff and uncooperative. Rationale:
Segment 2 is bistable, and it will need to "flip." Whenever it flips, its elastic influence will naturally attempt to "drag" the preceding Segments (0 and 1) into its new orientation. If they actually DO follow it, then there's a danger that Segment 2 will immediately FLIP BACK into its former position. In the worst case, it could vacillate between its two stable positions; viewers would see it flicker back and forth.
To avoid this risk, we'll make both of the initial Segments partially immune to SDT physics.
Segment 0 is very close to the ear. We need to limit its rotation so that it doesn't actually clip through the ear when the girl's chin is lowered.
This will be achieved via Rotation Constraints, but they'll be the "familiar" sort - a small Permitted range (which includes "straight down") and a broad Restricted range (which covers the "unnatural" orientations).
This is the intent -- even when the chin is forced downwards to an unnatural (neck-breaking!) degree, the hair strand wrap around the ear rather than clipping through it.
Here's the design view, with arcs drawn in to help visualize the Rotation Constraints.
The blending coefficients shown above will cause these two Segments to be somewhat "stiff." They'll be influenced by the orientation of the head and will mimic it, and they'll be less susceptible to the influence of elasticity from adjacent Segments (and gravity from the scene). Note that these are fairly "weak" effects - our coefficients are only 0.1 and 0.2. In a previous example, we used coefficients of 1.0 to achieve prominent animation effects. The intent here isn't to be especially visible, but instead to "set the stage" for the bistability effect (Segment 2) and ensure that it doesn't vacillate.
Design Note: When implementing this strand, I initially used strong binding coefficients (1.0) in order to ensure a stable baseline for the bistability effect. This approach worked, but the "stiffness" effect was excessive and distracting. I therefore gradually reduced the coefficients (through several rounds of adjustment and testing) until I obtained the values shown above.
Segment 2 - Bistability
Segment 2 is located well above the shoulder, near the base of the skull. You might expect that the bistable Segment would be placed at the shoulder, so that it can neatly "wrap around" it. That's a bad idea -- it forces us to apply a very heavy kink and the strand ends up looking stupid.
Instead, the key bistable Segment is placed higher up, and we'll find that a relatively small kink (a narrow "Restricted Range") suffices. The forbidden range extends 15° clockwise from the vertical, and 20° counter-clockwide. Remember: rotation constraints are always enforced with respect to the orientation of the previous Segment. It is actually possible for Segment 2 to point straight down... but only if Segment 1 is pointing in a different direction.
Design Note: why can't we extend this reasoning, and put the bistable fulcrum farther up the strand? The answer is: I tried that and it looked wrong. The hair strand showed a soft "deflection" effect as it wrapped around the shoulder, which would make a lot of sense for a long and heavy strand. But this strand appears very thin and light, so I wanted a tighter arc. I wanted the strand to seemingly "collide" with the sholder and hug its contour fairly closely.
Note the negative sign on the staticRotationMultiplier coefficient. We want Segment 2 to oppose the orientation of the preceding Segments. This opposition makes it easier to "flip" the strand, because Segment 2 is never "comfortable" if it's in alignment with the preceding strands (e.g. when resting against the shoulderblades or collarbone). Even if we omit the Rotation Constraint, Segment 2 will tend to form a kink because of its staticRotationMultiplier parameter. The constraint tends to enlarge this kink, and hence it serves our overall goal ("avoid shoulder-clipping").
Here's a collage of screenshots showing the in-game behaviour of Segments 0-3:
Segments 3...7 - Curvature
The remainder of the strand is fairly simple. We apply simple Rotation Constraints to achieve a stiffness effect, so that the lower Segments will inherit the kinked "shoulder avoiding" orientation from Segment 2, and then round it off (under the influence of gravity) into a pleasant curve.
The amount of stiffness (magnitude of the rotation limits) is arbitrary. It's actually somewhat difficult to choose a value, because we don't really observe any curvature in either of the bistable resting positions. In the standard SDT scenario, hair curvature is a transient phenomenon which occurs only during movement. For the sake of testing, we can use Animtools to twist the body into an unnatural posture in which hair curvature is a persistent phenomenon.
This screenshot demonstrates three different stiffness configurations. It isn't a great example (10 and 15 look very similar) but hopefully it illustrates the concept: when you're tweaking and testing hair parameters, you should occasionally force the strand into an extreme position and see what happens.
The strand is meant to exist on the DYNAMIC_HAIR_BETWEEN layer - nestling into the armpit. For the sake of clarity, I've promoted it to DYNAMIC_HAIR_OVER in the following screenshots.
--------------------
There's one additional configuration parameter worth mentioning - the blending on Segment 3. This was not part of the original animation plan; it was added in order to correct a flaw. I'm going to illustrate this flaw in an incredibly exaggerated way, because the actual flaw is fairly minor and it would require a lot of animation samples to make it apparent.
What happens when the character undergoes sustained movement in a particular direction? Let's assume that the movement is smooth (so it doesn't flip the bistable segment) and that the head remains upright.
The top segments are bound (weakly) to the head; they'll remain reasonably upright. The kinked (bistable) segment remains kinked -- it can't rotate clockwise because it's resting on the edge of its Restricted Range. But the remainder of the strand will trail behind as a long "windsock." This is a big lie; the distal Segments of the strand can't actually form such as exaggerated trail, because of the aforementioned stiffness rule).
If we apply some anatomical binding to Segment 3 then it will tend to remain more upright. The windsock effect will still occur, but now the strand is more likely to "wrap itself under the armpit" instead of clipping through the shoulder.
The flaw is that the distal portion of the strand tends to drift horizontally during rapid movement (mainly because of its low Weight). It would therefore often clip through the torso, which undermined the careful work we did at the shoulder. By binding Segment 3 to the orientation of girl's head, we tend to counteract the kink of Segment 2 (we add a second kink and thus generate a crude Z-shape). We bring the hair strand closer to the body, so that it tends to rest along the ribcage or the spine. And, because this pattern is based on anatomical binding, it will resist inertial deformation and remain (relatively) intact during movement.
Bistability isn't Perfect
The screenshots above illustrate an important limitation of our bistability technique. Note that the strand is in the "back" position while the character is leaning forward, and it's in the "front" position when she's leaning back! The strand is clipping straight through the shoulder! What's the deal?
These screenshots were obtained by moving very slowly -- "sneaking up" on the transition point. During normal gameplay, the momentum of the character will tend to make the hair strand flip its orientation much sooner. Each screenshot represents a limit point; if we move any further then a spontaneous flip will occur. The strand will jump through the arm and settle into the appropriate resting position.
If you want to avoid this problem entirely, then there are many options available:
use fewer Segments. We used eight in this example, which is (arguably) excessive. Fewer Segments means more predictable results with less testing.
Downside: the animation will be less fluid
use a wider Restricted Range (a sharper kink). The "sneak up" problem will still exist, but spontaneous flips will occur much sooner (before any actual clipping can occur).
Downside: the strand will always show a sharp kink, even when the character is leaning far back and the hair strand ought to form a straight vertical line.
add amplification to the bistable Segment. It will exhibit an exaggerated respose to the smallest movements (e.g. breathing) and will tend to pick up enough "random" momentum to flip itself. The sneak-up problem will be very rare.
Downside: The Segment will exhibit exaggerated response to all movements, and it will take longer to settle down. The strand will seem to be much more "feathery" than before - you may need to do additional fine-tuning in order to restore the previous animation patterns.
This site uses cookies to help personalise content, tailor your experience and to keep you logged in if you register.
By continuing to use this site, you are consenting to our use of cookies.