SyntaxTerror

Content Creator
Joined
Jul 24, 2014
Tutorial:
How to make a static hair mod

____________________________________________________________________________________________________________________
NOTE: this tutorial is under construction.
The missing sections should be available soon...
(ETA: 2025) :tongue:

____________________________________________________________________________________________________________________​
This tutorial will show you three different ways of making a PNG static hair mod for Super Deepthroat, using only free drawing softwares.​
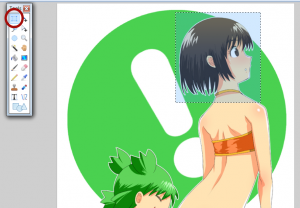
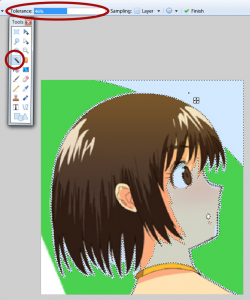
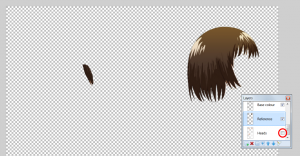
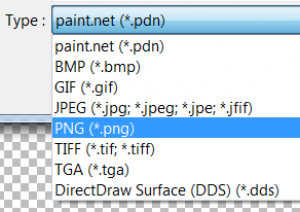
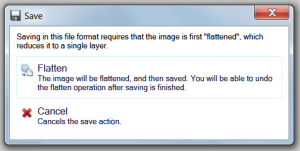
The softwares used here are Paint.net and Inkscape. Other can be used (Gimp, Photoshop, Illustrator, etc.) but I do not know how to use them, they may not be free and anyway, Paint.net and Inkscape are really fine for this kind of work.

There are many points listed below, but it is to explain clearly all the stages of the creation.
Note that with the first and the second parts of this tutorial (Begginer and Intermediate sections), the result may be crappy, blurred or pixelated. For the Intermediate section, It could be better if you use other softwares as GIMP or Photoshop, but believe me, learning to use them is more difficult than learning to use Inkscape and the result will not be better than with this vector graphics editor. So if you want to do some good job, pass directly to the Advanced tutorial below.
If you want to make SWF mods (static or dynamic hair, costumes, etc.) you need other softwares (i.e. a Flash editor) and the process is quite different. For this, check Synonymous' Costume Modding Tutorial or Dante's Loader Modding Tutorial (among others).

There are three levels, that will allow you to make different qualities of hair mods.
The quality of the result will depend of the method used, the references used and your talent.
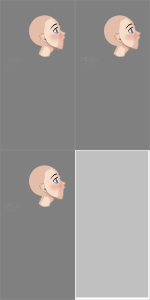
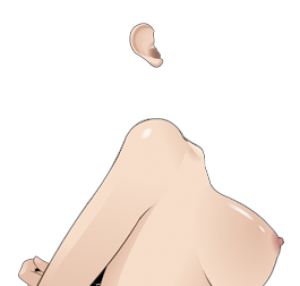
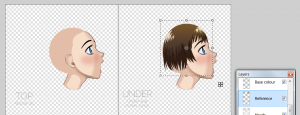
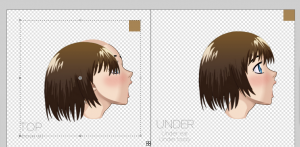
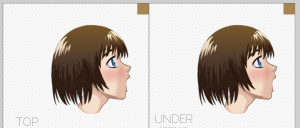
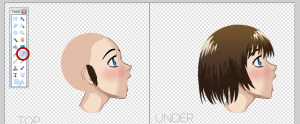
Note that anyway, you will need good reference shots (unless you are really a gifted artist), so before trying to draw something, make a very good search to find the best references as possible, especially if it is your first try at making an hair mod.

The three levels are:
  1. Beginner: just requires a very basic knowledge of raster graphics edition (copy/paste, resize, basic use of the eraser and of brushes, pencil and colour picker). All you will need is a good reference and Paint.net.
  2. Intermediate: requires some adverage aptitudes in raster graphics drawing. You will need some talent, a good reference and Paint.net.
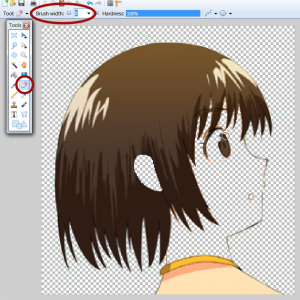
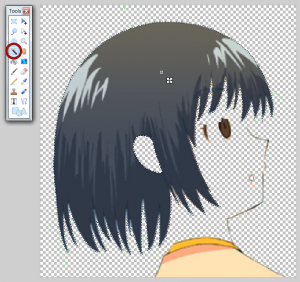
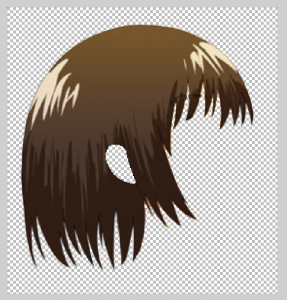
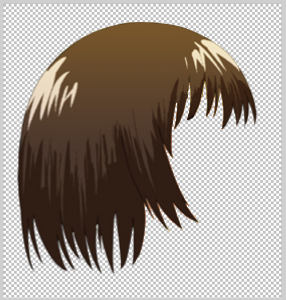
  3. Advanced: requires aptitudes in vector graphics drawing (but you may learn this quickly). You may need less talent than with the intermediate level, but the mastery of vector drawing requires patience and precision. You will need a good reference and Inkscape, Paint.net can be useful here, but not necessary.
I added some basics concerning the template used to make the hair mods prior to the tutorials. This part must be read and understood to figure how to use the different parts of the template.
 
Last edited:

SyntaxTerror

Content Creator
Joined
Jul 24, 2014
Basics

This part explains the layout of the template used to make a static hair mod. It must be understood to know where to draw to obtain the desired result.

The blank template is divided in four equal zones:

The zones are:
  • TOP (above all).
    • Everything drawn in this zone will be above anything except the male body (except his right hand), the HAIR_COSTUME_OVER layer (used for hair accessories, not available for PNG mods) and DYNAMIC_HAIR_OVER layer (used rarely in SWF dynamic hair mods). This zone will be used to get things appear above her body and ear (like a strand of hair between her face and ear). Note that cum will not land on this part of the hair, so the less things as possible should be drawn here.
  • UNDER (under ear, under body).
    • Everything drawn in this zone will be above the girl's head but under her ear and rest of her body (look at the picture below to see what will appear above the hair). This zone is designed to facilitate the view of the ear of the girl above the hair, and to make the hair pass behind her shoulder.
  • BACK (under all).
    • Everything drawn in this zone will be behind everything. It is mainly used for strands of hair behind the girl's head (on her left) and for hair that reach the level of her hips, so it doesn't pass between her legs when she is bending forward.
  • The fourth zone is unused and will not be shown ingame.
    • It may contain an example image of the character, its name, the anime, manga, game, etc. from where it is from, its custom data, your name, etc.
(you can also read How to arrange layers in your hair mod for more information on all the other hair layers, like those used in SWF mods and by the game itself)

These zones are important for where cum will stick also: It will land on things drawn in the UNDER and BACK zones, but not on the TOP one. So if you want that cum sticks to the hair of the girl, you have to draw it mostly in the UNDER and BACK zones.


What appears above the UNDER zone.

Note that the hair and accessories must fit in the rectangles of the zones: there is much space under and behind the head, but not in front and above. Remember this if the girl has a large or high hat, or accessories/nose/beak/whatever that go far in front of her: it may not fit the template and will not be displayed ingame. Also, eveything too much in front of the girl will seem to perforate the guy stomach...
 
Last edited:

SyntaxTerror

Content Creator
Joined
Jul 24, 2014
Beginner

This tutorial explains how to make a static hair mod to those that do not know how to draw nicely on a raster graphics editor, nor to use a vector graphics editor.

Note that the result may be crappy, blurred or pixelated, even if the reference is good.

The only things required are a good reference shot and Paint.net (or another raster graphics editor that can have an alpha layer, but the explanations are for paint.net).

  1. Download and install Paint.net.
  2. Download the PDN Blank Template.
  3. Open this template with paint.net. It features several layers, but only two will be used in this part of the tutorial: the Heads layer, that shows the heads of the SDT girl to know where to place the hair (this will not be shown ingame, this layer is locked because you do not need to modify it) and the Reference layer, where you will paste and adapt the hair from your reference. The other layers can be deleted or left in place, it doesn't matter.
  4. Find a high resolution reference shot, the best would be that the background is white or has very few colours.
  5. Copy and paste this reference in a new Paint.net document.
  6. Use the Magic Wand to remove everything that is not the hair (changing the Tolerance will help you get more or less things). When this is done, delete the last things touching the hair with the Eraser (you can change its size with Brush width).
  7. Now you should have only the hair on an alpha (transparent) background.
  8. If the ear was present, now you should have a hole at its place. Fill this with with the hair colour and redraw the strands as best as you can. Try to erase and redraw everything that is not the hair (like sometimes eyebrows that appear by transparence under the hair) or the parts of the hair that may be missing.
  9. Copy this hair and paste it in the Reference layer of the PDN Blank Template.
  10. Move it and resize it so it fits nicely the heads (if you need small ears or to see the complete body, unhide the corresponding layer).
  11. Make finishing touches to make the mod look nice.
  12. Hide the Heads layer.
  13. Save as... and chose the PNG (*.png) type (PDN is not recognised by the game).
  14. Save configuration (OK), Flatten.
  15. Your hair mod is ready to use and to share!
The numbers correspond to the list above.
Commands are indicated in italic and are followed by their keyboard shortcut between brackets when it exists.
Click on the images to see them in full size.


6. Copy and paste the reference in a new Paint.net document.


Select the hair quite closely.


Crop to Selection (CTRL+SHIFT+X)
7. Use the Magic Wand (S) to remove everything that is not the hair (changing the Tolerance will help you get more or less things.).


When this is done, delete the last things touching the hair with the Eraser (E) (you can change its size with Brush width).


Use again the Magic Wand (S) and select the hair, use the Tolerance to get every part, but not what is outside the hair.
If you cannot achieve this, delete with the eraser everything but the hair.


8. A a result, you should have only the hair on an alpha (transparent) background.


9. If the ear was present, you should have a hole at its place.
Fill this with with the hair colour and redraw the strands as best as you can.
Try also to erase and redraw everything that is not the hair (like sometimes eyebrows that appear by transparence under the hair) or the parts of the hair that may be missing.


10. Copy this hair and paste it in the Hair layer of the PDN Blank Template, in the UNDER zone.


11. Move it and resize it so it fits nicely the heads (if you need small ears or to see the complete body, unhide the corresponding layer).
You can change the Opacity of the Hair layer to see the head in transparence and place the hair correctly (there should be more or less an even thickness of hair everywhere).


When this is done, if you need to make the ear appear, you have to put the strand of hair above the ear in the TOP layer.


To paste the hair exactly at the right place, draw a square that touches the top right corner of the template (zoom in to place it correctly).


Select the hair and the square together, copy, paste and move it in the TOP zone.


Move the new square (still selected with the new hair) to the top right corner of the TOP zone. This will put the copied hair exactly in the right position.


Delete everything that is not the strand above the ear.
If the strand is long enough to pass above the shoulder, you can leave its end, if the strand is not long enough, you can let only the part of it that covers the ear.
In the case of the ear must be hidden by the hair, it is still better to leave most of the hair in the UNDER zone and to simply cover the ear with a circle of hair in the TOP zone.


13. Hide the Reference layer (normal/small ears, full body).


14. Save as... and chose the PNG (*.png) type (PDN is not recognised by the game).


15. Save configuration (OK), Flatten.


16. Your hair mod is ready to use and to share!
 
Last edited:

SyntaxTerror

Content Creator
Joined
Jul 24, 2014
Intermediate

This tutorial explains how to make a static hair mod to those that have an average knowledge of drawing on a raster graphics editor, it requires some time and a bit of talent.

Note that the result may be crappy or pixelated.
It may be better if you use other softwares like GIMP or Photoshop, but believe me, learning to use them is more difficult than learning to use Inkscape and the result will not be better than with this vector graphics editor. So if you want to do some good job, pass directly to the Advanced tutorial below.

The things required are a good reference shot and Paint.net (or another raster graphics editor that can have an alpha layer, but the explanations are for paint.net).

  1. Download and install Paint.net.
  2. Download the PDN Blank Template.
  3. Open this template with paint.net. It features several layers. From top to bottom: Outside line, Inner lines, Light reflection, Shade, Base colour, Reference and Heads (this is the basic layers for an anime type character, drawn with three different colours in its hair). They are all empty but the Heads one for the moment. The Heads layer shows the heads of the SDT girl to know where to place the hair (this will not be shown ingame, this layer is locked because you do not need to modify it). Others layers may be added to contain accessories (e.g. an headband or glasses) or special features.
  4. Copy and paste your reference in a new Paint.net document.
  5. Select only the part containing the hair and copy it.
  6. Steps 6.1 to 6.3 are optional, but will help you to have a clearer view in your work:
    1. Use the Magic Wand to delete everything that is not the hair (changing the Tolerance will help you to remove more or less things.).
    2. Delete the last things touching the hair with the Eraser (you can change its size with Brush width).
    3. Remove everything else to have only the hair then copy it.
  7. Paste the hair in the Reference layer.
  8. Reduce the Opacity of this layer, so you can see the heads under it (100 to 150 out of 255 is fine).
  9. Select the reference. and move it in the UNDER zone of the template.
  10. Resize and rotate it so it fits nicely the head.
  11. Lock the Reference layer, hide the Heads layer and select the Outside line layer.
  12. Now the drawing begins. It can be made with the Paintbrush, the Pencil, or Lines/Curves shaped with the Spline tool or the Bézier tool.
    • Bézier curves are the ones that give the best result. Here is how they work: they are constitued of four points, one at each end and two others that will define the curvature of the line near these ends. These points are represented by little circles in Paint.net. To modify the curvature, just change the position of the two middle points of the line, to make it look like an U, a V or even an S. A Bézier curve has two turns, if you want to have more, draw another curve.
  13. Draw the outside line first in the corresponding layer. Its colour and width will depend of the reference used, but most of the time, 1 px pure black will be fine.
  14. Draw the inner lines in the corresponding layers.
  15. Copy the outside line and paste it in the Base colour layer (in Paint.net, it will be pasted exactly where you copied it, in others softwares, use Paste in place).
  16. Use the Paint bucket to fill it the base colour you'll get on the reference with the Color Picker (select this layer to do that and remember to bring back opacity to 255).
  17. Hide the Base colour layer.
  18. Select the Shade layer and paste another copy of the outside line.
  19. Get the shade colour and draw the lines separating the shade from the base colour.
  20. Use the Paint bucket to fill the zone between these lines and the outside line.
  21. Select the Light reflection layer and do the same process as for the shade (you do not need to paste an outside line if the light reflection do not touch it).
  22. If the ear is shown and there is a strand of hair above it, it has to be drawn in the TOP zone. If the ear must be hidden by the hair, it needs to be covered with some hair in the TOP zone. To paste the entire hair in this zone at the right place, follow these steps:
  23. Draw a square that touches the top right corner of the template (zoom in to place it correctly).
  24. The problem is that the hair is actually in several layers, to gather them together, hide the Reference and the Heads layers and choose the option Flatten in the Image menu (or press Ctrl+Shift+F)
  25. Copy the square and the hair together.
  26. Undo the flattening to get back the layers (press Ctrl+Z).
  27. Unhide the Heads layer and select the Outside line layer.
  28. Paste the hair and the square and move them in the TOP zone, placing the square in the topright corner of this zone.
  29. Delete everything unnecessary (and the squares) and leave only the strands covering the ear.
  30. Make finishing touches to make the mod look nice. There may be some imperfections or zones not filled (e.g. some pixels at the end of the strands). Correct this with the Pencil in the right layers.
  31. Hide the Reference and Heads layers.
  32. Save as... and chose the PNG (*.png) type (PDN is not recognised by the game).
  33. Save configuration (OK), Flatten.
  34. Your hair mod is ready to use and to share!
A tutorial in images should be available soon...
 
Last edited:

SyntaxTerror

Content Creator
Joined
Jul 24, 2014
Advanced

This part is not ready yet (and I have no plans to make it soon...).
It should explain how to make PNG hair mods out of SVG files using vector graphics and Inkscape.

You can look at look at Gingerless Soul's PNG hair mod tutorial for this method.
 
Last edited:

I ain't got a username.

Potential Patron
Joined
May 1, 2020
So, there's an issue in that I'm basically 100% unable to install Paint.net, and get the Template file, basically locking me out of following the tutorial. Could someone put a template that isn't as a PDN? Maybe a PDF? Paint.net is very strict with how I'm able get images it seems, and I'd like to make a static hair file.
 

tickles

Content Creator
Joined
Aug 18, 2017
So, there's an issue in that I'm basically 100% unable to install Paint.net, and get the Template file, basically locking me out of following the tutorial. Could someone put a template that isn't as a PDN? Maybe a PDF? Paint.net is very strict with how I'm able get images it seems, and I'd like to make a static hair file.
Have you tried using FireAlpaca? It's the program I use when making static hairs. (which are unreleased atm...)
 
Last edited:

I ain't got a username.

Potential Patron
Joined
May 1, 2020
Have you tried using FireAlpaca? It's the program I use when making static hairs. (which are unreleased atm...)
I do have it, and I also moved onto Medibang paint, but it's less figuring out how to acquire it now, and more, providing a better source of a template for people that happen to be unlucky enough (me for example) to have trouble even accessing it. I currently have just downloaded the template photo already shown and worked off of that.
 

SyntaxTerror

Content Creator
Joined
Jul 24, 2014
Could someone put a template that isn't as a PDN? Maybe a PDF?
I believe that you don't really understand what is a PDN file: it is Paint.net's native image format (a raster graphics image with layers). The only thing it has in common with a PDF file are the two first letters of its extension.

If you can't use Paint.net, you can't follow this tutorial.
You can either still read all carefully to learn the bases and try to adapt them with another raster graphics editor that handles layers (use the blank template provided above), or give a try with vector graphics and Inkscape (best option in my opinion as raster graphics editing requires more skills and takes more time, but still usually gives a crappier result): look at Gingerless Soul's PNG hair mod tutorial.

Good luck.
 
Last edited:

I ain't got a username.

Potential Patron
Joined
May 1, 2020
I believe that you don't really understand what is a PDN file: it is Paint.net's native image format (a raster graphics image with layers). The only thing it has in common with a PDF file are the two first letters of its extension.

If you can't use Paint.net, you can't follow this tutorial.
You can either still read all carefully to learn the bases and try to adapt them with another raster graphics editor that handles layers (use the blank template provided above), or give a try with vector graphics and Inkscape (best option in my opinion as raster graphics editing requires more skills and takes more time, but still usually gives a crappier result): look at Gingerless Soul's PNG hair mod tutorial.

Good luck.
I can draw pretty decently. Does that help?
 

SyntaxTerror

Content Creator
Joined
Jul 24, 2014
I can draw pretty decently. Does that help?
Drawing on paper may help, but it's not drawing on a computer, where drawing raster graphics is different from drawing vector graphics, and drawing with a mouse is different from drawing with a stylus...

Anyway, "modding doesn't require talent, it only requires time" (can't remember who said this :tongue:).

As far as I know, no modder here is a gifted artist: good modders are good copiers that can trace over a well chosen reference shot.
The only things needed to become a modder are patience, perseverance and precision (and knowing the basics of how mods work).
 

I ain't got a username.

Potential Patron
Joined
May 1, 2020
Drawing on paper may help, but it's not drawing on a computer, where drawing raster graphics is different from drawing vector graphics, and drawing with a mouse is different from drawing with a stylus...

Anyway, "modding doesn't require talent, it only requires time" (can't remember who said this :tongue:).

As far as I know, no modder here is a gifted artist: good modders are good copiers that can trace over a well chosen reference shot.
The only things needed to become a modder are patience, perseverance and precision (and knowing the basics of how mods work).
Ah, I'm sorry, there was kind of misunderstanding there I mean to say I may come and literally make my own hair images to put into SDT, original or of my own perspective, as I have a pen and tablet, an art program, and decent drawing ability. I wouldn't say it's.... Masteful, but I can make something and it won't look terrible.
 

SyntaxTerror

Content Creator
Joined
Jul 24, 2014
Ah, I'm sorry, there was kind of misunderstanding there I mean to say I may come and literally make my own hair images to put into SDT, original or of my own perspective, as I have a pen and tablet, an art program, and decent drawing ability. I wouldn't say it's.... Masteful, but I can make something and it won't look terrible.
Then get a raster graphics editor that handles layers, put this blank template in the background layer and draw your hair in layer(s) above it.
Then hide/delete the heads template layer, save as PNG and you can try your mod.
Read carefully the basics above to know where to draw
To see how things should be done, possibly look at an existing mod like this one where the hair covers partially the ear or that one where the ear is hidden by the hair.
And try to draw as much as possible in the UNDER zone of the template, as cum won't land on hair drawn in the TOP zone.

Reading the above tutorials will also show you how things should be done, including where to draw the different parts of the hair and how to cut off the part that covers the ear and should be in the TOP zone.
Just jump in and make tries, it's how all of us learnt.

Good luck.
 

CaptainVenom

Potential Patron
Joined
May 21, 2020
Is there an editing program for making this that doesn't cost money other then fire alpaca it sucks I can't adjust the hair size to be what I need it to
 

Rod

Content Creator
Joined
Jul 14, 2020
I found Krita to be a very capable tool. It's free and available on most platforms. There's also lots of good documentation and videos explaining the feature set.

Krita home page
 

Users who are viewing this thread

Top


Are you 18 or older?

This website requires you to be 18 years of age or older. Please verify your age to view the content, or click Exit to leave.