Someone else will be able to help you very quickly and easily if you upload your project or .fla file. As for RGB controls, the costume has to be a movie clip with a Shading layer and an RGBFill layer which get color tinted. Are you using Konashion's SDTMod.fla? It has a Tutorials folder. Inside the Costume Tutorial there are examples.
Your mod looks good, can't wait to see what else you make.
The .fla is attached. I'm getting an error whenever the game starts up if I add it to moreclothing, which keeps me from really testing whether the rgb works or not.
The only section I've tried getting rgb to work with is the right thigh.
The glare is appearing because you've used the rightThigh and rightCalf symbols as the basis for your work - you drew the pyjamas directly onto the "skin" layer. These symbols include a "Glare" layer, which surmounted your own artwork and therefore appeared overtop of it.
The quick fix is to find and delete the Glare layer. The proper solution is to re-organize your work so that the pyjamas are defined as a completely separate clothing symbol (the anatomical references are left in their original form; they're simply imported onto the canvas as a "Reference" layer). See attached FLA file.
I've also repackaged the whole thing as a Vanilla import rather than a Loader import, since you weren't really using the Loader stuff (except for a few redundant calls which would have burned CPU cycles for no reason).
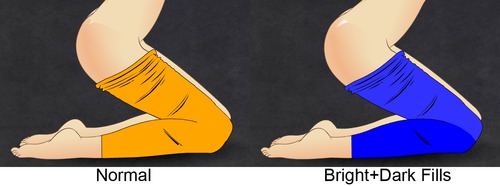
2. How do I make it rgb compatible while maintaining the shading I have in the screenshot (darkened versions of the original color)? There's a couple posts trying to explain the process on the forums, but I didn't get that info from them.
Create a new layer which lies above your rgbFill layer. Create a partially-transparent fill on this new layer. If you want to darken, then it should be a partially-transparent black fill. If you want to lighten, make it a partially-transparent white fill. Unlike the rgbFill layers, no special naming is required. They simply need to be present on the canvas.
The attached FLA demonstrates this technique. The thigh portion is lightened and the calf is darkened. The layers are deliberately named "TEMP" - feel free to replace or rename or delete them.
Note that these are very simple fills - they apply an isotropic bright/dark fill to the entire section of clothing. It's possible to use varying-intensity fills (e.g. to suggest a directional light source, or to hint at the roundness and contour lines of the leg). You can also apply both partial-alpha highlights and partial-alpha shadows to a single clothing item.
[attachmini=1]
How do you test the RGB without adding it to moreclothing?
If you've named the fills correctly then you can load your SWF file in SDT (Loader is not required), call up the appropriate slider (e.g. pants), drag it to a new value, and watch the changes occur.
Other stuff
when you're experimenting with the light/dark alpha fills, consider including a few soft highlights (via the Radial Gradient tool). Doing so can help to give the impression of 3-dimensionality. Flat colour tend to look unreal.
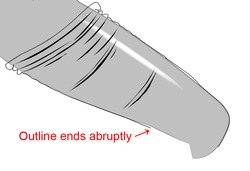
the paths are somewhat rough; they contain too many anchor points. This is appropriate in the "rumpled" area, but it also occurs in the smooth sections. Try to use fewer anchor points - you can adjust the tangent lines between the points and thereby create a smooth curve (which is "cheaper" for the CPU to draw, and makes your artwork easier to modify in the future).
some of the paths are incomplete (see screenshot below). It's a good idea to trace shapes completely, even if it seems that the "extra" portion will be hidden behind an adjacent bodypart. During gameplay, the two bodyparts may slide away from each other, leaving a gap in the outline.
Thanks for the in depth explanation. Was I using an out of date guide or something? I followed void's guide to the letter without it mentioning any of that.
I'm not able to edit the fills for some reason. I tried implementing a bright fill for the calves (duplicating the fill used for the thighs and changing the shape to suit the calves, with all the instances the same for each part etc.) and it doesn't change the fill at all. Still looks exactly the same as before.
Thanks for the in depth explanation. Was I using an out of date guide or something? I followed void's guide to the letter without it mentioning any of that.
Ah, it's somewhere on here. Anyways, I changed the shape of the thighs a bit, leaving everything else exactly the same and the thighs rgb broke. Calves still work and everything is still identical in properties. No idea.
Reloaded SDT instead of resetting and it worked. Didn't think that made a difference.
When you start exchaning feedback about a modding project, it becomes important to be precise in your language. If you want to modify the shape of the thighs (e.g. to add toned musculature, or to make a big bouncy butt) then you'll need to switch back to the Loader format that you were using initially -- vanilla swf imports do not alter the bodyshape. If you want to modify the shape of the clothing on the thighs then that's no problem.
Anyways, it looks like you've pulled the pants down farther along the thighs (leaving more bare skin around the buttocks and pelvis). No complaints or concerns here.
Reloaded SDT instead of resetting and it worked. Didn't think that made a difference.
When I'm developing and testing vanilla mods, I simply load them via the "Swf Mod" button and then click the adjacent removal button (left-facing curved arrow) because it's faster. I don't bother with Reset or Reload unless I'm doing Loader stuff (in which you tend to see unwanted lProxies remaining in-effect after the parent mod has been unloaded).
I'm going to quote your PM here because putting this stuff in public may help someone else (in the future) with a similar question/problem:
I don't see how to use a gradient on an instance. If I break it off from the rgbFill to edit, it doesn't function.
The idea is to leave the rgbFill stuff as-is. It's an independent Symbol, whose instance is given a special name, and it lives on its own Layer.
We then create additional layers above (on top of) the rgbFill layer, and draw small shadow/highlight details upon those layers. See the attached file for a few simple examples.
[attachmini=1]
In this case, I've put two elliptical highlights and a circular shadow on the same layer.
Note: these gradient fills are just samples to demonstrate the concept. If you're uncertain about how and where to place highlights, then a simple starting point is to mimic the "glare" patterns on the skin. Then spread/soften the glare effect to show that the clothing is made of fabric (e.g. flannel?) which is less lustrous than sweaty human skin. Or, if your garment is latex, you could intensify the glare effect. Then you can start placing shadows on the side of the limb which lies opposite to the highlights you've just drawn (e.g. add shadow gradients on the posterior thigh and anterior calf).
Alternatively, you can extract some of the vanilla clothing elements (such as the SDT jeans), copy-paste the shading patterns directly into your project, and then stretch them to fit (since jeans aren't quite the same shape as pyjama pants). If you want to use this technique then let me know - we can apply Masks to save time and effort.
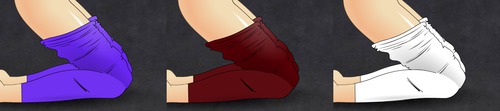
There's an important quirk that's worth noting here - maximum and minimum brightness. The technique used to accomplish the rgb shifts is not especially "clever" - it can easily "run out of room." Consider the examples below.
The leftmost screenshot uses an intermediate-brightness colour. It shows both highlights and shadows. The second screenshot uses a bright pink; the highlights are almost completely invisible (if it were bright white then they would be literally invisible). The third screenshot uses dark red; the highlights are prominent but the shadow is difficult to distinguish.
There are fancy color-and-fill techniques which can avoid these problems, allowing your mod to look good across the entire ARGB range. For an initial project, I'd suggest instead that you simply choose either "bright colours" or "dark colours" and then do your testing and tweaking on this basis. Don't try to please everyone :)
You can also create shadow/highlight details below the rgbFill layer, but this is usually a waste of effort. rgbFill elements are opaque by default, so your details would be hidden until/unless the user reduces the Alpha slider in-game. This could be a valid approach if you want special artistic effects to occur when the user switches to a transparent/gauzy setting (e.g. when creating a negligee) but it's more difficult and usually not necessary.
The basic answer is "just draw the desired shapes, then make them partially transparent." In this example, I've separated the "outlines" layer into two layers - the actual "outline" of the garment, and the internal "pleats." I've reduced the Alpha of the pleats to 60% so that they'll appear as a dark version of the chosen RGB slider setting, instead of being pure black. The net effect is that they appear as dark shading marks when the costume is loaded into the game.
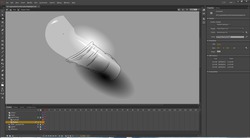
And more importantly, why in my most recent update is there a flashlight shining out of her ass? Also screenshotted.
You had an extra gradient ellipse on the pyjamaThigh symbol. It's easy to miss when working against a white background. Of course, when you notice a "flashlight" effect during testing, it's an obvious sign that you need to check for misplaced highlights :)
Of course, working against a black background isn't any better - you'll be unable to see the shadows! Working against grey is possible but usually not necessary. The better solution (which I've applied in the attachment) is to setup a Mask. We tell Flash "here's a set of boundaries; anything which falls outside these boundaries should not be included in the scene." The Mask object itself is simply a copy of the thigh rgbFill symbol; we can then draw some very large shadow and highlight ellipses (or lots of little shapes, if you prefer) and never worry about a flashlight effect appearing on-screen. Even if the center of the gradient shape is outside the thigh, only the portion within the thigh will actually be drawn.
Note (1): The Mask approach can be a great time-saver. For instance, we could have imported the shading from the SDT Jeans and then used a Mask to "make it fit" onto the pyjama bottoms. Unfortunately, the imported shading would probably look wrong (because the SDT Jeans are very shiny) and Masks are somewhat CPU-intensive. But feel free to apply them anywhere that you're worried about accidentally "colouring outside the lines."
Note (2): I haven't deleted the previous gradient highlight shapes. They still exist on the "TEMP" layer; I've just hidden them. Feel free to re-include them.
Examples
Since we're using both shadows and highlights, we can guarantee that some shading details will be visible regardless of which RGB setting is chosen by the user. In my opinion, the lighter colours look better - the highlights against the dark red appear "fake." But that's just with this specific shading pattern! If you want your pyjamas to work well with dark colours, then you simply need to adjust the shading parameters (e.g. heavier shadows, more subdued highlights) until they look good.
As mentioned previously, I'd recommend against trying to setup shading which looks good across the whole spectrum.
Good stuff. You should consider putting all this together in a guide.
I can see why there's less then a handful of people still making imports for this, the information to get started (for a beginner) isn't easy to find at all. Most of it isn't even on the forums at all, requires asking around like I have.
You could probably just take an existing guide, add this to it and make a thread for it to be stickied on the imports forum. Have all the info in one easy to reach place for newcomers.
Last (hopefully) question:
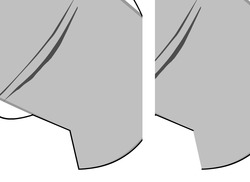
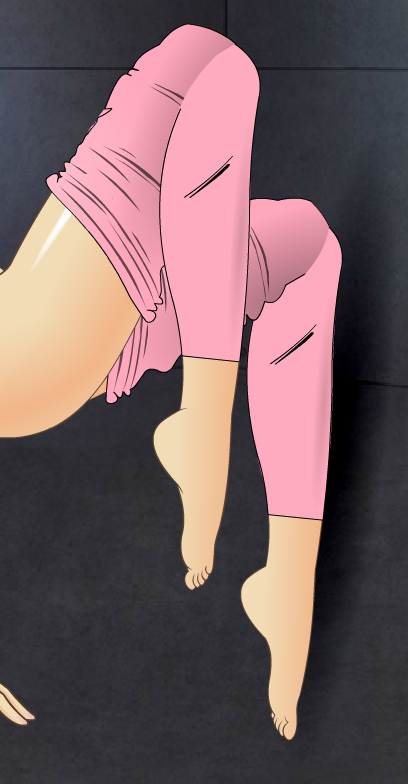
The reason I deleted some of the outline in the thighs is because of what you get in the screen below. How do you fix that without just deleting the outline that's overlapping?
The reason I deleted some of the outline in the thighs is because of what you get in the screen below. How do you fix that without just deleting the outline that's overlapping?
Ah, I see. The problem is occurring for two reasons:
we've taken a slightly lazy shortcut by copy-pasting the right leg components instead of making a separate left leg. Ideally, we'd draw a different left leg (e.g. showing some fancy details along the inner thigh) but we can just apply a half-ass solution to save time.
the right/left laziness would not normally be visible in-game, except that you've tested it with a custom Animtools position which spreads the legs apart.
if you consider the pulled-down pants as a real clothing object, then spreading the legs apart should be limited (e.g. the character wouldn't be able to walk properly). The only reason that pelvic penetration is even plausible in your screenshot is because the SDT guy's penis is ridiculously long.
We could apply physics rules to show the fabric stretching between the legs when they're moved apart, but that would be a huge additional modding effort. Instead, let's just ignore the "pants" idea and pretend that the legs are separate (e.g. thigh-high stockings).
There are two fairly-easy solutions, but neither provides perfect results.
modify the outline slightly. Instead of tracing the "entire" outline, we omit the section which was omitted in the original Thigh bodypart reference.
Delete the little diagonal line.
OR
add a Mask. The left leg becomes a "cropped" copy of the right leg, with a slice removed.
We create a new symbol, which consists of an instance of the existing Pyjama Thigh. Then we draw a (very approximate) mask onto it.
Adjust the Pyjama Bottoms symbol. Instead of having two instances of the Pyjama Thigh symbol with different names, we now have one instance of Pyjama Thigh and one instance of Pyjama Thigh (left).
When loaded in-game, the left kneecap will include a visual "hinge" point which looks bad. There's not much we can do about this (or about the weird floating shadow which accompanies her left calf) because that's a weakness of SDT itself. It wasn't designed to deal with this sort of body positioning.
We could fix it with Loader scripting, but that's off-topic for a simple clothing mod.
Both of these approaches require additional work: the junction of calf and thigh will look bad until you do some shading work on the calf so that its shadows and highlights are congruent with those of the thigh.
This site uses cookies to help personalise content, tailor your experience and to keep you logged in if you register.
By continuing to use this site, you are consenting to our use of cookies.