Can´t get the coloring right (1 Viewer)

Every_Tuesday

Content Creator
Joined
May 10, 2017
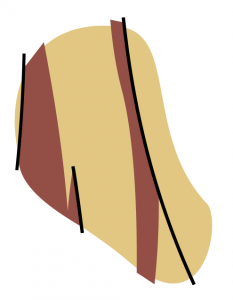
Hey Guys/Girls i need a little advice from you cause i cant get a proper tutorial that helps me out in this situation. A few days ago, i tried to experience a little bit in Inkscape. The outlines are now done, which wasn´t realy the hard part. My problem however now, is that when i want to color the filling layer, this happens
Imgur: The most awesome images on the Internet
If someone could describe what i could do, so that the colors don´t burst over the outlines without gaps, that would be nice

If you need more information, maybe you wanna look up the file for yourself
File-Upload.net - KanamiIchizaki2.svg

Anyway nice day you all
 
Last edited:

SyntaxTerror

Content Creator
Joined
Jul 24, 2014
Hello Every_Tuesday Every_Tuesday .
  1. I think that you forgot to close your polygon/shape. If there is no segment between the last node and the first one, the fill can look strange.
  2. If closing it does not work, try this:
    • Open the Fill and Stroke dialog box by selecting Object >> Fill and Stroke... (alternatively, Shift + CTRL + F).
    • Change this little icon to the other option:
    • 89bDgds.png
  3. If nothing works, host your SVG file somewhere and put a link to it in your first post, I'll try to have a look at it.
 

Every_Tuesday

Content Creator
Joined
May 10, 2017
I think that you forgot to close your polygon/shape. If there is no segment between the last node and the first one, the fill can look strange.
Do you mean joining the nodes of the bezier curves? I tried a few several things to get the curves combined but they end in the same result

Change this little icon to the other option:
Unfortunately the second point doesn´t do the trick either. Neither of these two buttons bring an actual change. Maybe i´m just blind for the obvious :confused:

Well i try a bit more to figure out what i do wrong and what i am missing and uploading the file above.
Thank you for the response
 

SyntaxTerror

Content Creator
Joined
Jul 24, 2014
Every_Tuesday Every_Tuesday : In fact it is very simple: you just have to understand how vector drawing is different from raster.
  • Raster graphics (i.e. MSPaint, Paint.net, GIMP, etc.) just cares about pixels colours. If you try to fill a square for example, the program will look the colour of the pixel inside the square you choose and paint all the adjacent pixels the same colour until it reaches the borders of the square (i.e. the pixels that have a different colour as the ones inside the square).
  • Vector graphics (i.e. Inkscape, Animate CC, etc.) cares about vectors (lines going from one node to another one). In Inkscape, nodes can be linked to one other node (making a segment) or two others (then the node is part of the segment, making an edge of a polygon for example. If you try to fill a square, it must be a closed polygon (i.e. 4 nodes, each one linked to 2 other nodes), so the program will fill the inside of the polygon between the lines. If you make a square with 4 lines (i.e. 4 times 2 nodes linked together), the program will try to paint each line and will fill with colour the area defined by the line and the shortest line linking the nodes.
An image may be clearer:
I made curved sides to show the issue better.
The left shape is not a polygon, but four lines with end nodes at the same position. Inkscape cannot fill it properly because it doesn't recognizes a polygon.
The right shape is a proper polygon, made with four nodes and four lines linking them.

What you have to do is draw ONE outside line (i.e. ONE line with SEVERAL nodes), then copy it and past it in place on an under layer, fill it with the base colour and eventually remove its line.
You can draw the inside lines on another layer, it makes thinks easier.

I suggest that you use my SVG Hair Template that has all the necessary layers (outline, inner lines, light reflection, base colour, references, heads, etc.) along with a layer with small ears and another showing her body to help drawing at the right places.

Look also at one of my hair mods to understand better how a vectorised hair mod has to be drawn on Inkscape : Hiiragi Akira.svg

Learning how to use vectors may be a bit tricky at the beggining, but you'll quickly learn how to use them and you'll see the advantages on raster graphics, even if vectors take a bit longer to trace.

Good luck and do not hesitate if you have other questions.
 
Last edited:

Every_Tuesday

Content Creator
Joined
May 10, 2017
Wow, amazing this really helps a lot. Thank you very much
Kanami Ichizaki 2.png

Now we´re cooking :wink: I´m so glad it finally works

Vector graphics (i.e. Inkscape, Animate CC, etc.) cares about by vectors (lines going from one node to another one)
I made curved sides to show the issue better.
The left shape is not a polygon, but four lines with end nodes at the same position. Inkscape cannot fill it properly because it doesn't recognizes a polygon.
The right shape is a proper polygon, made with four nodes and four lines linking them.
Oh so that´s how it is, interesting. This is really easy to understand, but like i said i was once again blind for the obvious :rolleyes:

Learning how to use vectors may be a bit tricky at the beggining, but you'll quickly learn how to use them and you'll see the advantages on raster graphics, even if vectors take a bit longer to trace.
Im looking forward to it. I can keep you updated on the progress if you like. In any case, i will post the final mod, once its done, on this thread as well if someone is interested :wink:

Good luck and do not hesitate if you have other questions.
Thank you. In fact i got another question right now. How can i copy the hair in the "Under" Section the best to get it exactly parallel in the "Top" Section?, cause there is a little bit ear showing in the outline as you can see here Imgur: The most awesome images on the Internet
 

SyntaxTerror

Content Creator
Joined
Jul 24, 2014
How can i copy the hair in the "Under" Section the best to get it exactly parallel in the "Top" Section?
If you want to put most of the hair in the UNDER section and hide the ear in the TOP section (what is the good thing to do if you want to see cum stick to most of the hair), you have two solutions:

Only with Inkscape:
Copy the vectorised lines and fills on the TOP section and make it cover what you want. To copy exactly at the same position, I use a trick expalined in the #11 of my Beginner Static Hair Mopd Tutorial. It works with Paint.net, but can be adapted to Inkscape:
  1. draw a rectangle and move it to the top right corner of the UNDER section (just outside the grey lines).
  2. select this rectangle and the parts of the hair needed.
  3. copy the selection and paste it in the TOP section.
  4. move everything to put the rectangle in the top right corner of the TOP section (just outside the grey lines).
  5. delete the rectangles.
  6. create new nodes just outisde the ear on the lines covering it.
  7. create a shape a little bigger than the ear and fill it with the base colour.
  8. do the same with the shade and/or light reflection.
You should have something like this on the TOP section:
Every lines and fills (i.e. lines, base colour, shade, etc.) will be in the same layer, but it doesn't really matters.

With Inkscape and Paint.net or another raster graphics editor:
Export your hair mod in PNG with Inkscape and do the same as above with Paint.net with the raster version of your hair mod.
This option is easier and faster, but the other one will make you learn how to trace vectors and display the one above another in the good way. Also, you'll have everything drawn with vectors in your SVG file, that makes further modifications easier.

Anyway, this operation can only be done when your hair mod is almost finished. You have to draw the shades and light reflections before making these cuttings.
 
Last edited:

Every_Tuesday

Content Creator
Joined
May 10, 2017
Im nearly done now. I only get this "bug" now, that when i zoom in, i sometimes see the outlines of the ear in her right braid. But this happens only when i zoom. Maybe it is because of my version of SDT?
Imgur: The most awesome images on the Internet

If i can improve the hair a bit more pls let me know :wink:
 

Attachments

  • Kanami Ichizaki.png
    Kanami Ichizaki.png
    215.2 KB · Views: 113

SyntaxTerror

Content Creator
Joined
Jul 24, 2014
when i zoom in, i sometimes see the outlines of the ear in her right braid
This is something I forgot to explain:
If you use the second option (i.e. "With Inkscape and Paint.net"), do not use the Eraser to remove the excess pixels of hair around the ear, but the Lasso or the Rectangle Select, and try to make lines as vertical/horizontal as possible.

Here's why:
WyaVUC5.png


LBpUxVL.png

  • The red arrow shows your cutting with the Eraser: the pixels are semi-transparent. If you add a semi transparent pixel over another one, the overall colour will change.
  • The green arrow show a cutting with the Rectangle Select: there is no semi-transparent pixels and ingame, the colour of the TOP section will not blend with the one in the UNDER section.
  • The orange arrow show a cutting with the Lasso: some pixels in the diagonals will be semi-transparent.
So avoid using the Eraser (even with a Harness of 100%) or do not rely on Paint.net to make this kind of cutting.
[EDIT] If you use the second option (i.e. "With Inkscape and Paint.net"), be careful to disable the antialiasing when using the Eraser to remove the excess pixels of hair around the ear.
2QYjBJv.png

Without it, some pixels will become semi-transparent and when SDT will put the layers one above another, the colour of these pixels will change, making the outline you are speaking of.
If you add a semi transparent pixel over another one, the overall colour will change.
[/EDIT]

Talking about you work, it is pretty good. However, I have some remarks:
  • You should try to add gradients to your base and shade colours to give some relief to them. Be careful to make one polygon of all the separate ones (even if there are gaps between the different parts), so the gradient will apply evenly to the whole colour.
  • You can trace pointed lines in some places instead of square shaped ended ones. I explain my technique in this post.
These little things will enhance your hair mod and give you a good training for the advanced use of Inkscape.

Good luck.
 
Last edited:

Every_Tuesday

Content Creator
Joined
May 10, 2017
do not use the Eraser to remove the excess pixels of hair around the ear, but the Lasso or the Rectangle Select, and try to make lines as vertical/horizontal as possible.
So avoid using the Eraser (even with a Harness of 100%) or do not rely on Paint.net to make this kind of cutting.
That´s good to know. So basically i either use the lasso function for the cutting, or i deactivate the anti-aliasing in the eraser function in paint.net so the cuts are clearer.

Be careful to make one polygon of all the separate ones (even if there are gaps between the different parts), so the gradient will apply evenly to the whole colour.
If course you can, i really am grateful for all the advice cause working with inkscape is obviously a whole new experience for me Do you mean like a stripe formed gradient? I will try to figure out how its best in this kind of situation. It´s a little complicated because the hair is very curly on the braids and also very curvy and not flat .
This little trick you mentioned in the post above is very nifty and i definitely use it in the future.
For now i will try to figure out how the gradients would fit the best

Thanks for all the help :wink:
 

SyntaxTerror

Content Creator
Joined
Jul 24, 2014
deactivate the anti-aliasing in the eraser function in paint.net so the cuts are clearer
Damned, you made me discover a thing about Paint.net today!
I was never aware of this antialiasing thingy, thank you for pointing it out. :smile:
I edited the post above to take this in count.

Do you mean like a stripe formed gradient?
Stripe formed gradient = linear gradient?
There are two kinds of gradients available: linear and radial.
It depends where and how you use it, but most of the time I try to use radial gradients, because a curve looks more natural than a straight line. Also, curves follow the round shape of the head.
Gradients on Inkscape can be a bit tricky to handle. You have to understand the concept of "stops" (i.e. colour depending on the origin point of the gradient)
Take a look at this video that explains the basics of radial gradients (this can be transposed to linear gradients that are almost the same but with only one direction).
It is difficult for me to help you on this point unless you have very specific questions. I learn nearly all by myself through experimentations (but I am far to know everything!), and I guess you'll have to go the same way to become more competent.
Only advice I can give you is to use very large gradients (i.e. their centre are outside the shapes), to have them crescent shaped on the part of the hair you are working with.

Good luck.

[EDIT] Here is what @Huitznahua did using two radial gradients (it is on Animate CC, but the technique can be adapted to Inkscape):
1D0iyz0.png

So you see that many things are possible, just think outside of the box.
Here in fact, there is a rounded shape on the breast with a radial gradient on its bottom, and another shape under with another inverted radial gradient.
Anyway, keep in mind that complicated gradients requires a lot of work and of time, and that a good result using vectors is quite difficult to obtain.
 
Last edited:

SyntaxTerror

Content Creator
Joined
Jul 24, 2014
i checked his downloads and his import threads and i didn't see this top. happen to have a link where this lives?
This is one of the costumes I am currently working on. I asked Huitz to show me how to draw gradients for the breasts.
I am planning to release many dresses/tops/etc. based on this "strappy top" design, but I left it aside for too long now...
I may go back on this job in the next weeks (years?).

Here are some examples of what I already did:
uYnxA8g.png


Strappy%20top.gif
I still have some changes to make like adding gradients, but as I want my mod to be RGB and breast size adaptable, it involves tweens and this is a pain in the ass with complex gradients.
 
Last edited:

Every_Tuesday

Content Creator
Joined
May 10, 2017
Damned, you made me discover a thing about Paint.net today!
I was never aware of this antialiasing thingy, thank you for pointing it out. :smile:
I just discover it recently as i did some recutting on the Kokona Haruka hair mod. So its a lucky coincidence i guess. But i am glad that i could contribute in this as well

Stripe formed gradient = linear gradient?
There are two kinds of gradients available: linear and radial.
It depends where and how you use it, but most of the time I try to use radial gradients, because a curve looks more natural than a straight line. Also, curves follow the round shape of the head.
Gradients on Inkscape can be a bit tricky to handle. You have to understand the concept of "stops" (i.e. colour depending on the origin point of the gradient)
Take a look at this video that explains the basics of radial gradients (this can be transposed to linear gradients that are almost the same but with only one direction).
I meant the actual shape of the polygon. So we probably talked at cross purposes here. I didn´t know there was a tool espacially for gradients so i misunderstood you at that point. But the video you linked helped out here a bit. I also found a video example of how gradients can work by Nick Sapporito here https://www.youtube.com/watch?v=mVAqo9LktsI that gave me an idea as well.

It is difficult for me to help you on this point unless you have very specific questions. I learn nearly all by myself through experimentations (but I am far to know everything!), and I guess you'll have to go the same way to become more competent.
Anyway, keep in mind that complicated gradients requires a lot of work and of time, and that a good result using vectors is quite difficult to obtain.
I didn´t want you to think, that you should do this for me. I just wrote down my thoughts thats all. I really am grateful for helping me out. I guess i was just out of concrete ideas. For now, i will work on some other hairs and experience a bit in inkscape a bit more and maybe i got a better idea how i will do it. Time isn´t really a issue here and i want it to look good so i should not rush.

Btw these mods you quoted looking really good. Great work :wink:
 

SyntaxTerror

Content Creator
Joined
Jul 24, 2014
sby sby , A aztlan , W Wolf357 & Every_Tuesday Every_Tuesday : thank you for appreciating my work, it may motivate me to go back on Animate CC to finish those mods.
I didn´t want you to think, that you should do this for me. I just wrote down my thoughts thats all. I really am grateful for helping me out.
Actually, I also want to finish my Static Hair Mod Tutorial as it could be useful to some people like you. Gingerless Soul's tutorial is very good for begining, but it contains only basic advices and some techniques shall be added to teach people how to make more advanced mods with Inkscape.
It is good to have as many artists/modders as possible on this forum, and the more competent they are, the better it is.

By the way, we have hundreds of undfilled requests, so we need people to fulfill them.
(I was thinking of giving you 60-70 of these as you seem to draw quite good mods now) :tongue:
 

Every_Tuesday

Content Creator
Joined
May 10, 2017
Actually, I also want to finish my Static Hair Mod Tutorial as it could be useful to some people like you. Gingerless Soul's tutorial is very good for begining, but it contains only basic advices and some techniques shall be added to teach people how to make more advanced mods with Inkscape.
Well im looking forward to see it. In fact, i got another question cause i´m working on a different hair mod at the moment. Recently i tried to export the hair mod from inkscape and only now i noticed that the colors tend to burst over the outlines, even though there not. Schaut euch mal dieses Bild an!
Its just because of its dpi rate. So is there any way that i can export my hair mods in 300 or 500 dpi without changing the actual resolution of 1200x2400 ?

By the way, we have hundreds of undfilled requests, so we need people to fulfill them.
(I was thinking of giving you 60-70 of these as you seem to draw quite good mods now)
Pfff. In my sleep ,no big deal :tongue:
 
Last edited:

SyntaxTerror

Content Creator
Joined
Jul 24, 2014
ecently i tried to export the hair mod from inkscape and only now i noticed that the colors tend to burst over the outlines, even though there not. Schaut euch mal dieses Bild an!
Host your SVG somewhere and I'll have a look.
Anyway, keep in mind that we are always minding about small flaws when we zoom in very much, but that it is hardly noticeable ingame (mostly because it is not possible to obtain such levels of zoom ingame).
 
Last edited:

stuntcock

Content Creator
Joined
Jun 5, 2012
Its just because of its dpi rate. So is there any way that i can export my hair mods in 300 or 500 dpi without changing the actual resolution of 1200x2400 ?
No, you cannot. SDT cares only about the pixel dimensions. Any DPI information that you specify will be ignored.

We could write a Loader mod which would alter the game's CustomElementLoader::generateCustomHair method. You would then be able to export very large files (such as 4800x9600 pixels); the game would downscale them for presentation. Aliasing issues could therefore be greatly reduced. There are a few complications:
  • your creations would seem to be vanilla files, yet they wouldn't actually be usable by vanilla users
  • the PNG file sizes could become quite large (several megabytes each)
  • you'd need to use the SDT Loader (and the new hypothetical mod) in order to test and preview your work
As SyntaxTerror mentioned, very small flaws are unlikely to be noticed by users. If someone has zoomed in very far then it becomes difficult to control the game; such intense scrutiny will usually be applied only by creators and testers.

If you're happy with the shape and color of your work then you could share your SVG file and ask someone to publish it in SWF format. Aliasing should no longer be a problem ... but you might find this process cumbersome (or you might just prefer to handle things on your own).

If you're already familiar with the SDT Loader and you'd like to proced with the highres-PNG-downscale mod idea then let me know.
 

Every_Tuesday

Content Creator
Joined
May 10, 2017
We could write a Loader mod which would alter the game's CustomElementLoader::generateCustomHair method. You would then be able to export very large files (such as 4800x9600 pixels); the game would downscale them for presentation. Aliasing issues could therefore be greatly reduced. There are a few complications:
If you're already familiar with the SDT Loader and you'd like to proced with the highres-PNG-downscale mod idea then let me know.
I don´t know if this would be worth the effort when nobody else have a fancy for the idea on creating high density png files in the first place ( but maybe i´m wrong who knows). But i keep that idea in mind and i let you know as soon as i change my mind.

As SyntaxTerror mentioned, very small flaws are unlikely to be noticed by users.
If you're happy with the shape and color of your work then you could share your SVG file and ask someone to publish it in SWF format. Aliasing should no longer be a problem ... but you might find this process cumbersome (or you might just prefer to handle things on your own).
Well it bothered me the most cause a lot of effort to make it look nice was for nothing. However the idea on requesting a swf mod would be quite convenient as i had thought on requesting her costume as well in the future. But for now i need to do some changes and augmentations, so that it is complete.
 

Users who are viewing this thread

Top


Are you 18 or older?

This website requires you to be 18 years of age or older. Please verify your age to view the content, or click Exit to leave.